
Intellix
®
Payments
Reference Guide
Table of Contents
Overview 3
Accessing Payment Functionality 3
About this Guide and Additional Training 3
Using List Functionality in Intellix Payments 4
Overview 4
Standard Conventions in Intellix Payments 4
Filtering a List (Standard) 5
Filtering a List (Advanced) 7
Sorting Data in a List 8
Adding and Rearranging Columns in a List 8
Managing Views 10
Exporting a List 11
Printing a List 11
Working with Payments and Templates 13
Payment Statuses, Workflows and Release 13
Modifying a Payment or Template 15
Deleting a Payment or Template 16
Creating a Payment Template Group 17
Modifying a Payment Template Group 18
Using Quick Entry 19
Approving Payments and Templates 21
Approving a Payment or a Template 21
Rejecting a Payment or Template 23
Unapproving an Approved Payment 25
Alert Settings 26
Payment Reports 28
Viewing a Report 28
Report Definitions 28
Viewing Additional Detail Within a Report 32
Filtering a Report 32
Printing a Report 34
Exporting a Report 35
Capital One Intellix
®
Payments | 2
Capital One Intellix
®
Payments Overview | 3
Overview
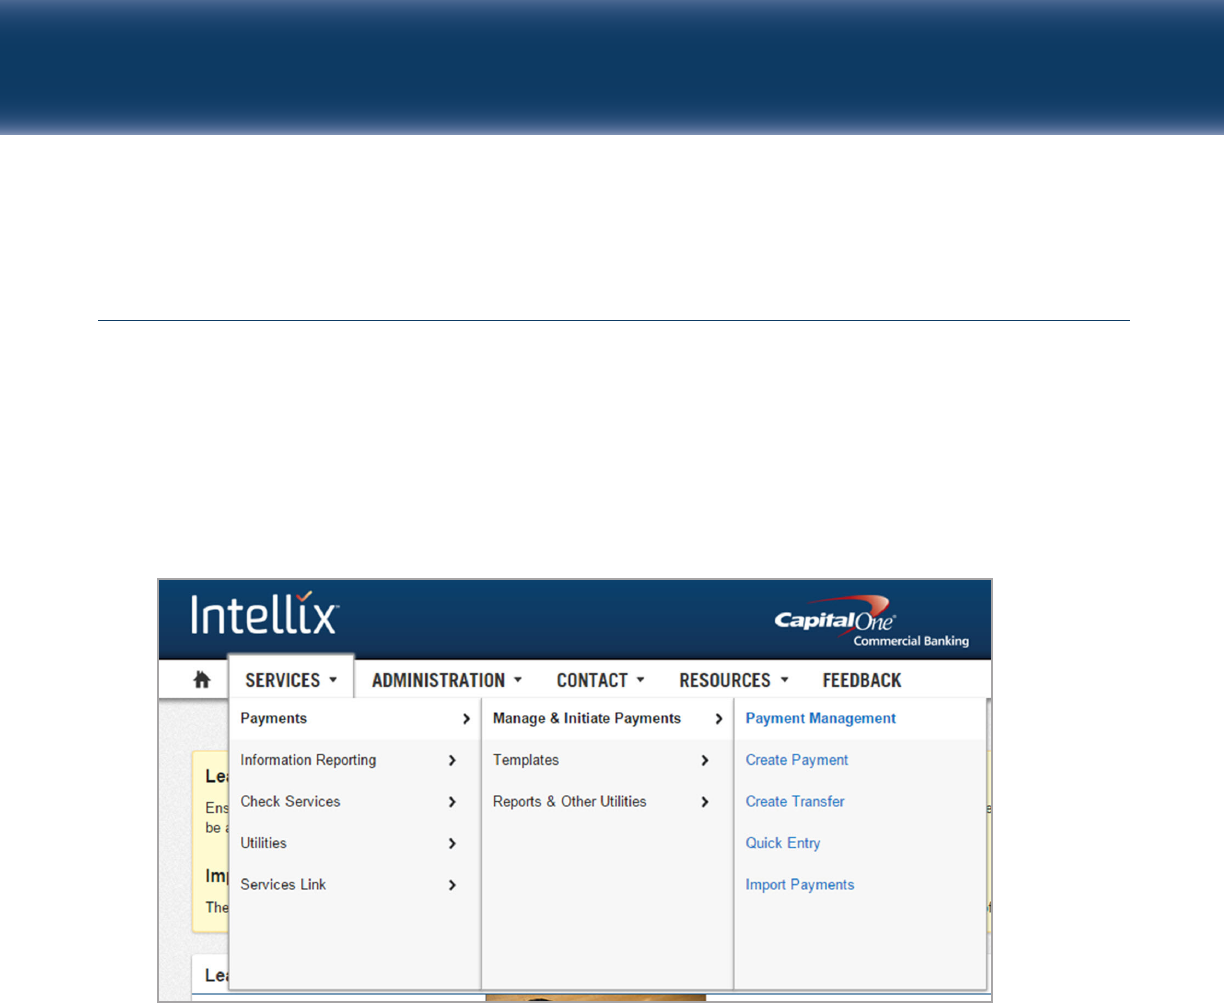
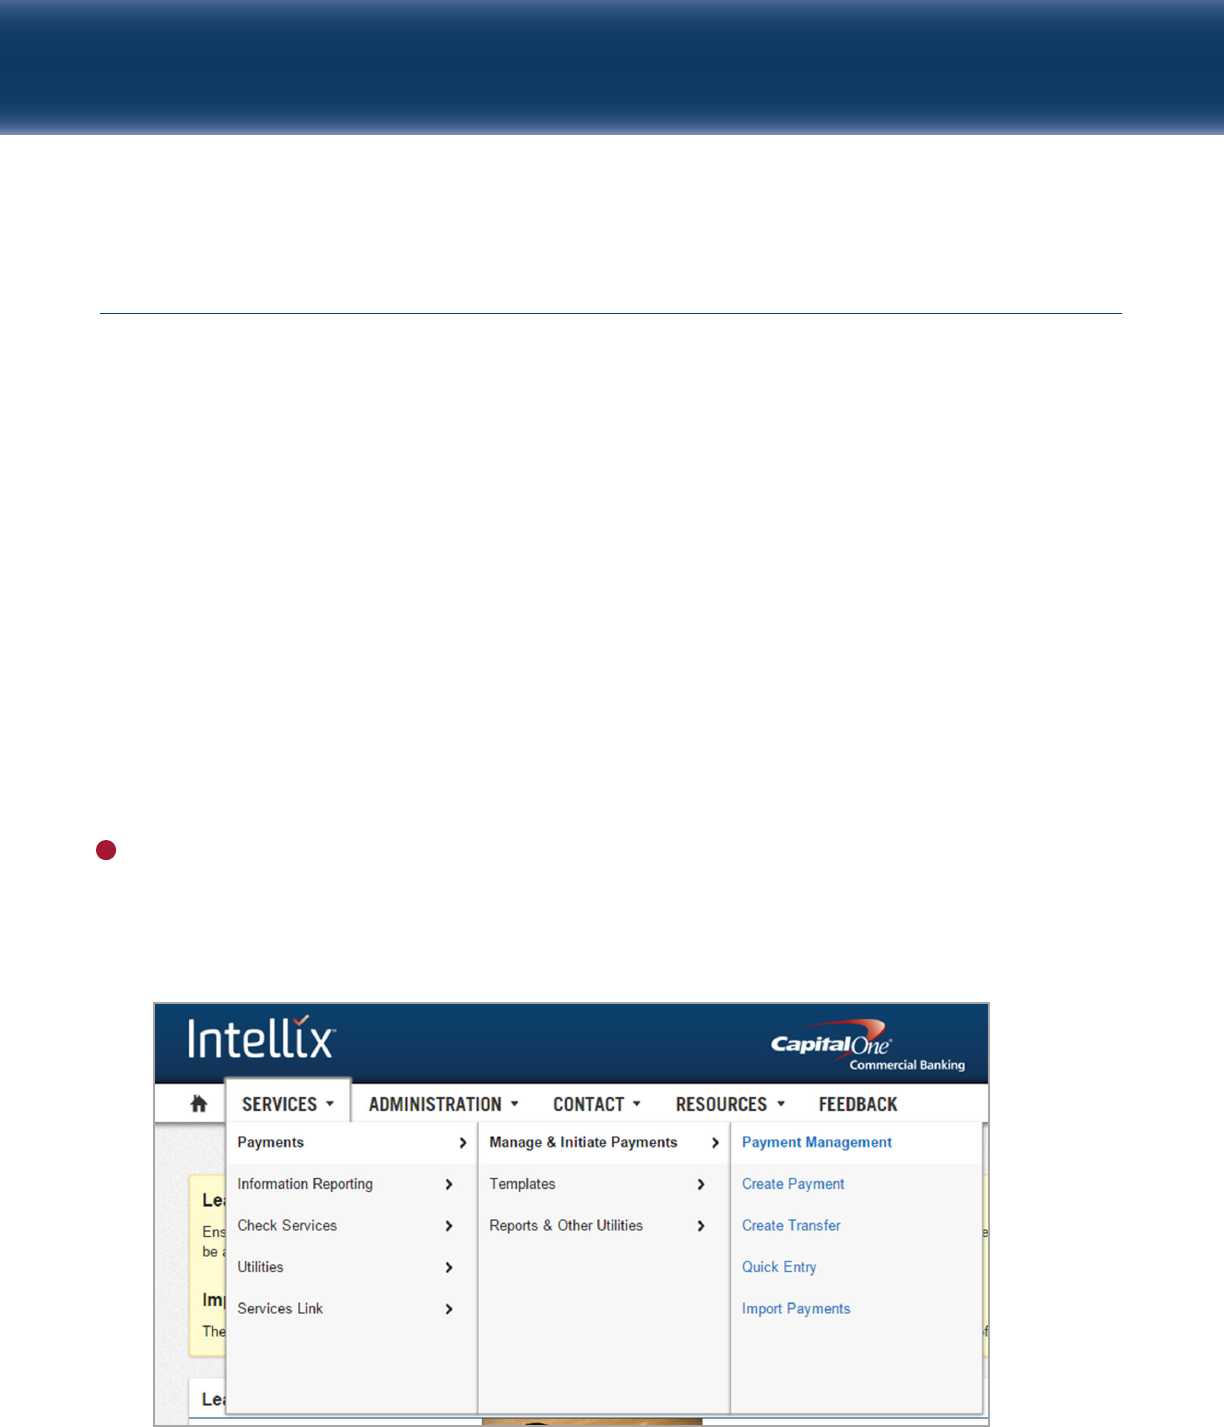
ACCESSING PAYMENT FUNCTIONALITY
Transaction types such as ACH (Payroll, Corporate Collections, etc.), Wire Transfers, and internal account
transfers are referred to as Payments in Intellix. Payment functions can be accessed through the Services g
Payments menu in Intellix. Your access to different options and information within Payments is based on the
entitlements for your organization and your permissions. As a result you may not have access to some of the
functions and information outlined in this guide.
ABOUT THIS GUIDE AND ADDITIONAL TRAINING
This guide provides an overview of functionality common to all types of Payments. Additional training and
reference materials are also available on the Resources tab. These materials include specific reference
guides for each type of payment (ACH, Domestic Wires, International Wires and Book Transfers), Quick
Start Guides and several eLearning videos that demonstrate how to work with the various functions within
Intellix Payments. Please refer to these materials for further information and to help you to use all of the
functions of Intellix Payments.
Capital One Intellix
®
Payments Using List Functionality in Intellix Payments | 4
Using List Functionality in Intellix Payments
OVERVIEW
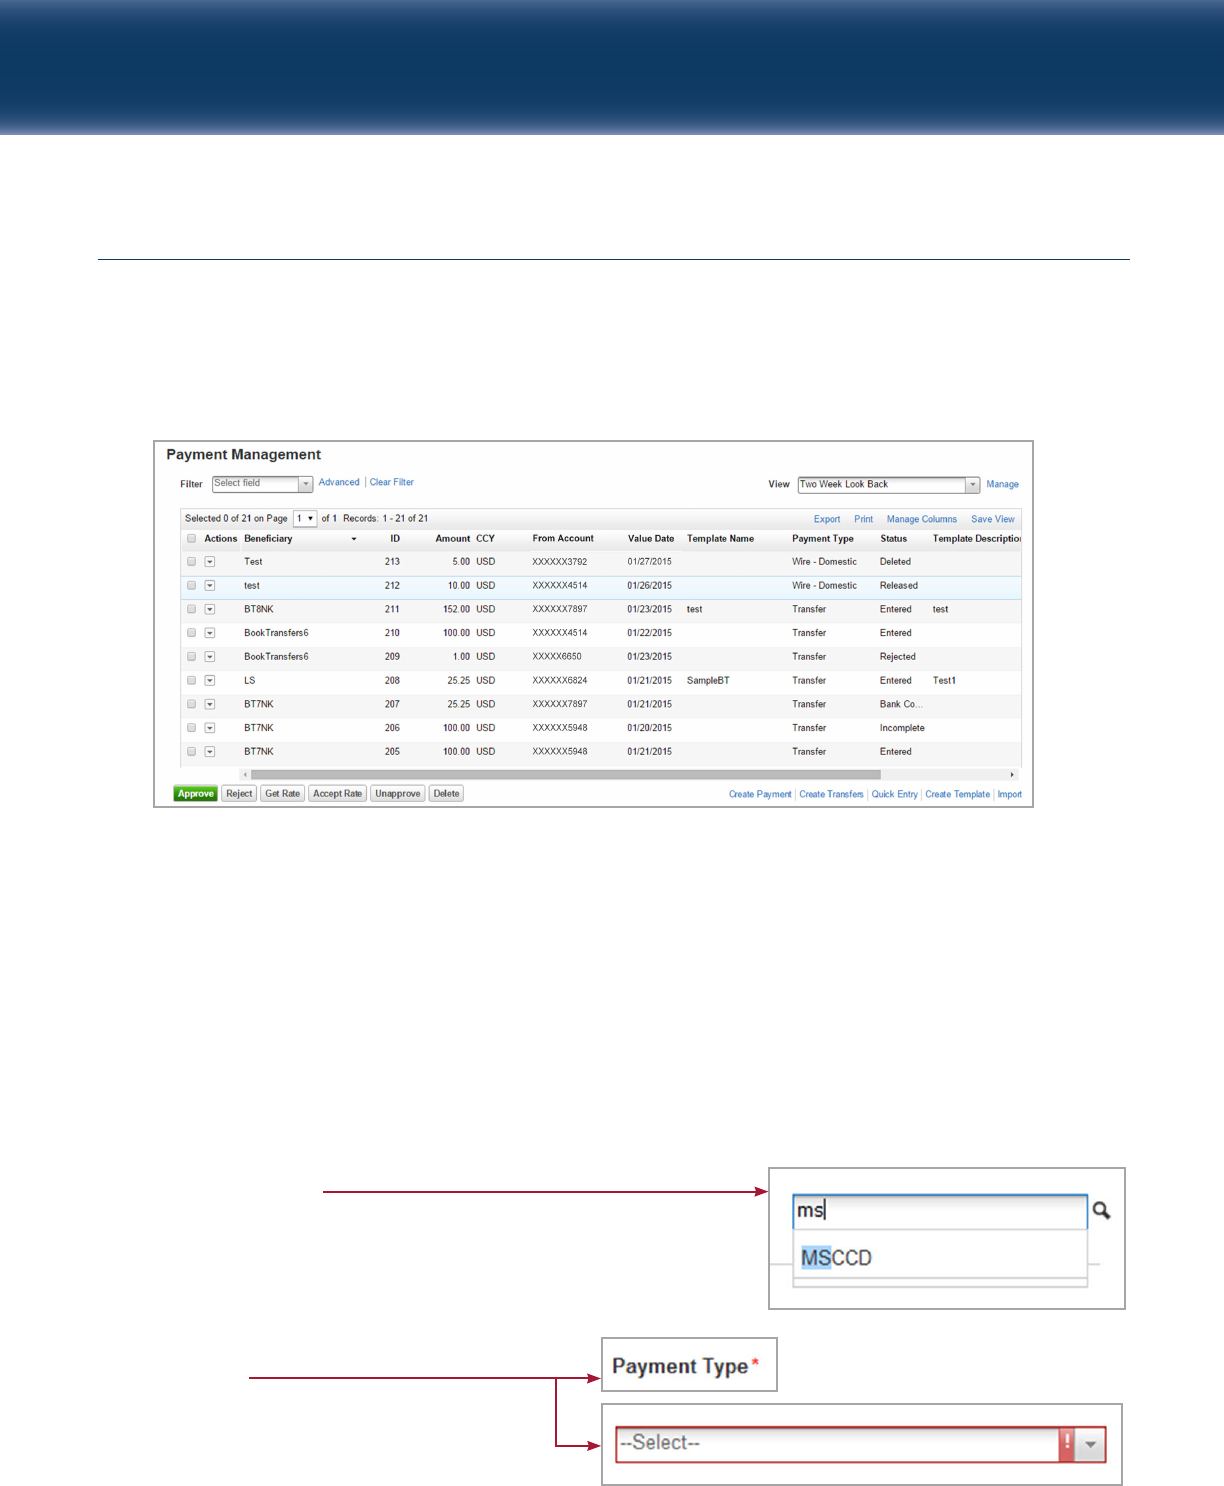
Payment screens display information in a list
within Intellix. The Payment Management screen is shown;
however other services will have different buttons, menus and commands.
This view presents records in a spreadsheet-style format, with each record on a new row, and various
columns of detail displayed for each item.
• The view may be customized to display only the records you wish to see, through Filtering, Sorting,
and
Managing Views
.
• The data shown for each record may be customized by adding and rearranging columns.
See detail on each of these options below.
STANDARD CONVENTIONS IN INTELLIX PAYMENTS
The following are used throughout Intellix Payments:
Type Ahead and Search
Fields followed by a magnifying glass (see right) may be filled in
one of two ways; you may begin typing in the field, which will
filter your choices to match the information typed, or you may
click on the magnifying glass icon and perform a search for the
appropriate selection.
Required Fields
These fields will be identified with either a
red asterisk (*) or a red exclamation point (!).

Capital One Intellix
®
Payments Using List Functionality in Intellix Payments | 5
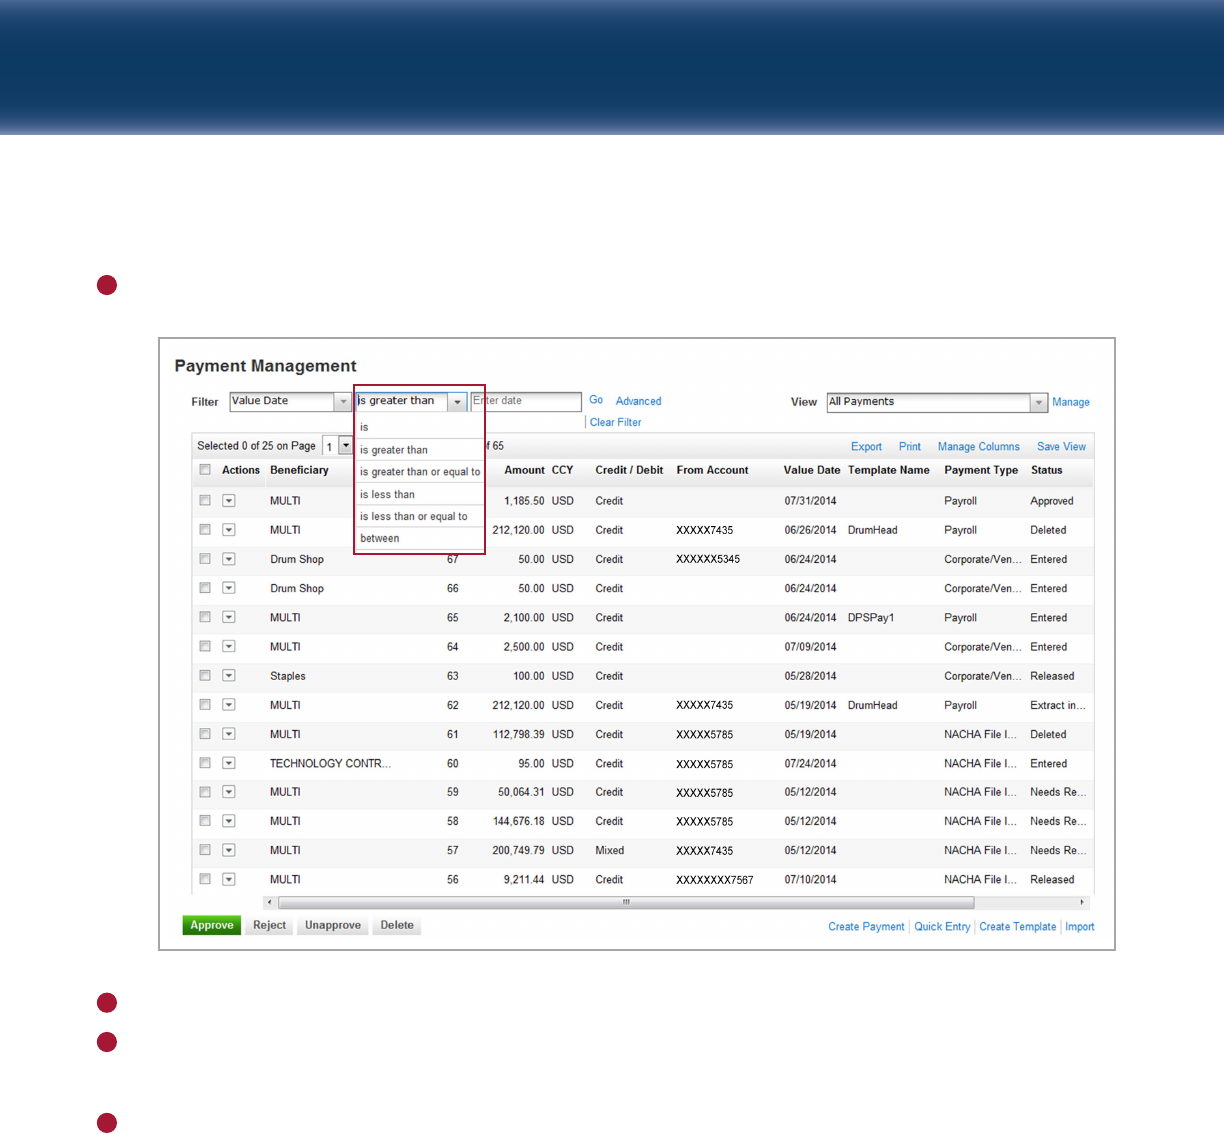
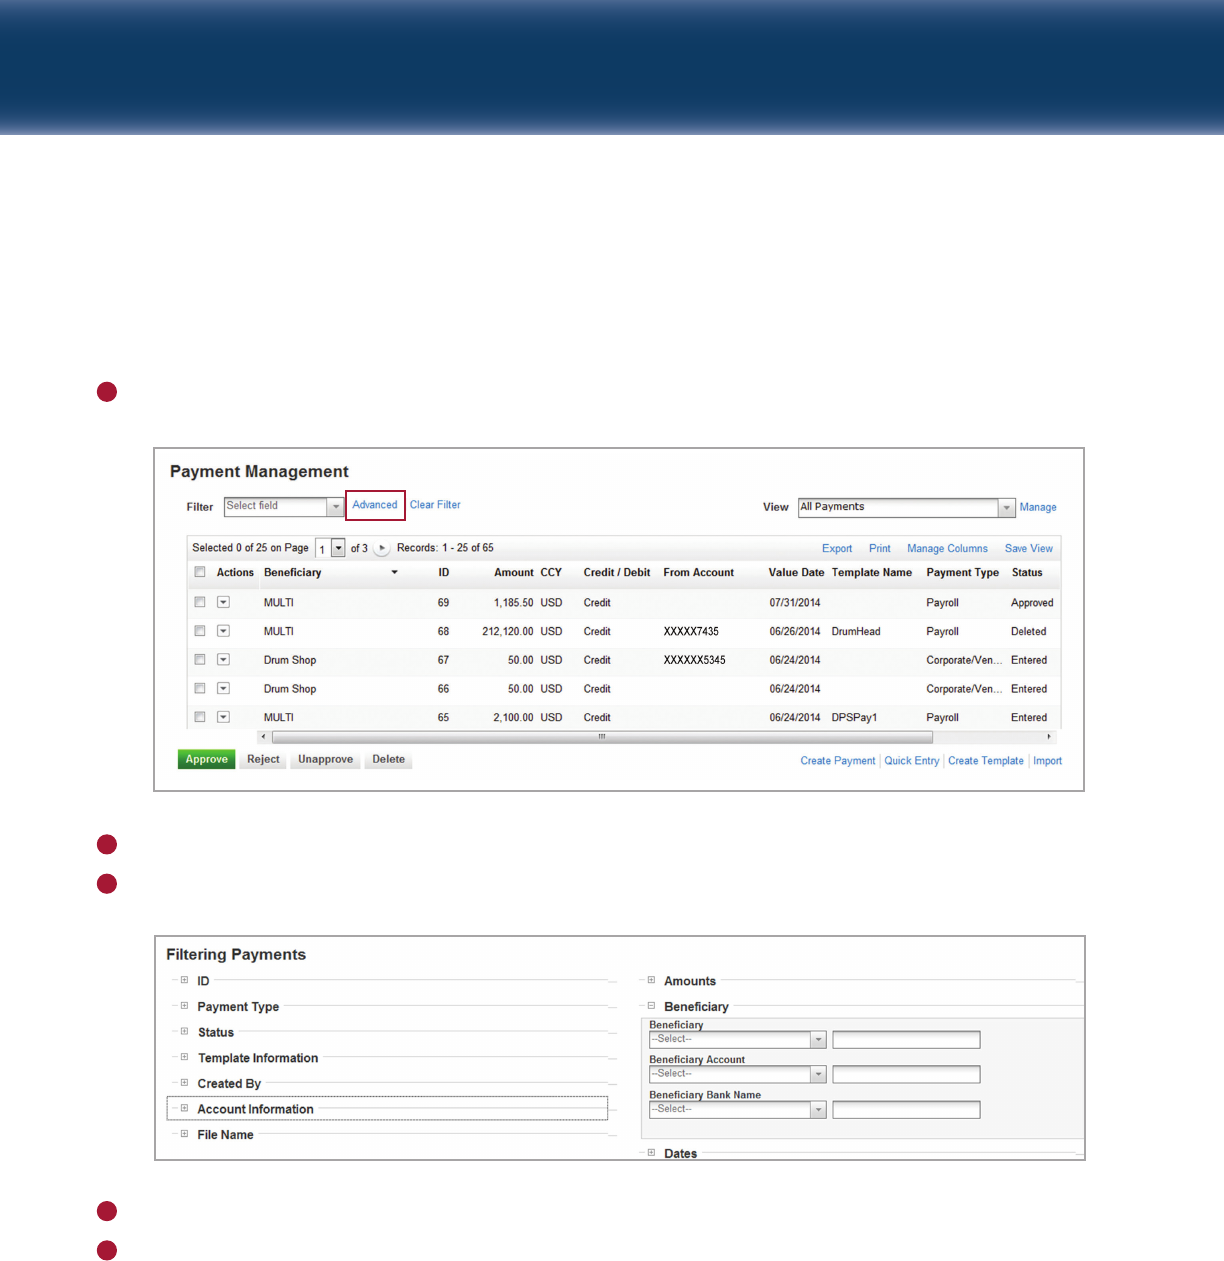
FILTERING A LIST (STANDARD)
A list may be filtered to display only the information you want to see. You can create a filter using any of
the data fields, even if that column is not currently displayed in the list. The basic filter displays at the top
of every list as shown. To create a basic filter:
Click on the Filter drop-down menu at the top of the list and select the field you wish to filter.
1
Capital One Intellix
®
Payments Using List Functionality in Intellix Payments | 6
Select an operator if necessary (is greater than, contains, etc.).
2
Select or enter criteria for the filter.
Click Go.
Results will display based on the criteria specified in your filter.
If you create another filter, it will filter within the current filtered results. Click Clear Filter to return to
the original view of the list.
3
4
5
Capital One Intellix
®
Payments Using List Functionality in Intellix Payments | 7
FILTERING A LIST (ADVANCED)
An Advanced Filter allows you to filter on multiple data fields at one time. The link to create an advanced
filter displays at the top of every list. To create an advanced filter:
Click on Advanced next to the filter box at the top of the list, as shown.
1
Select the category(ies) you wish to use in your filter (e.g., Beneficiary).
Select the field and value combinations as appropriate.
2
3
Click the View Results button in the lower left corner of the screen to show the results of your filter.
If you use the Advanced Filter again, it will search all of the items of the original list, not the filtered list.
Click Clear Filter to return to the original view of the list.
4
5
Capital One Intellix
®
Payments Using List Functionality in Intellix Payments | 8
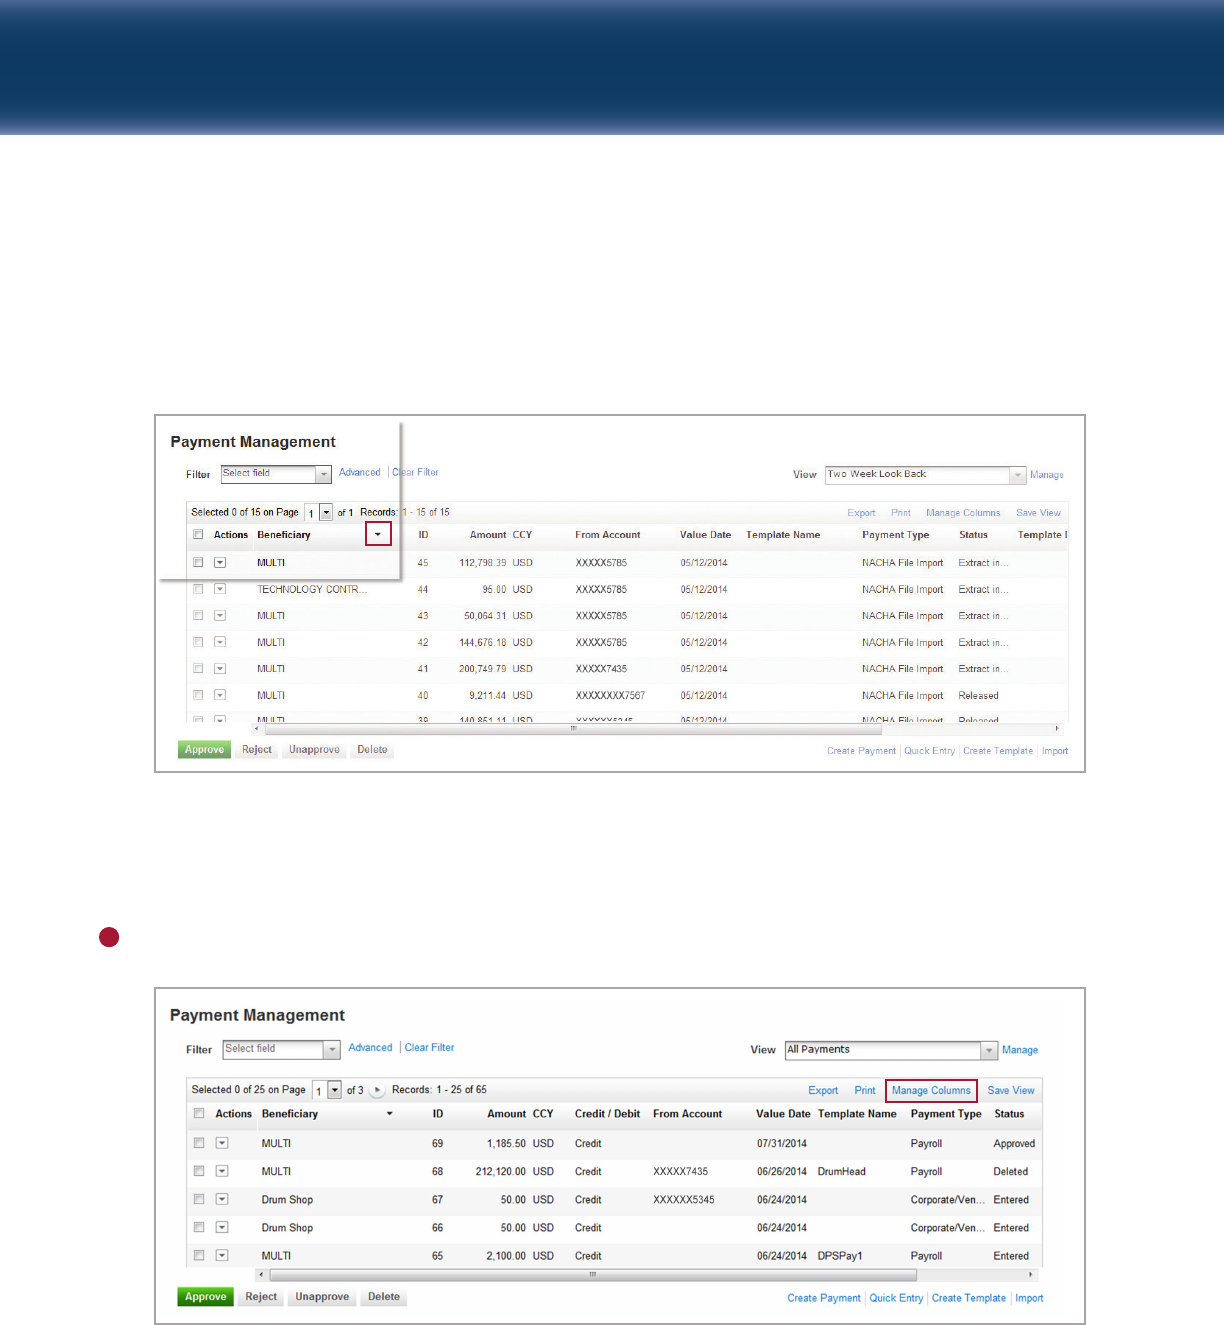
SORTING DATA IN A LIST
To sort the data in a column click the column header. An arrow t will display, which will show the sort
order of the data. Click the column header again to reverse the sort order.
ADDING AND REARRANGING COLUMNS IN A LIST
The List View allows you to add, remove and rearrange which columns are shown in your list.
To manage these columns:
Click the Manage Columns link at the top right of the list view (as shown below).
1
Capital One Intellix
®
Payments Using List Functionality in Intellix Payments | 9
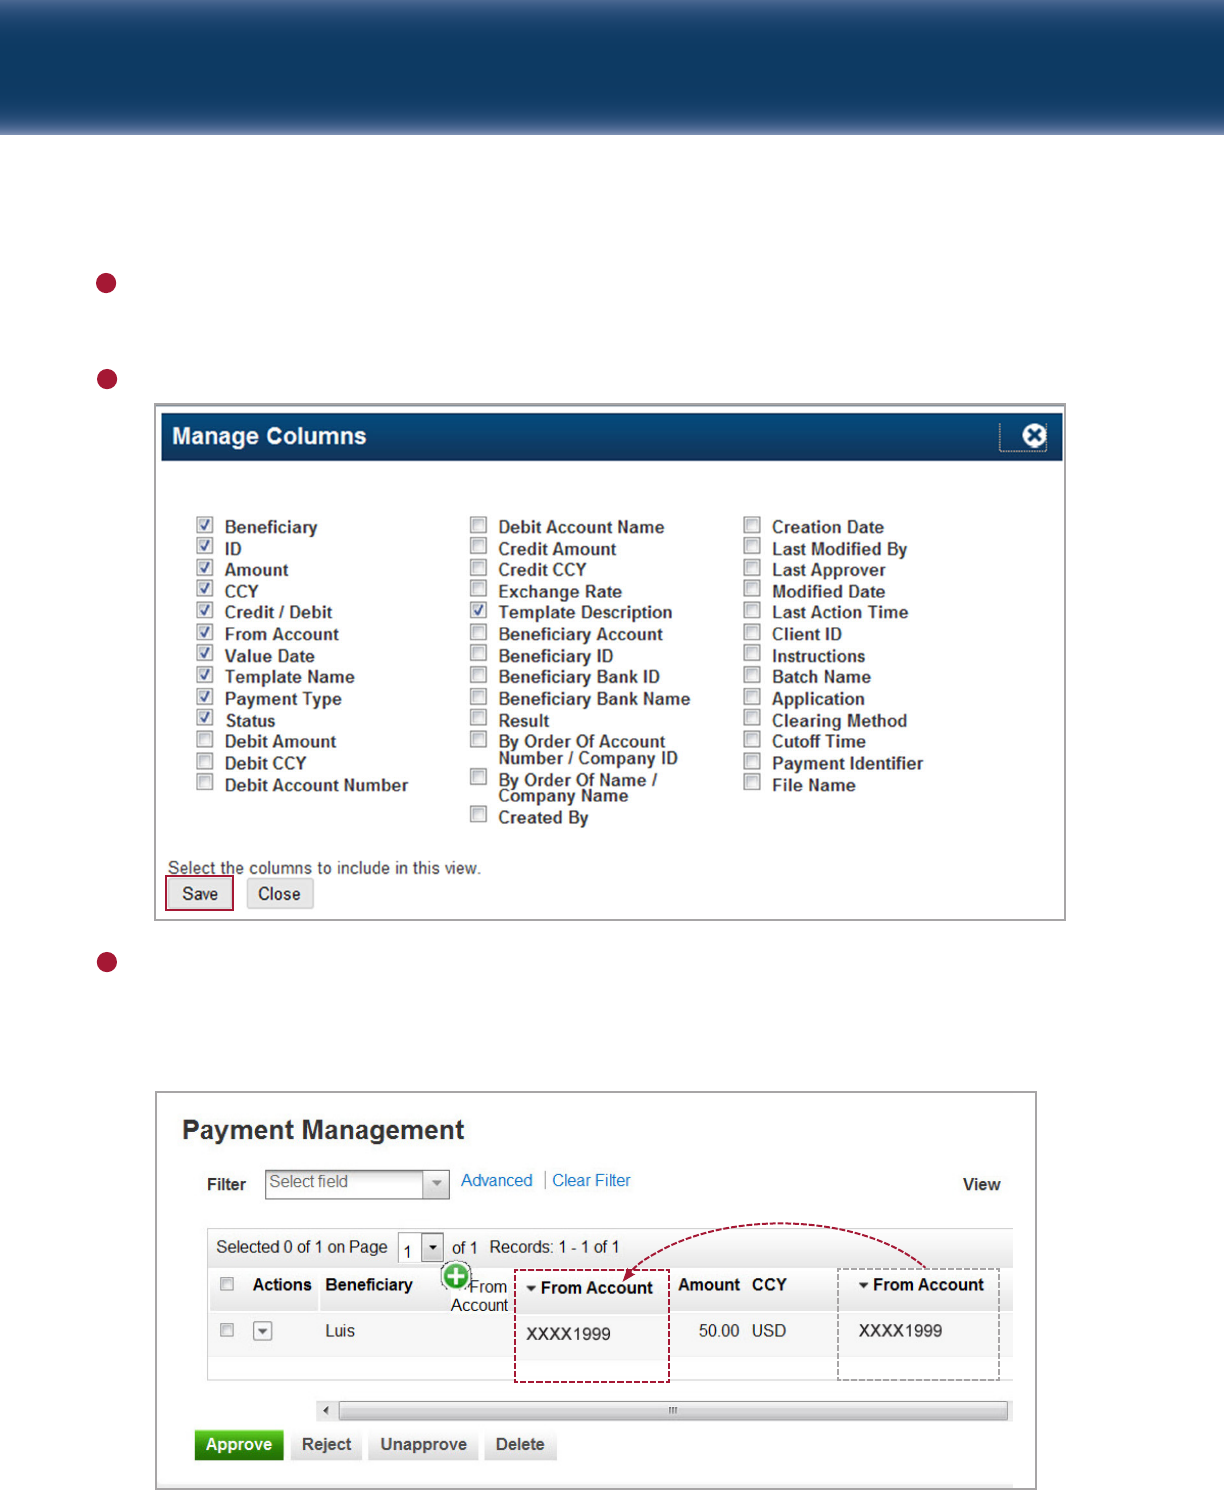
Click Save to save these columns to your view.
3
You may rearrange the order of the columns by clicking and dragging them within the list.
A. Click and drag a column header to the desired position.
B. When the column is in a valid position, a green button with a plus sign “+” displays.
C. “Drop” the column by releasing your mouse button.
4
Select or deselect the columns as desired.
NOTE: The Payment Management column choices are shown here. Each list will display the columns
appropriate for that list.
2
Capital One Intellix
®
Payments Using List Functionality in Intellix Payments | 10
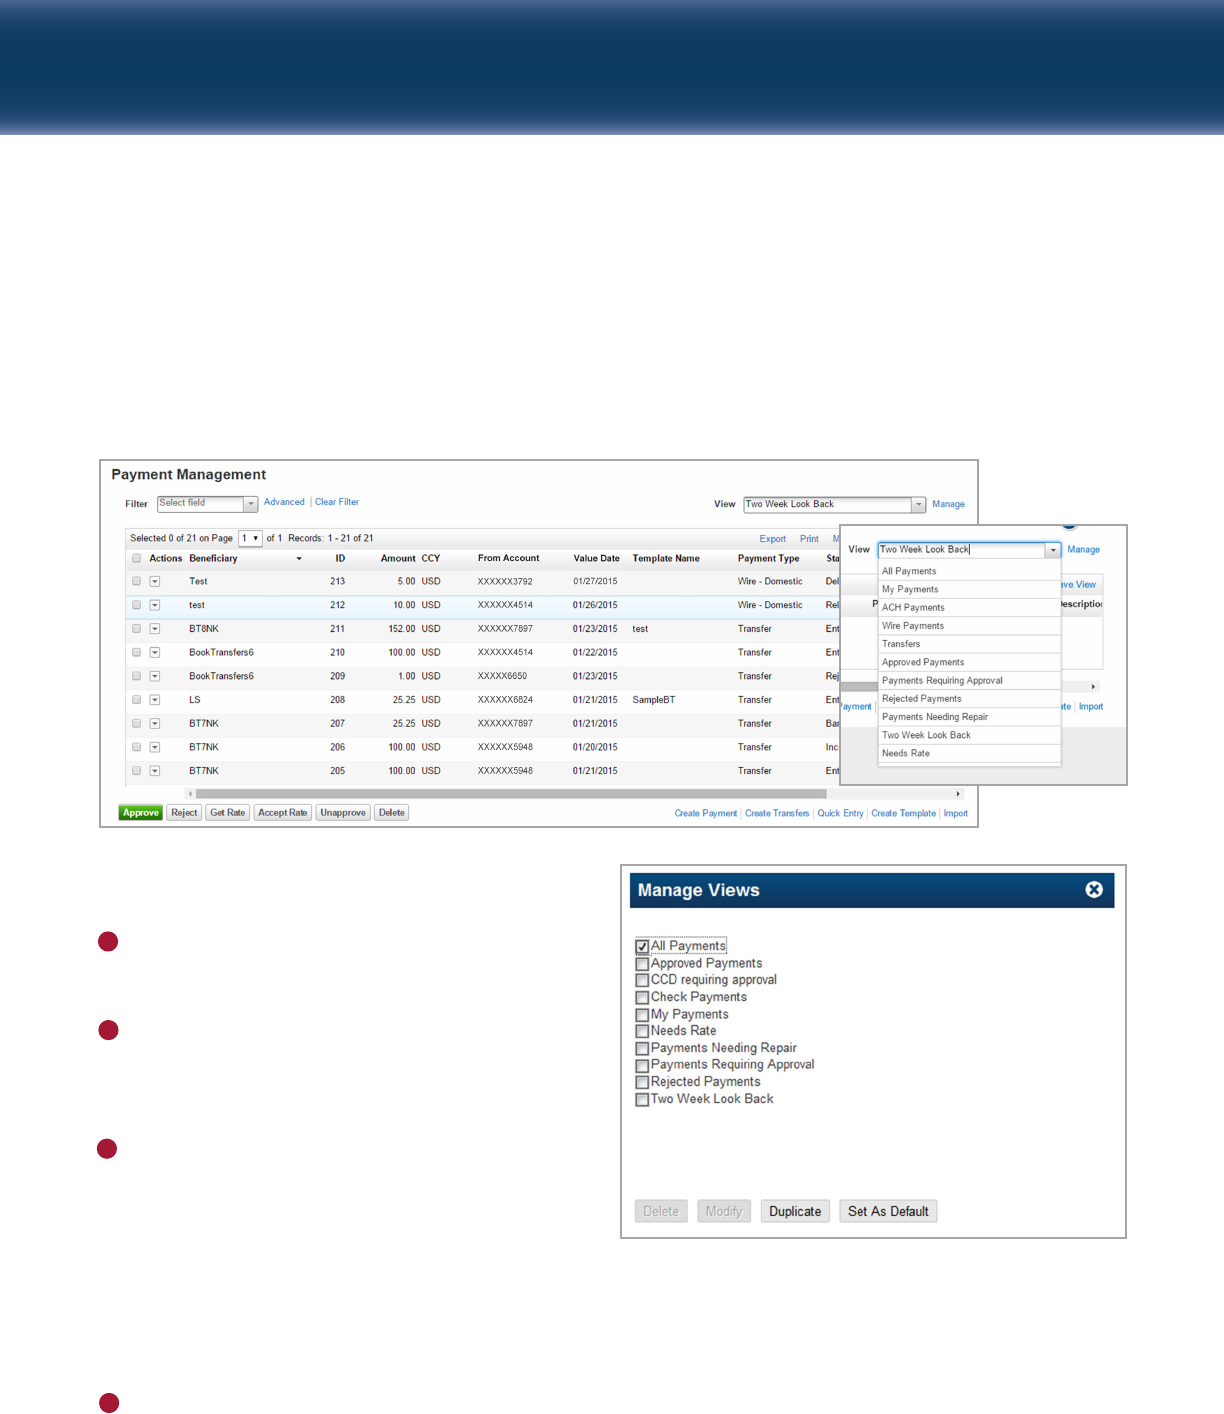
MANAGING VIEWS
Views are pre-defined filters; when selecting a view, a filter is applied and only the items that meet the
criteria are displayed. Some views are provided by default, but you can save your own settings as a new
view, or set one as your default view including columns that have been added or removed. The default view
is shown every time you access that screen or page. You may select an existing view from the drop-down
menu as shown:
To create a new view, modify an existing view, or set
one as default:
Click Manage to the right of the View drop-down
menu (shown above). The Manage Views window
displays.
Select a view from the list. If the selected view is
a system standard, such as All Payments, you may
not delete or modify it but may duplicate it and
modify the copy.
Select one of the following options:
A. Delete: Removes the custom view from the list.
B. Modify: Opens the advanced filters page and
allows you to modify the settings associated
with the view.
C. Duplicate: Creates a copy of the selected view and opens the advanced filters page. You may then
modify the filters and save your settings under a new view name.
D. Set as Default: Saves the selected view as the default.
If you choose Modify or Duplicate, make appropriate changes to the filters, then click Save to save your
changes or Cancel to exit without making changes. If you choose Set as Default, you will see a window
confirming your default setting. Click the “X” to close this window.
2
1
3
4
Capital One Intellix
®
Payments Using List Functionality in Intellix Payments | 11
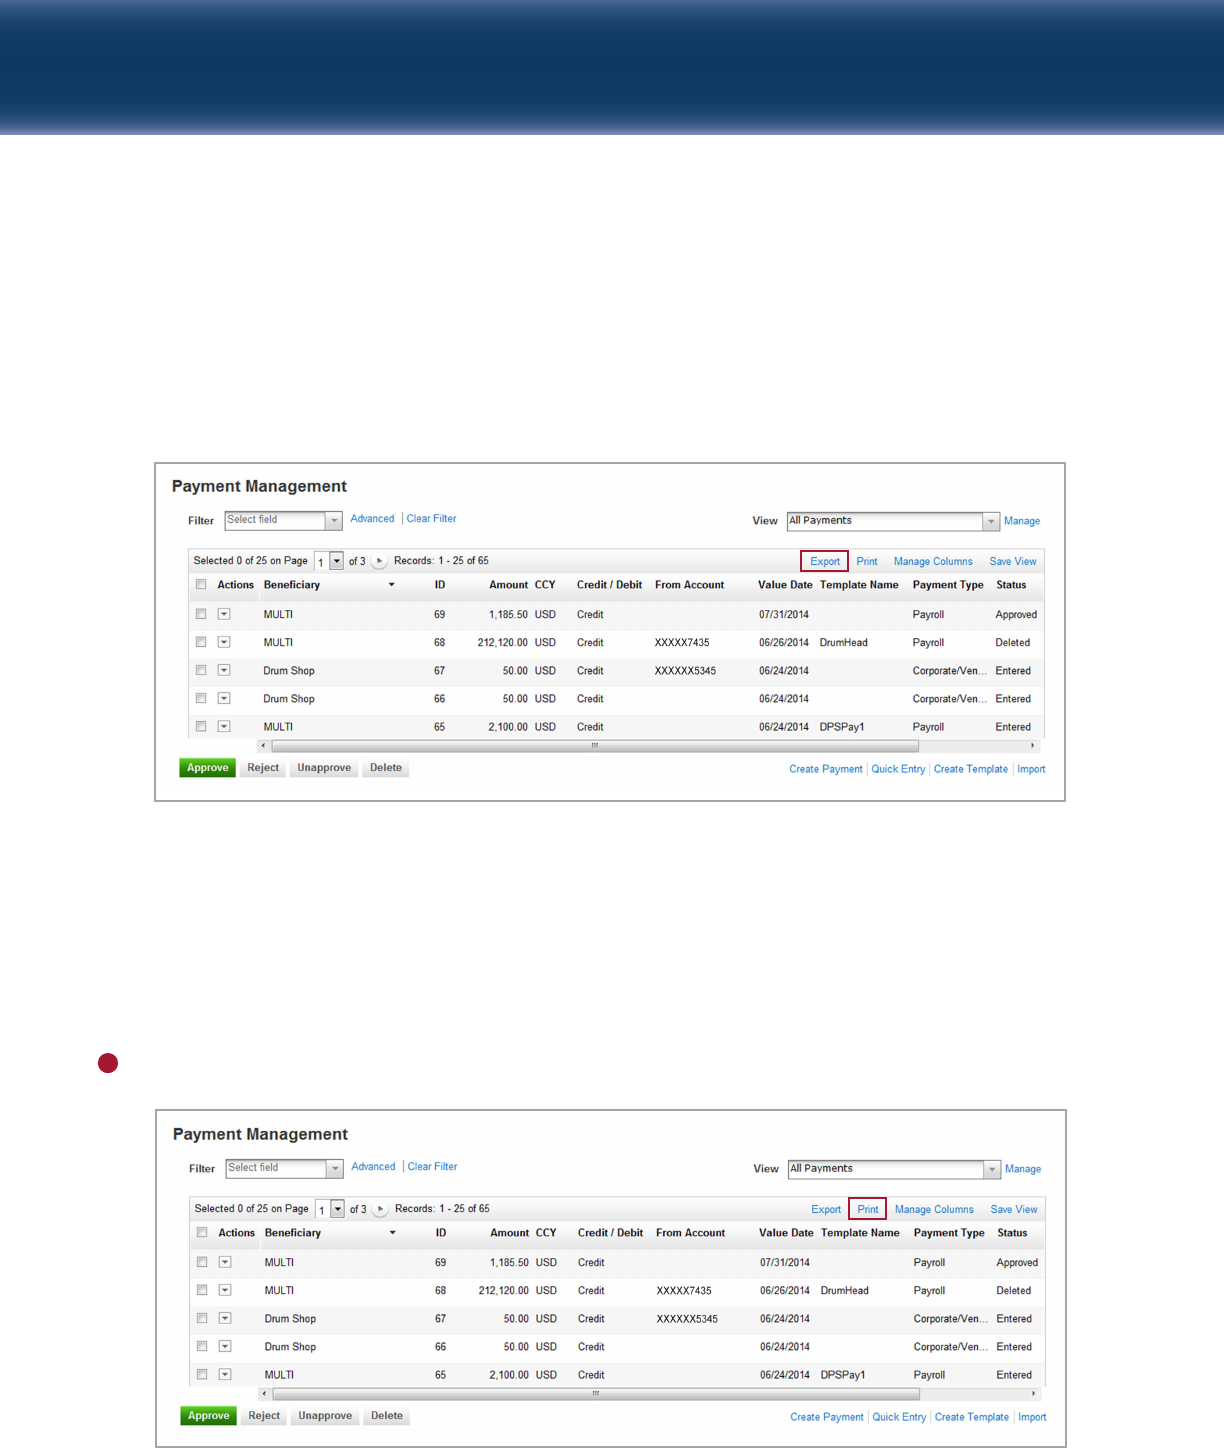
EXPORTING A LIST
A list can be exported as a comma-separated values (.csv) file. This process varies based on the browser
being used. In this guide we will define the process for using Internet Explorer. For other browsers, please
visit Resources
g
eLearning and reference the eLearning modules related to exporting a list.
To export a list, click on the Export link as shown:
When prompted, either Open or Save the file, as appropriate.
PRINTING A LIST
This process varies based on the browser being used. In this guide we will define the process for using
Internet Explorer. For other browsers, please visit Resources
g
eLearning and reference the eLearning
modules related to printing a list.
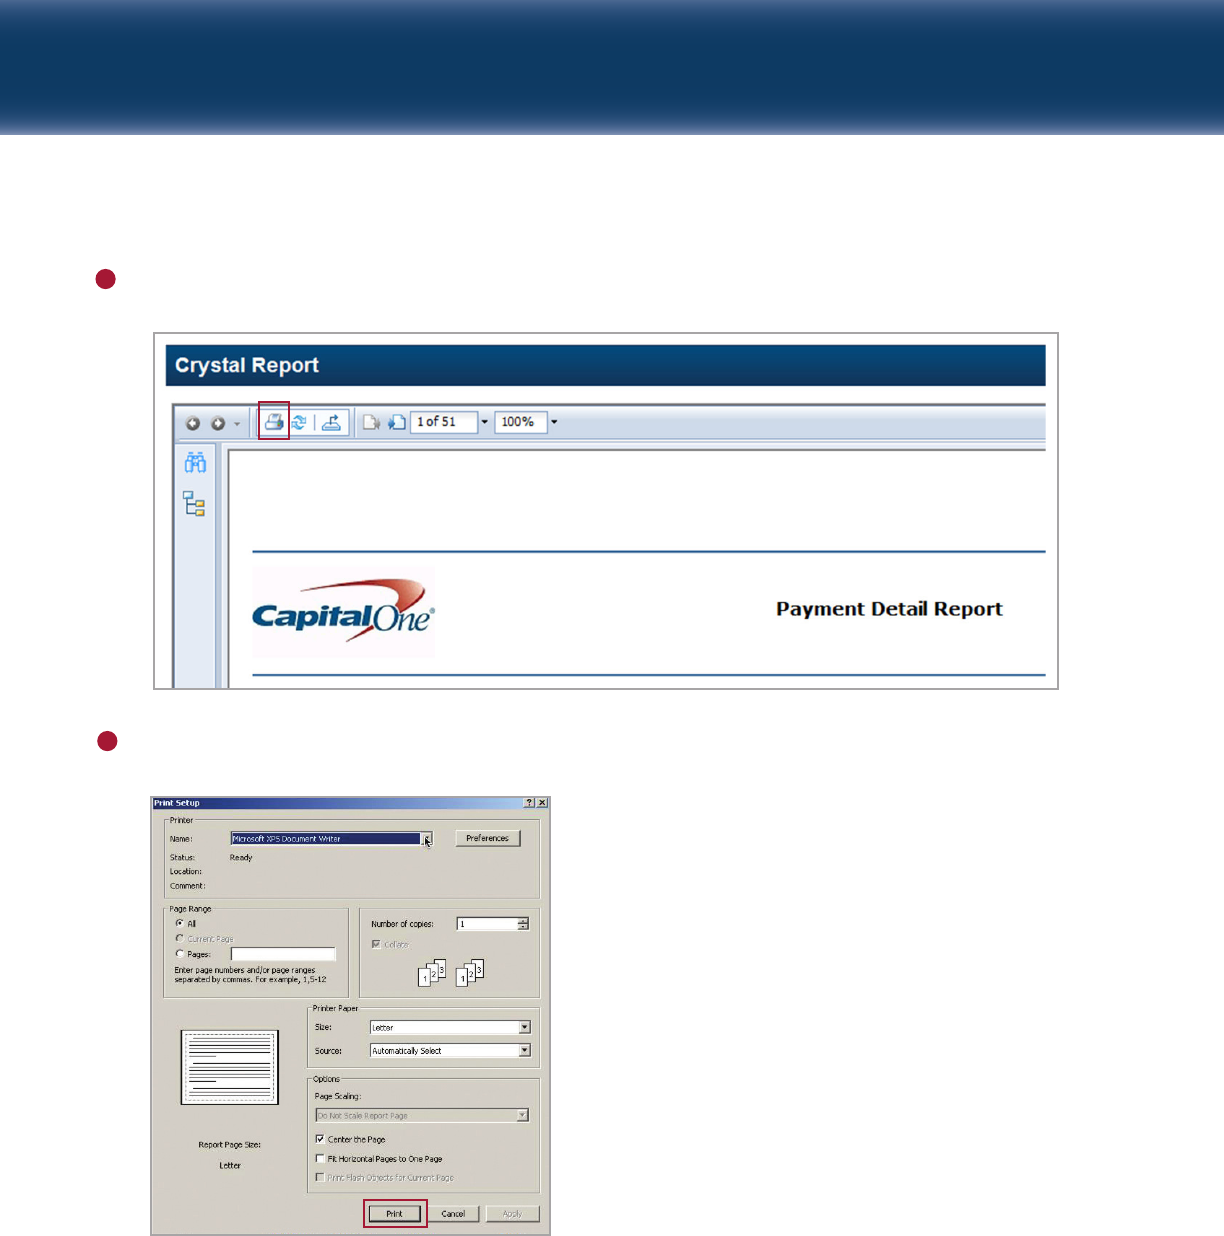
Click Print. The report window is displayed.
1
Capital One Intellix
®
Payments Using List Functionality in Intellix Payments | 12
Click the Print icon.
2
Set print properties and click Print.
3
Capital One Intellix
®
Payments Working with ACH Payments and Templates | 13
PAYMENT STATUSES, WORKFLOWS AND RELEASE
Standard payment statuses:
Workflow examples:
• ACH: Entered
g
Approved
g
Sent to Bank (appears momentarily)
g
Released
• Domestic wire transfer: Entered
g
Approved
g
Sent to Bank (appears momentarily)
g
Bank Received
(appears momentarily)
g
Bank Confirmed
•
International wire transfer: Entered g Needs Rate g Sent to Bank (appears momentarily) g Bank
Received
(appears momentarily)
g
Bank Confirmed
• Book transfer: Entered
g
Approved
g
Sent to Bank (appears momentarily)
g
Bank Received
(appears momentarily)
g
Bank Confirmed
Release schedule for future payments: Approved payments are released to the bank for processing on the
process date for that payment type. The exact timing of each release cycle is shown on the table below with
example approval and paid dates.
Working with Payments and Templates
Status Definition
Entered Entered without errors, ready for approval. Can be modified or deleted.
Approved Approval workflow complete. Not available for modification or deletion.
Ready for extraction to back office.
Needs Rate Payment requires a real-time exchange rate. Not eligible for modification
(International Wires only) or deletion. Once rate is applied, status changes to “Bank Confirmed.”
Released (ACH only) Released to the bank for processing. Not available for workflow, deletion,
or modification.
Bank Confirmed Payment has been paid by the bank. Not eligible for modification or
(Wires and Transfers) deletion.
Payment Type Date Approved Date/Time Released (a.k.a., Process Date) Date Paid (Value Date)
ACH (for same Tuesday Tuesday at the next regular extraction time Tuesday
day payment) (9 AM and Noon, all times Eastern)
ACH (for next Tuesday Tuesday at the next regular extraction time Wednesday
day payment) (9 AM, Noon, 2 PM, 5 PM, 7:30 PM, and
9 PM all times Eastern)
ACH (for payment Tuesday One Business Day PRIOR to the Value Date Future Value Date
2 or more days at 9 AM Eastern Specified
in the future)
Domestic Wire Tuesday Immediately Tuesday
(same day)
(continued)

Final status upon completion: ACH Payments will show in “Released” status, wires and transfers will show as
“Bank Confirmed.”
Additional statuses:
Capital One Intellix
®
Payments Working with ACH Payments and Templates | 14
Status Definition
Incomplete Saved in an incomplete status, for later completion. Can be modified
or deleted.
Needs Repair Needs repair, usually due to an error in a file import validation.
Incomplete Approval Currently in approval workflow. Not available for modification or deletion.
Approver Rejected Rejected by approver at the client. Can be modified or deleted.
(Can be rejected by the system if the cutoff time passed for the
specified Value Date.)
Bank Rejected Rejected by the bank, generally due to insufficient funds, a closed account
or other issues within a Wire or Transfer. Not available for workflow or
deletion.
Deleted Deleted. Not available for workflow or modification.
Sent to Bank Only displays for approx 1 minute as the cut begins but has not completed
processing.
Rejected Rejected by the system, generally for a NACHA import issue. Not available
for workflow, deletion, or modification.
Bank Received Denotes initial acknowledgement that the payment has been received
by the bank. Not eligible for modification or deletion.
Payment Type Date Approved Date/Time Released (a.k.a., Process Date) Date Paid (Value Date)
Domestic Wire Tuesday Process Date Specified, 7 AM Eastern Process Date Specified
(future date)
International Wire Tuesday Process Date Specified, 7 AM Eastern Process Date +
(except MX/CA) 2 business days
International Wire Tuesday Process Date Specified, 7 AM Eastern Process Date +
to Mexico/Canada 1 business day
Book Transfer (same day) Tuesday Immediately Tuesday
Book Transfer (future date) Tuesday Process Date Specified, 7 AM Eastern Process Date Specified
(continued from prior page)
Capital One Intellix
®
Payments Working with ACH Payments and Templates | 15
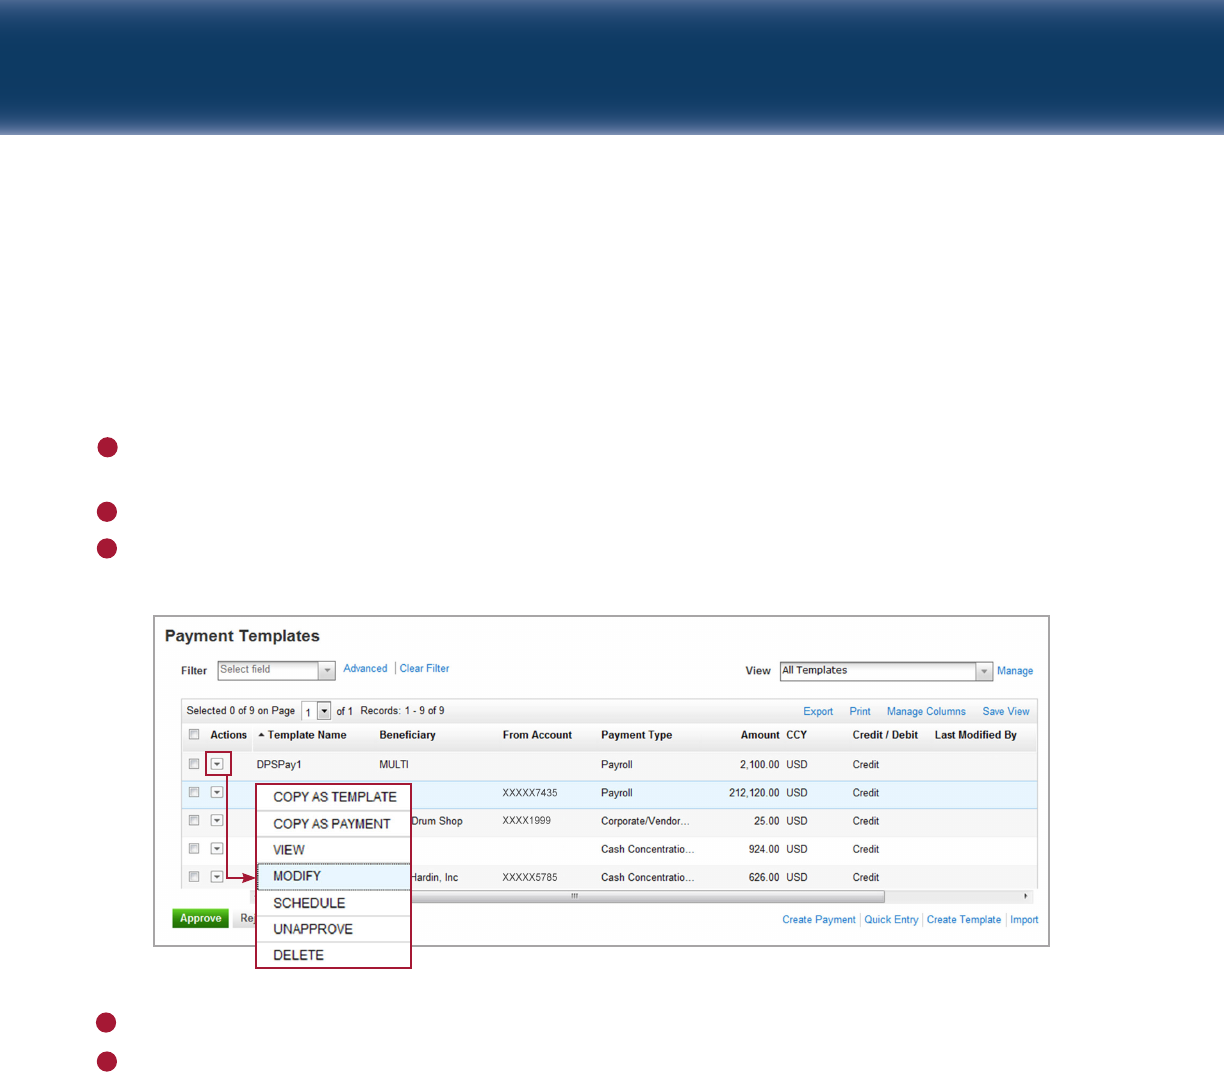
MODIFYING A PAYMENT OR TEMPLATE
Both payments and templates may be modified after entry, for example to change or add beneficiaries,
or to change the amount of a payment. Payments in “Approved” status must be “Unapproved” prior to
modification. Approved templates do not need to be “unapproved” prior to modification.
To modify a payment or template:
From the Services g Payments g Templates menu, select Maintain (to modify a payment, select Payment
Management from the Services g Payments g Manage & Initiate Payments menu).
Locate the item to be modified in the Payment Templates/Payment Management list.
Select the Modify option from the Actions drop-down as shown below, or select the item using the checkbox
and click the Modify button.
1
2
3
Make changes to the template or payment as appropriate.
Click
Submit
(or, if the item is not complete, you can click
Save Draft
to save your existing work).
Depending on your organization’s approval policy, the status of the payment or template will change to a
Modified status or to an Approved status. If the payment or template is in a Modified status, then it needs
to be approved as a second step. Refer to page 21 for more information on Approvals.
4
5
Capital One Intellix
®
Payments Working with ACH Payments and Templates | 16
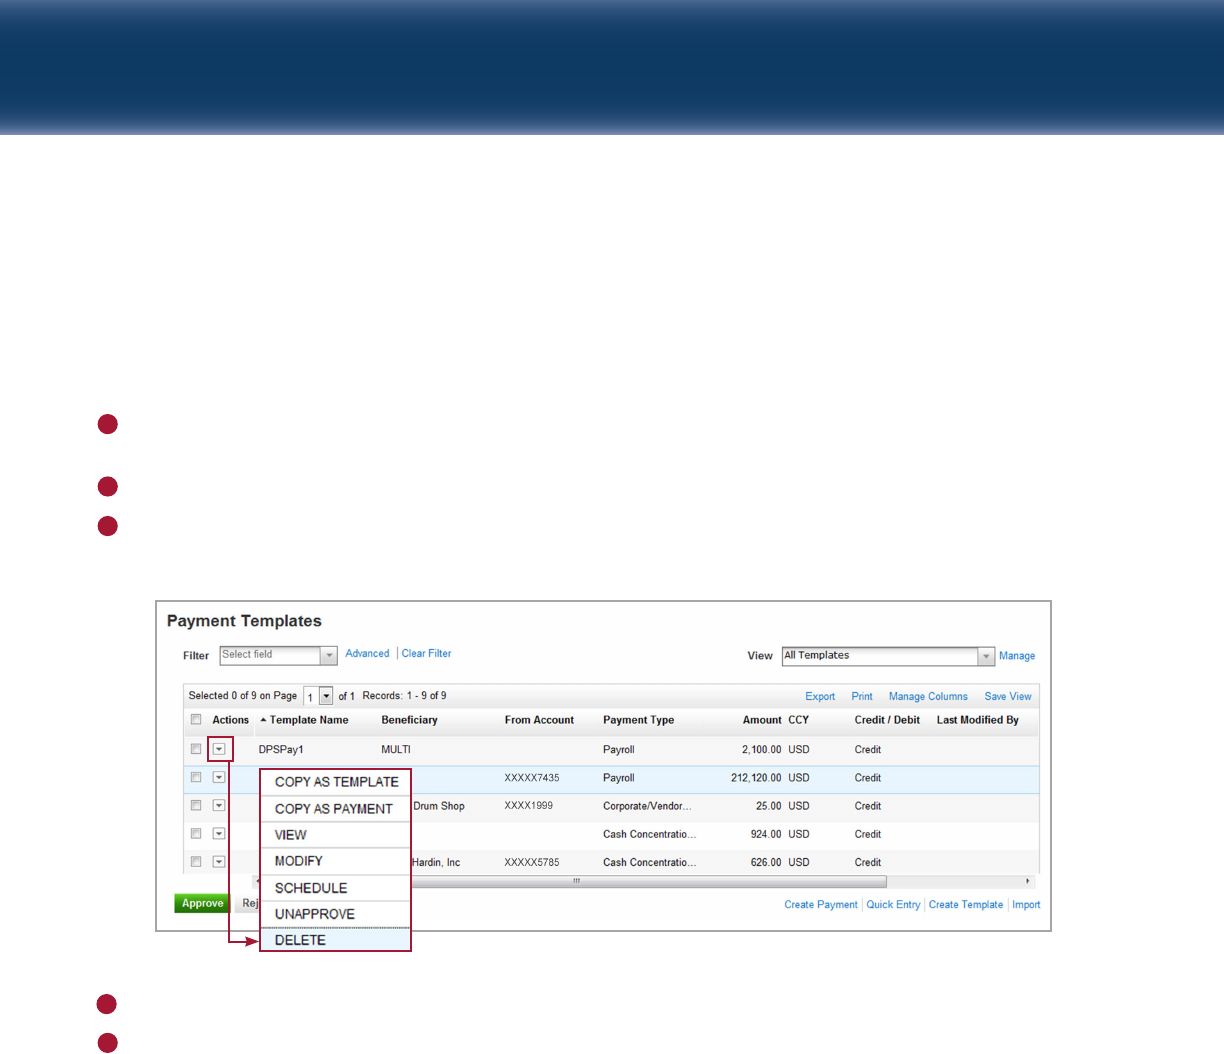
DELETING A PAYMENT OR TEMPLATE
Payments and templates may be deleted if necessary. If a payment has been approved, it must be
“unapproved” prior to deletion. Approved templates do not need to be “unapproved” prior to deletion.
To delete a payment or template:
From the
Services g Payments
menu, navigate to Templates
g
Maintain Templates or Manage & Initiate
Payments
g
Payment Management.
Locate the appropriate item in the list.
Select the
Delete
option from the
Actions
drop-down, as shown below, or select the payment or template
using the checkbox and click the
Delete
button.
The confirmation window displays. Click
Yes
to proceed.
Click the “
X
” to close the window and return to the previous screen.
4
1
2
3
5
Capital One Intellix
®
Payments Working with ACH Payments and Templates | 17
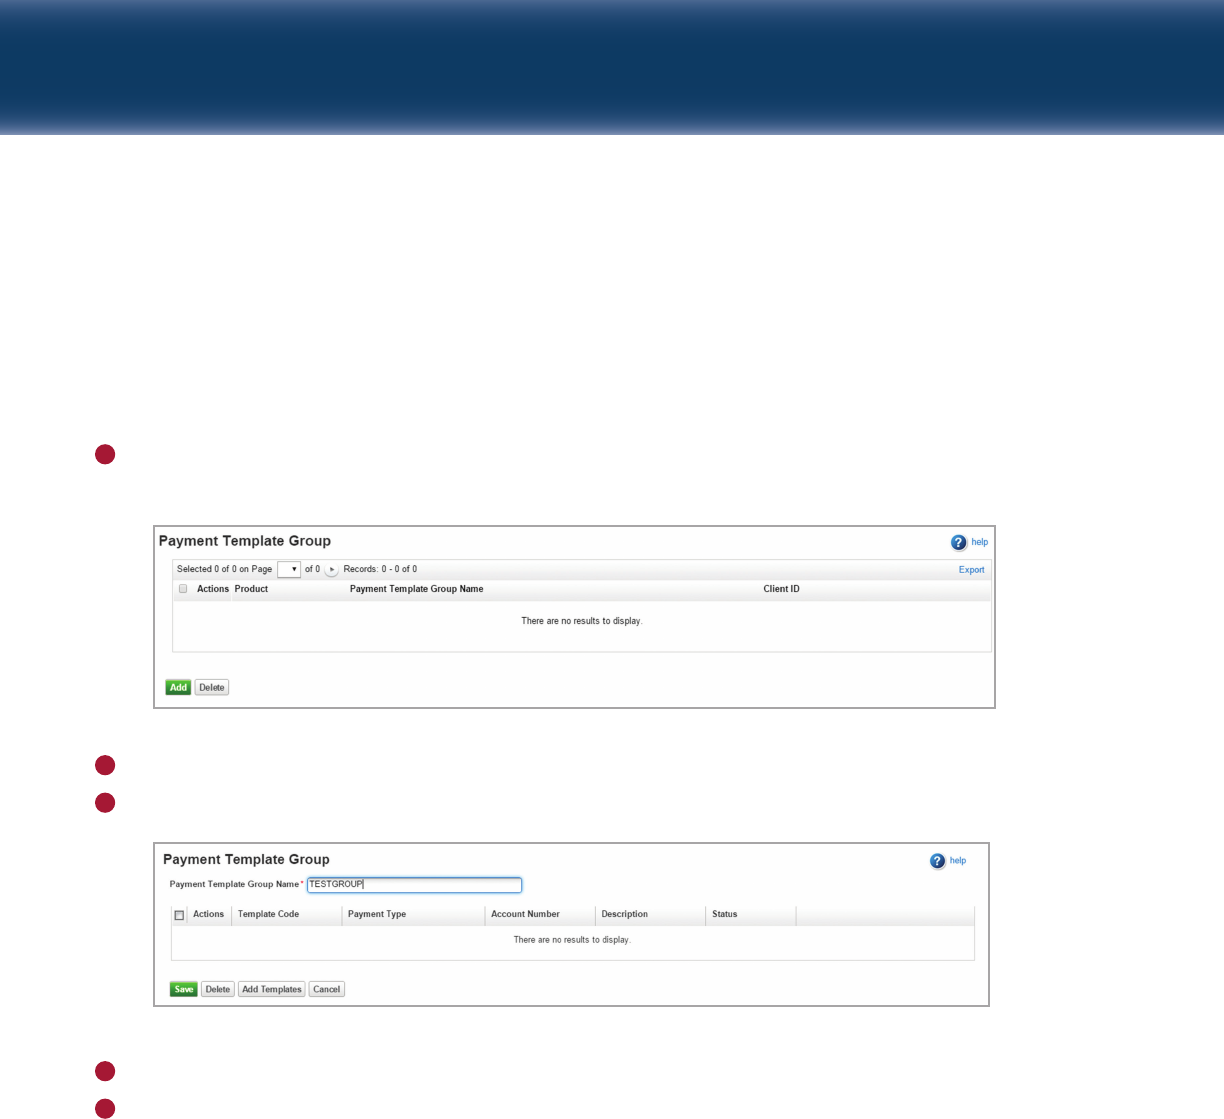
CREATING A PAYMENT TEMPLATE GROUP
A payment template group is a set of one or more templates that can be used to make payments using
Quick Entry. The templates used to create the group must have only one beneficiary each, and the group
may not include templates for tax payments.
To create a payment template group:
Select Template Group from the
Services g Payments g Templates
menu. The system displays the
Payment Template Group screen.
1
Click Add.
Enter a template group name in the Template Name Group field.
2
3
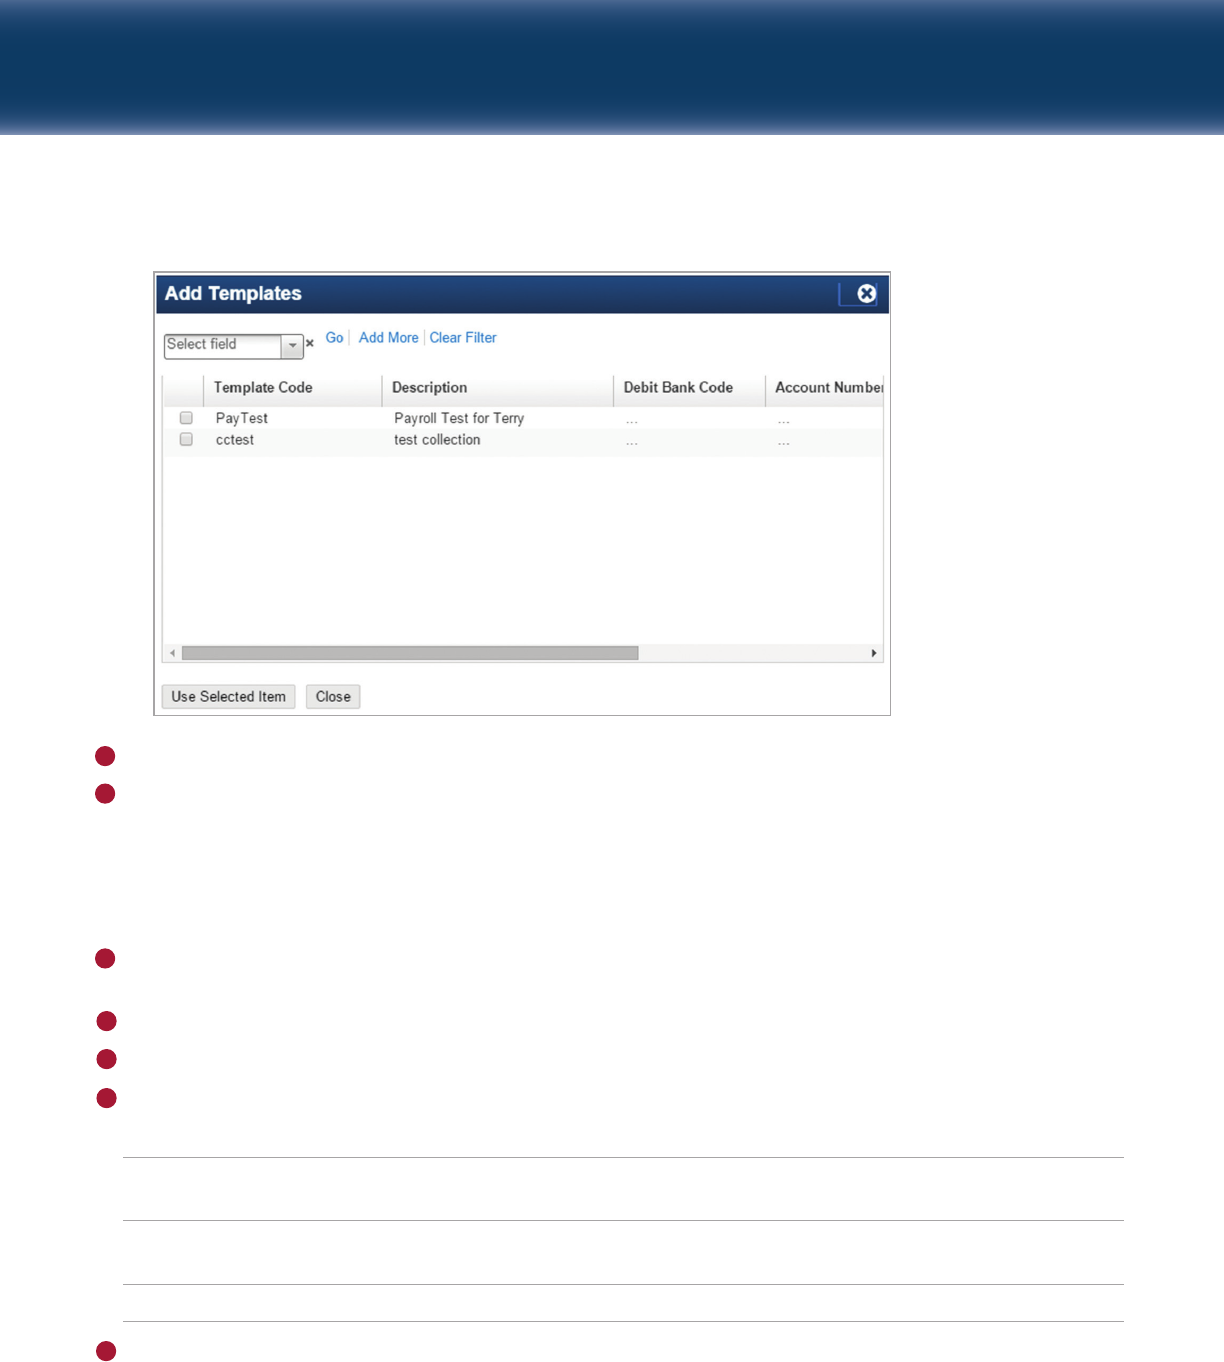
Click Add Templates.
Select the templates to add to the group.
4
5
Capital One Intellix
®
Payments Working with ACH Payments and Templates | 18
MODIFYING A PAYMENT TEMPLATE GROUP
Click Use Selected Item.
Click Save.
6
7
To modify a template group:
Select Template Group from the
Services g Payments g Templates
menu. The system displays the Payment
Template Group screen.
Select a Template Group from the list.
Select a Payment Template from the list.
Perform one of the following actions:
If you want to... Then...
Delete a single template from the group Select a template from the list and select Delete from
the Actions drop-down list.
Delete multiple templates Select the templates fom the list and click Delete at the
bottom of the screen.
Add templates to the group Click Add Templates at the bottom of the screen.
Click Save.
5
1
2
3
4
Capital One Intellix
®
Payments Working with ACH Payments and Templates | 19
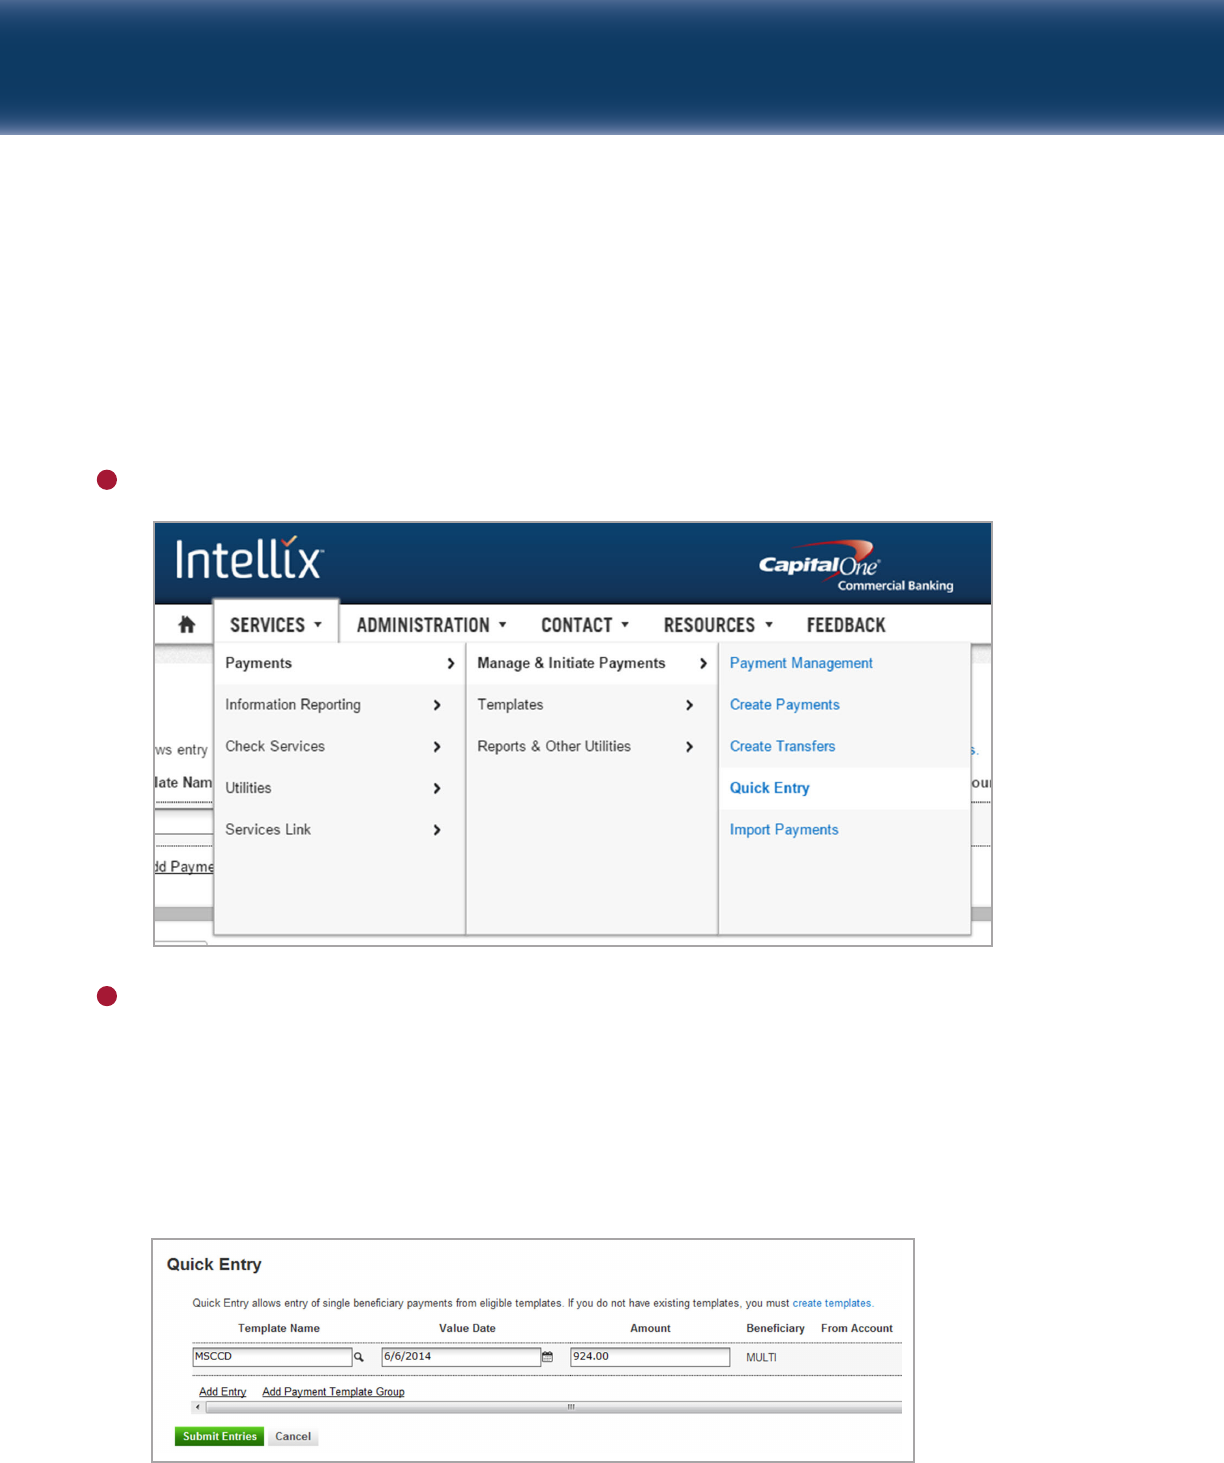
USING QUICK ENTRY
Quick Entry
can be used to generate payments from multiple templates; however, each template must have
no more than one beneficiary. The
Quick Entry
link can be accessed from either the Payment Management
or Payment Templates screen. Remember, if your template contains more than one beneficiary, it is not
eligible for
Quick Entry
. When using
Quick Entry
, you can only change the
Value Date
and
Amount
.
To create a payment using
Quick Entry
:
From the
Services g Payments g Manage & Initiate Payments
menu, select
Quick Entry
.
1
3 Complete the information on the screen:
A. Select the template or template group you wish to use (remember, only templates with ONE
beneficiary will be displayed in the search window).
B. Select the Value Date.
C. Edit the amount, if desired.
D. Add additional templates by clicking the Add Entry link, or payment template group by clicking the
Add Payment Template Group link.
2

Capital One Intellix
®
Payments Working with ACH Payments and Templates | 20
Click
Submit Entries
.
Upon submission, the payment will be validated and you will see a confirmation or error pop-up on your
screen. Click the
Manage Payments
button to exit and return to the Payment Management screen, click
Create Another Payment
button if you wish to create another new transaction, or click the
Print Details
button to print a report of this payment.
What happens when you click Submit depends on your organization’s setup and the permissions of the
individual submitting the item.
See page 15 for a detailed explanation of the approval process.
3
Capital One Intellix
®
Payments Approving Payments and Templates | 21
Approving Payments and Templates
For organizations with a Dual Approval policy, when a payment or template is created or modified, it must
be approved as a second step by someone with appropriate approval permissions. And, some organizations
require that the approval be done by someone other than the creator of the payment or template. Until the
payment or template is approved, it will remain in Entered or Modified status.
NOTE: Some organizations have a Single Approval policy. In this case, when a payment or template is
created or modified by someone with appropriate approval permissions, it will be approved at the same
time.
APPROVING A PAYMENT OR A TEMPLATE
Alerts
may be created by the approver (or by an administrator on his/her behalf) to notify them that new
payments or templates are awaiting approval. Approvers can also use the
Payments Requiring Approval
view
within the
Payment Management
or
Payment Templates
lists to filter for these items. See Working With
Lists
g
Managing Views to learn how to use Views.
Approvers should review each transaction for accuracy and completeness before approval.
To approve a pending payment or template:
Access the
Payment Management
or
Payment Templates
list from the
Services g Payments
menu.
A. For Payments, access the list through Services
g
Payments
g
Manage & Initiate Payments
g
Payment
Management.
B. For Templates, access the list through Services
g
Payments
g
Templates
g
Maintain Templates.
1
A pop-up window will display if the approval was successful. Click the “
X
” to close the window and
return to the
Payment Management
or
Payment Templates
screen.
The status will change to
Approved
. Payments will automatically be released and templates will now be
available for use.
Capital One Intellix
®
Payments Approving Payments and Templates | 22
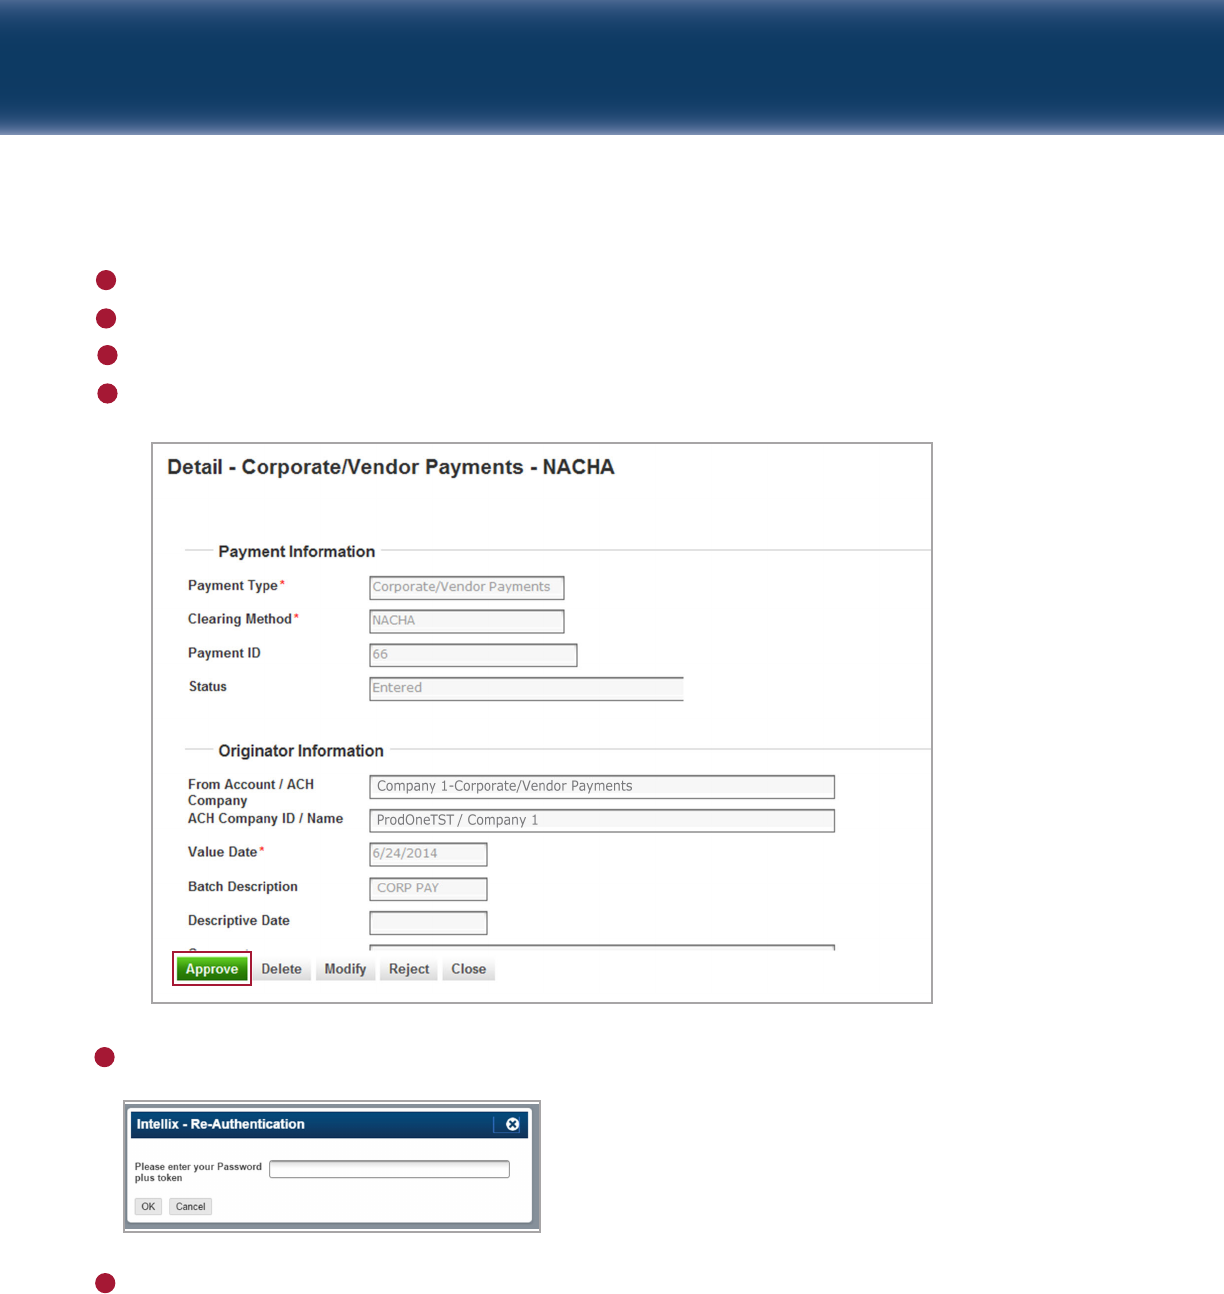
Locate the payment or template in the list.
Click on the item to open it.
Review the item for accuracy and completeness.
If the item is acceptable, click the
Approve
button at the bottom of the screen.
2
3
4
5
If prompted, enter your Password and Tokencode to complete the approval.
6
7
Capital One Intellix
®
Payments Approving Payments and Templates | 23
REJECTING A PAYMENT OR TEMPLATE
If a payment or template contains an error, an
Approver
can reject it so that it can be corrected. If the
approver rejects a payment or template, it will change to an
Approver Rejected
status.
NOTE:
For those that
create payments and templates, an
Approver Rejected Alert
is available. See
Alert Settings
for detail.
To reject a pending payment or template:
Access the
Payment Management
or
Payment Templates
list from the
Services g Payments
menu.
A. For Payments, access the list through Services
g
Payments
g
Manage & Initiate Payments
g
Payment
Management.
B. For Templates, access the list through Services
g
Payments
g
Templates
g
Maintain Templates.
Locate the payment or template in the list.
Click on the payment or template record to open the item.
1
2
3
Capital One Intellix
®
Payments Approving Payments and Templates | 24
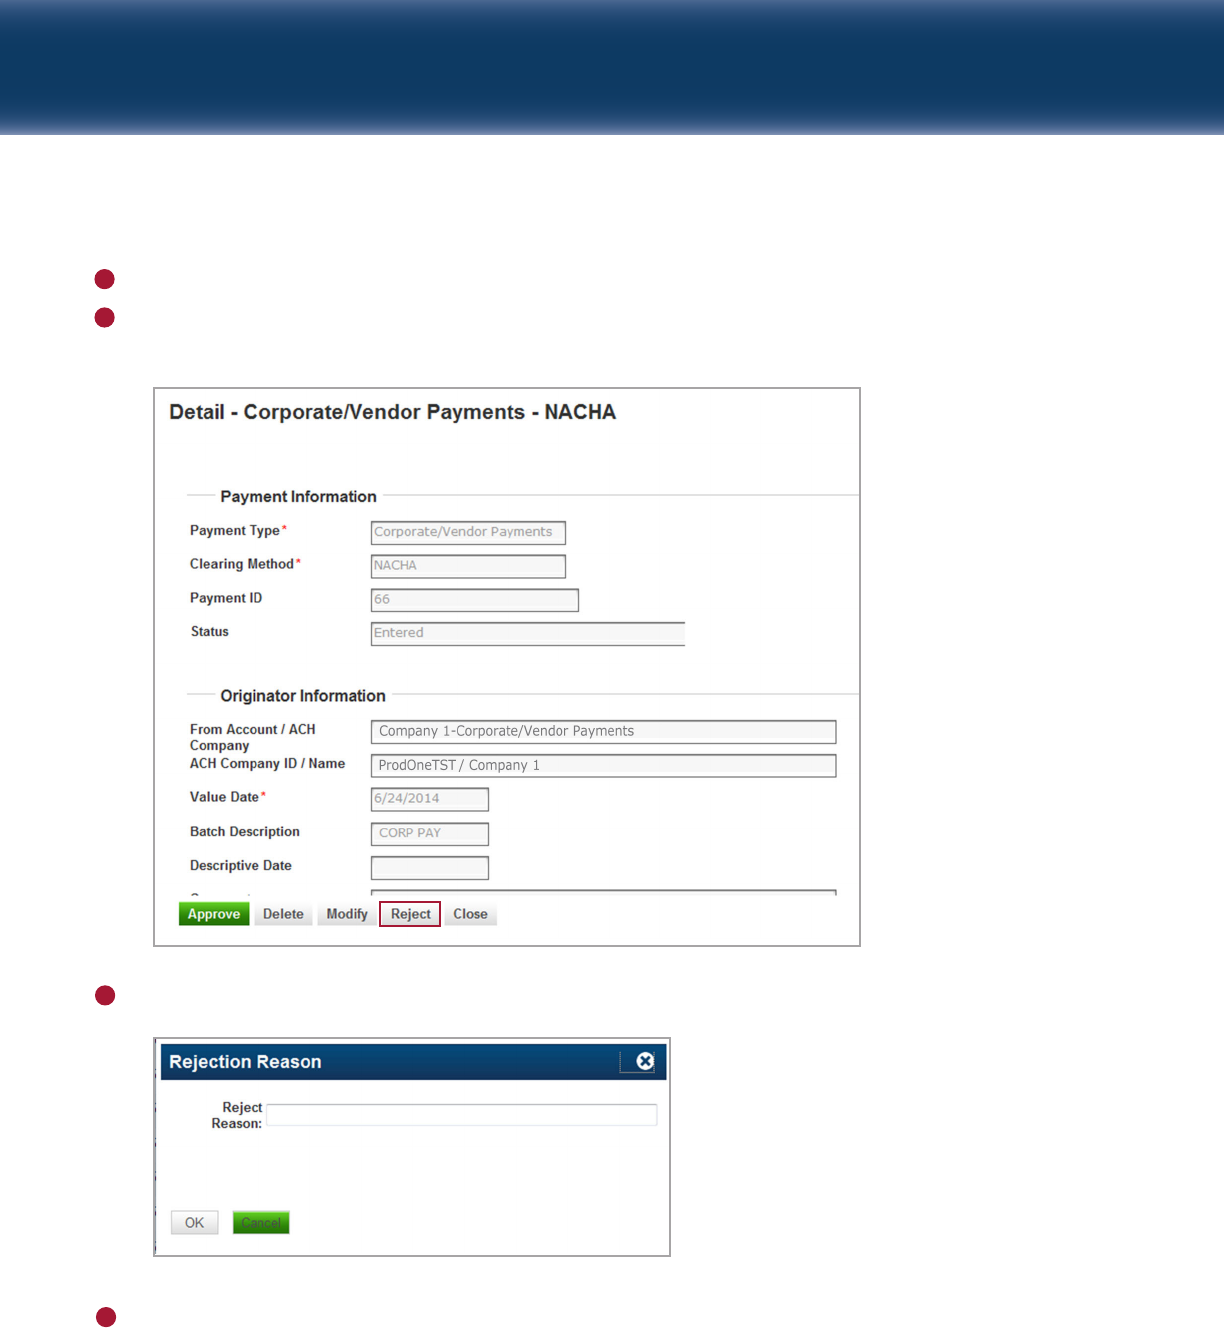
Review the item for accuracy and completeness.
If the item is incomplete or contains errors, click the
Reject
button at the bottom of the screen. The
Rejection Reason
window displays.
4
5
Enter a
Rejection Reason
.
6
Click
OK
. The status will change to
Approver Rejected
and the payment will be held.
7
Capital One Intellix
®
Payments Approving Payments and Templates | 25
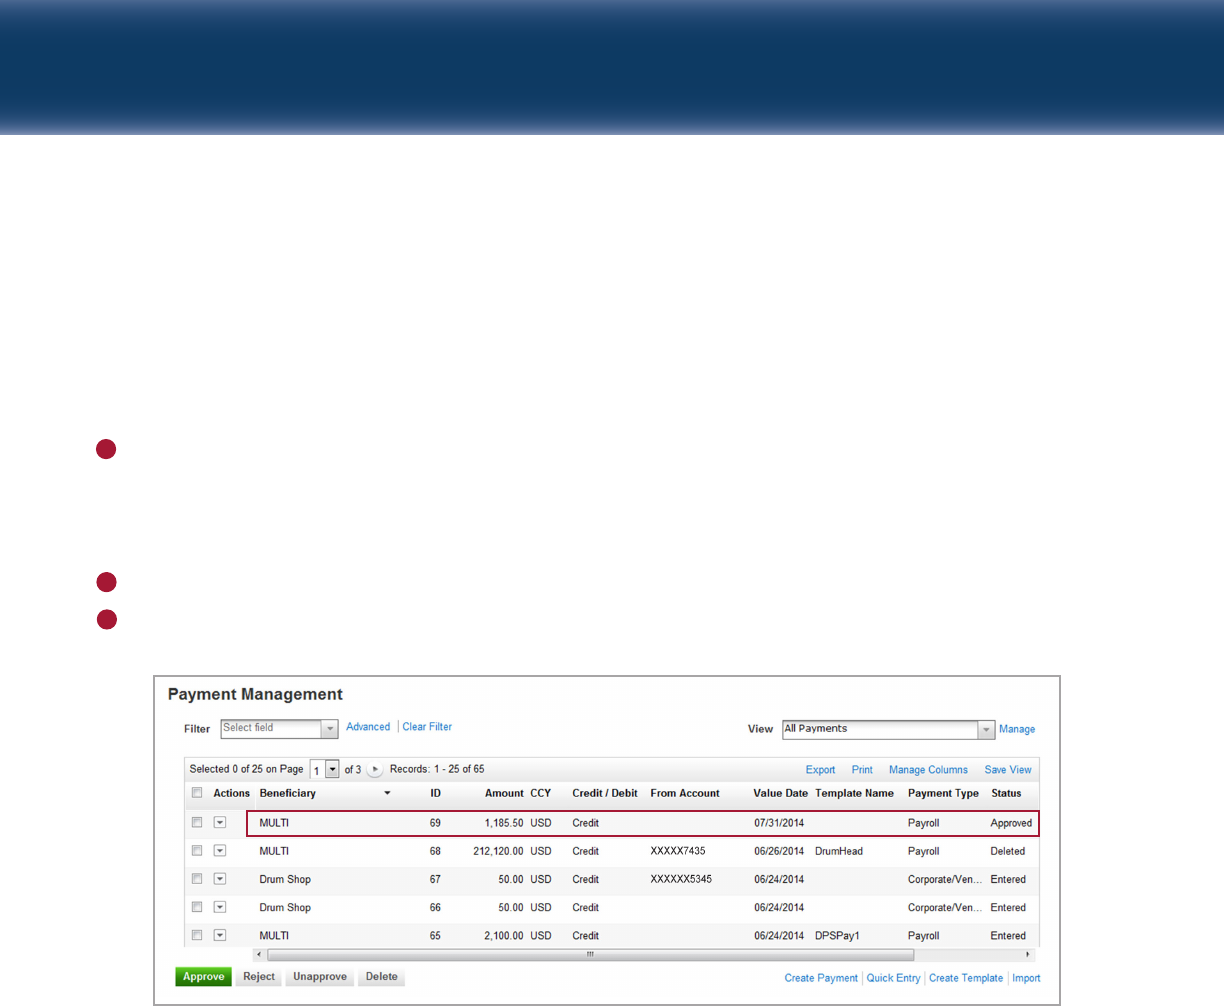
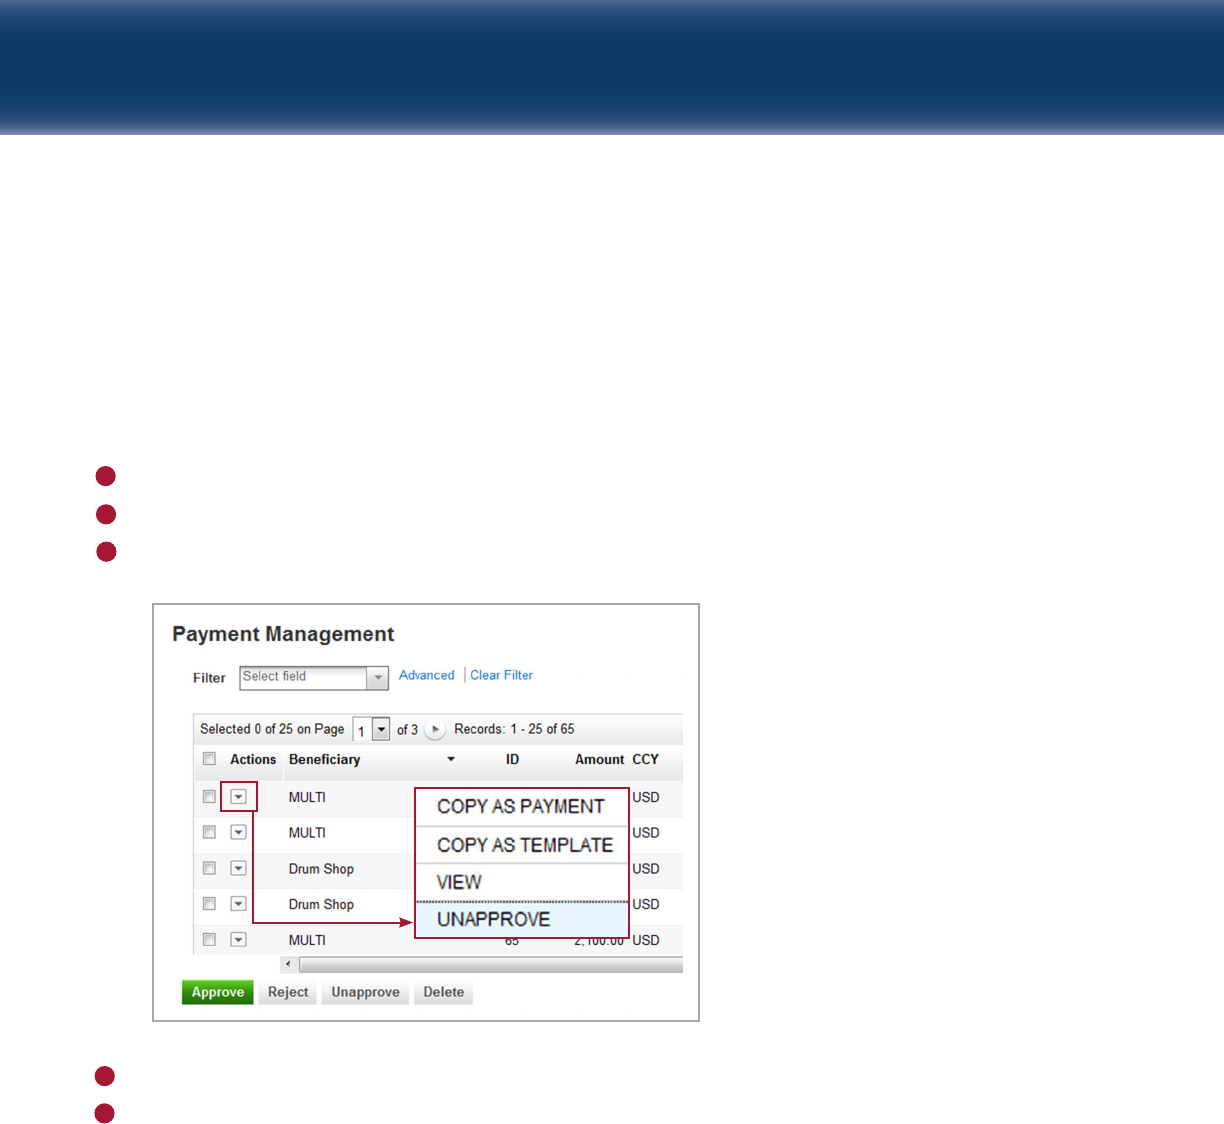
UNAPPROVING AN APPROVED PAYMENT
Approved payments may not be altered. In order to modify or delete an approved payment, it must first be
“unapproved.” An authorized approver must perform this task. Once the payment has been released to the
bank, it can no longer be unapproved. If you are unable to unapprove a payment, it has already been
released to the bank for processing.
To unapprove a payment:
Access the
Payment Management
list from the
Services g Payments
g
Manage & Initiate Payments menu.
Locate the payment.
Select the
Unapprove
option from the
Actions
drop-down, as shown below.
1
2
3
Click the “
X
” to close the window and return to the Payment Management screen.
Modify
or
Delete
the item as necessary. See
Modifying a Payment
or
Deleting a Payment
for detailed
instructions.
4
5
Capital One Intellix
®
Payments Approving Payments and Templates | 26
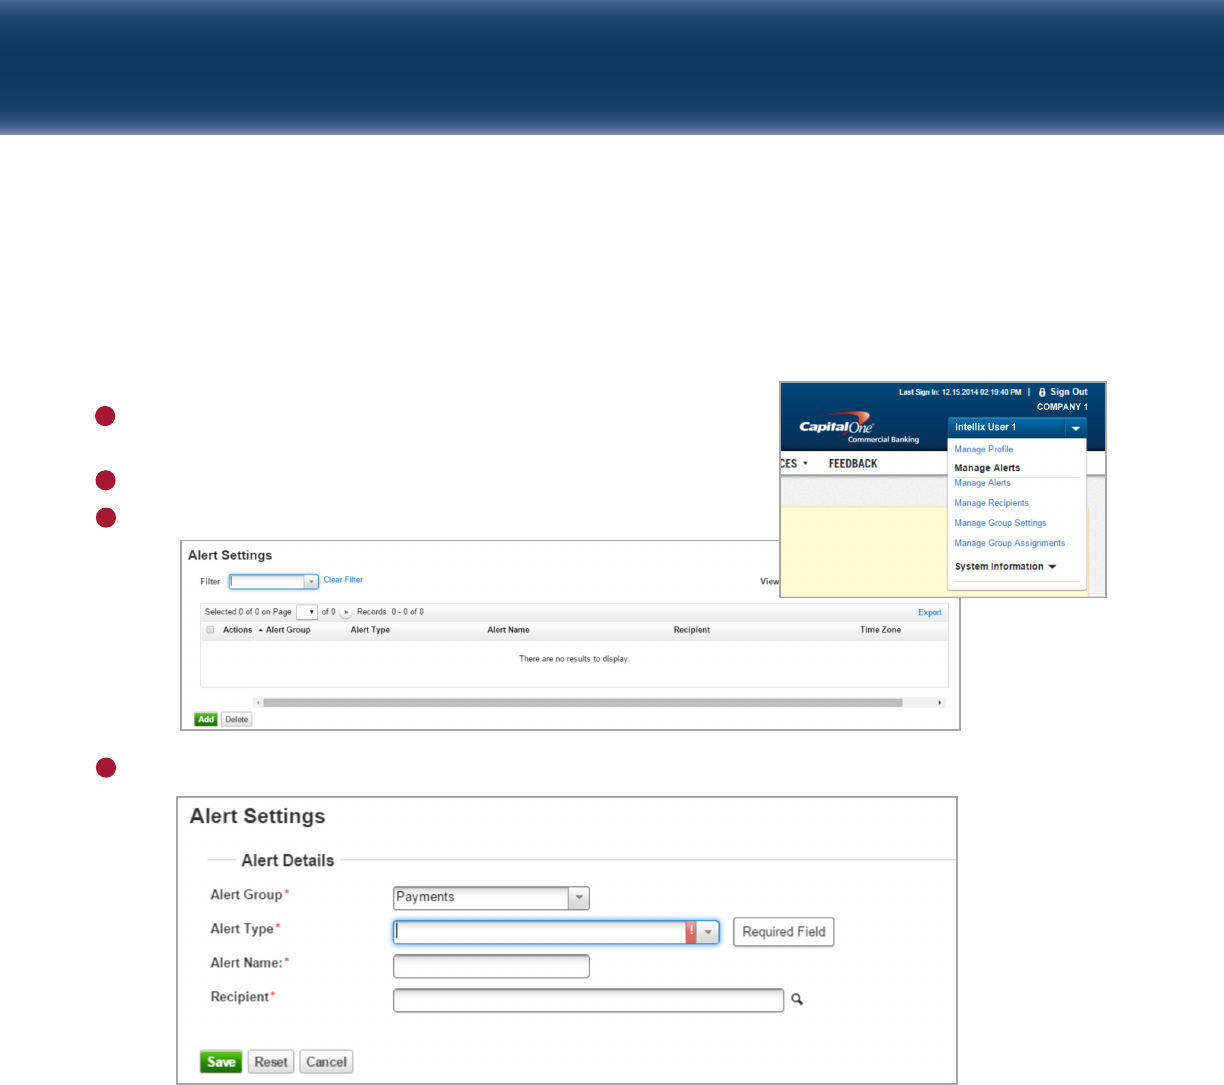
ALERT SETTINGS
Based on your permissions, you may have the ability to set alerts to notify yourself when a payment
is rejected, or if a payment is ready for approval. Alerts are created using the profile menu in the upper
right-hand corner of the Intellix screen. To create an alert:
Click on the drop-down menu next to your name. Most users
will only see the Manage Profile and Manage Alerts links.
Select Manage Alerts.
Click Add.
Complete the following Alert Details:
• Alert Group: Select Payments or Information Reporting (see below).
• Alert Type (select one of the following):
A. Approver Rejected Payments: This type of alert sends you an email if a payment you submitted was
rejected in the approval process. This allows you to quickly fix any problems that caused the
payment to be rejected.
B. Payment(s) Automatically Generated: This type of alert sends you an email when a payment has been
automatically generated by the system, such as a scheduled payment.
C. Payments Awaiting Approval: This type of alert sends you an email when a payment has been
submitted for a type of payment for which you are responsible for approval.
D. Payments Rejected Today: This alert sends an email when a payment is rejected during the current
business day. This alert is only applicable to Wire and Book Transfers.
1
2
3
4

E. Payments Needing Rate: This type of alert sends an email to the individual authorized to apply an
exchange rate to an International Wire Transfer. This person will be required to get and approve the
rate by close of business in order to release the transfer.
F. Payment Processed: This type of alert sends an email when a Wire Transfer or Book Transfer is
processed by the bank. Individual settings allow for alerts when the bank receives, confirms, or
rejects the payment.
NOTE: If you wish to set up an alert for Wire Transfers and other payments received to your accounts,
you can utilize the Transaction Notification alert, found under the Information Reporting Alert Group.
For Wire Transfers, specify transaction type 195 on the alert setup page.
• Alert Name: Create a name for this alert.
• Recipient: Enter or select your email address. If you are an administrator you may enter or select any
email address or group in the organization.
Click Save.
5
Capital One Intellix
®
Payments Approving Payments and Templates | 27
Capital One Intellix
®
Payments Reports | 28
Payment Reports
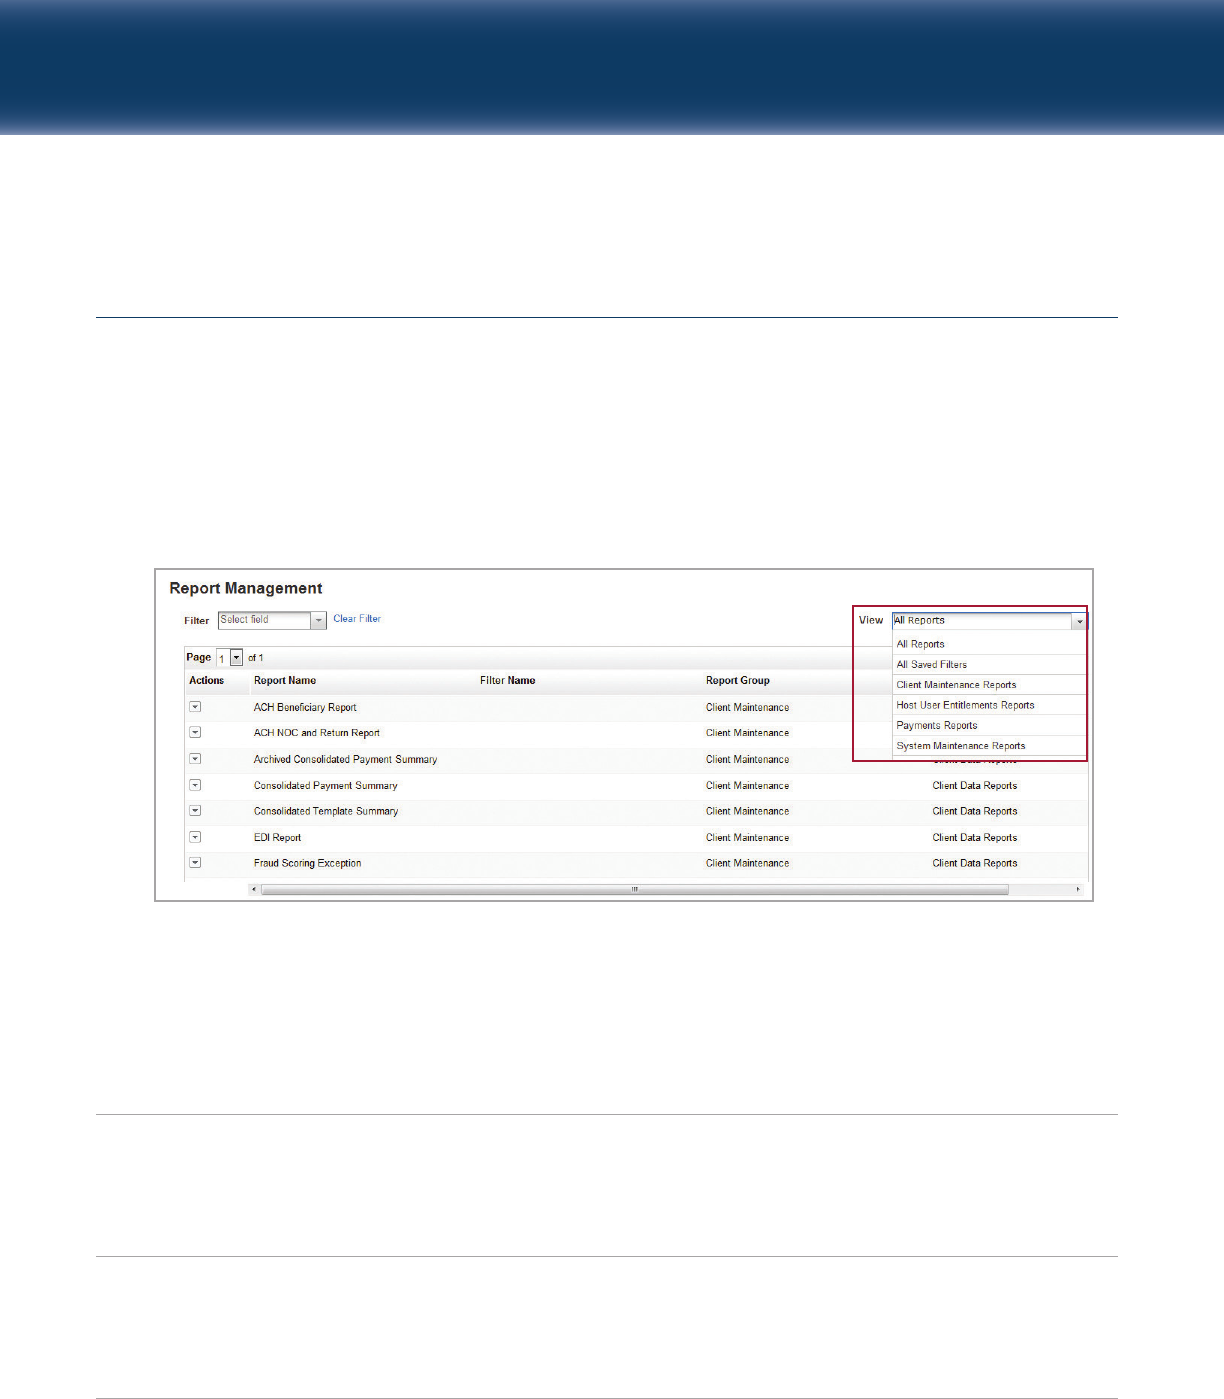
VIEWING A REPORT
From the
Services g Payments
menu, select
Reports
. The Report Management window will appear, listing
all payment reports to which you have access. Click on a report to display, or click the
Actions
drop-down
and select
View
.
You can also filter reports using the
View
menu.
REPORT DEFINITIONS
The table below defines the standard payment reports available within Intellix Payments. Your access to
different reports is based on your organization’s entitlements and your permissions. As a result, you may
not have access to some of the reports outlined in this section.
Report Name Description
ACH Beneficiary Report
Details the beneficiary information for incoming bulk payments. It is
generally used by nursing homes for payments received from government
agencies. E.g., for lump-sum incoming payment, this report will provide
detail on the breakdown of payments for each beneficiary so the funds
can be applied correctly.
ACH EDI Agenda Report
Displays transaction and remittance detail on incoming ACH Credits/
Deposits to a client’s account. This report helps reconcile deposits to
invoices issued as it includes remittance detail sent through the ACH
network. Remittance detail can include numerous invoice numbers,
pricing discount amounts, product codes, customer codes and more.

Capital One Intellix
®
Payments Reports | 29
Report Name Description
ACH Return and Notice of
Displays returned ACH items when the account could not be debited/
Change (NOC) Report
credited or when incorrect account information identified with the
recipient’s account. This report includes the originating transaction
information, as well as the corrected information (if known) and the
return/change reason code. ACH return reasons include insufficient
funds, account closed, unable to locate account, account frozen and
more. ACH Notice of Change reasons include incorrect account number,
routing number, receiving company name and transaction type code.
ACH Company Information The ACH Company Information report displays bank-maintained ACH
company information and the payment types entitled to each ACH
company.
Users will only see ACH company information to which they have access.
Report data includes payment types, child support agencies and tax
authorities.
ACH Company The ACH Company report displays a list of all ACH companies that are in
the system.
ACH Payment Audit Trail The ACH Payment Audit Trail report lists all ACH payment and batches
with transaction details as well as any auditing information associated
with the batch or transaction.
Users will only see payment batches to which they have access.
ACH Payment Detail The ACH Payment Detail report lists all payment batches and their
transactions in detail.
Users will only see payment batches to which they have access. An
archived version of this report also exists.
ACH Template Detail This report lists all templates and their detail transactions.
Users will only see templates to which they have access.
ACH File Import Status The ACH File Import Status report lists all files imported to create
payment batches and notes the import status of each transaction. It is
specific to the File Import action available from within the Payments and
Template List View and applies to full file imports.
Users will only see payment batches to which they have access.
ACH Payment Detail Export The ACH Payment Detail Export report lists all payment batches in a
fixed-width padded format. The report can be exported to multiple
columns in Excel where each field will be broken into a cell. The header
is also exportable to Excel.
Users will only see payment batches to which they have access. An
archived version of this report also exists.
ACH Payment Detail Import The ACH Payment Detail Import Status report lists all detail imports into
payment batches and notes the import status of each transaction.

Capital One Intellix
®
Payments Reports | 30
Report Name Description
ACH Payment Summary Totals The ACH Payment Summary Totals report lists all payment batches in
summary format with a drill down to the payment detail.
Users will only see payment batches to which they have access. An
archived version of this report also exists.
ACH Template Audit Trail The Template Audit Trail report displays a list of templates and their
detail transactions.
ACH Template Detail Export Lists all templates in a fixed-width padded format. This report can be
exported to multiple columns in Excel where each field will be broken
into a cell. The header is also exportable to Excel.
Users will only see templates to which they have access.
ACH Template Detail Import The ACH Template Detail Import Status report lists all detail imports into
payment batches and success, failure, and rejects per transaction.
Users will only see templates to which they have access.
ACH Template Summary Totals The ACH Template Summary Totals report displays all templates in
summary format with a drill down to the template detail.
Users will only see templates to which they have access.
Wires/Transfers Payment Lists all Wire and Transfer payments with transaction details and auditing
Audit Trail information.
Archived Consolidated Archive of all payments (ACH, Wires and Transfers) over 90 days old in
Payment Summary summary format with a drill down to detail.
Beneficiary Import Summary Lists all beneficiaries imported into the Beneficiary Address Book in
summary format with a drill down to detail.
Consolidated Payment Summary Lists all payments (ACH, Wires and Transfers) in summary format with a
drill down to detail.
File Import Summary Summary list of all files imported into Intellix.
Wires/Transfers Payment Data – Lists all payments in a fixed-width padded format. This report can be
Export Format exported to multiple columns in Excel where each field will be broken
into a cell. The header is also exportable to Excel.
Wires/Transfers Archived Archive of all payments over 90 days old in summary format with a drill
Payment Summary down to the payment detail.
Wires/Transfers Future-Dated Lists all Wire and Transfer payments with future value dates
Payments
Wires/Transfers Payment Detail Lists all Wire and Transfer payments in detail.
Wires/Transfers Payment Lists all Wire and Transfer payments in summary format with a drill down
Summary to the payment detail.
Report Name Description
Wires/Transfers Payments Lists all payments awaiting approval.
Pending Approval
Consolidated Template Lists all templates (ACH, Wires and Transfers) in summary format with a
Summary drill down to detail.
Wires/Transfers Template Detail Lists all Wire and Transfer templates in detail.
Wires/Transfers Template Lists all Wire/Transfer templates in summary format with a drill down to
Summary detail.
Exchange Rates Displays the indicative rates for the current day.
Capital One Intellix
®
Payments Reports | 31
FILTERING A REPORT
Some reports support filtering to return a custom report. Filters may be saved so that the custom report can
be run on demand with a single click.
To create a report filter:
From
Services g Payments g Reports & Other Utilities
menu, select Payment
Reports
.
Click the
Actions
drop-down next to the report you wish to filter, and click
Filter
.
1
2
Select the appropriate filter options and click
View Results
. The filtered report will display.
Optionally, you can select the filter options and click
Save Filter
. You will be prompted to name and save
the filtered report.
3
4
Capital One Intellix
®
Payments Reports | 32
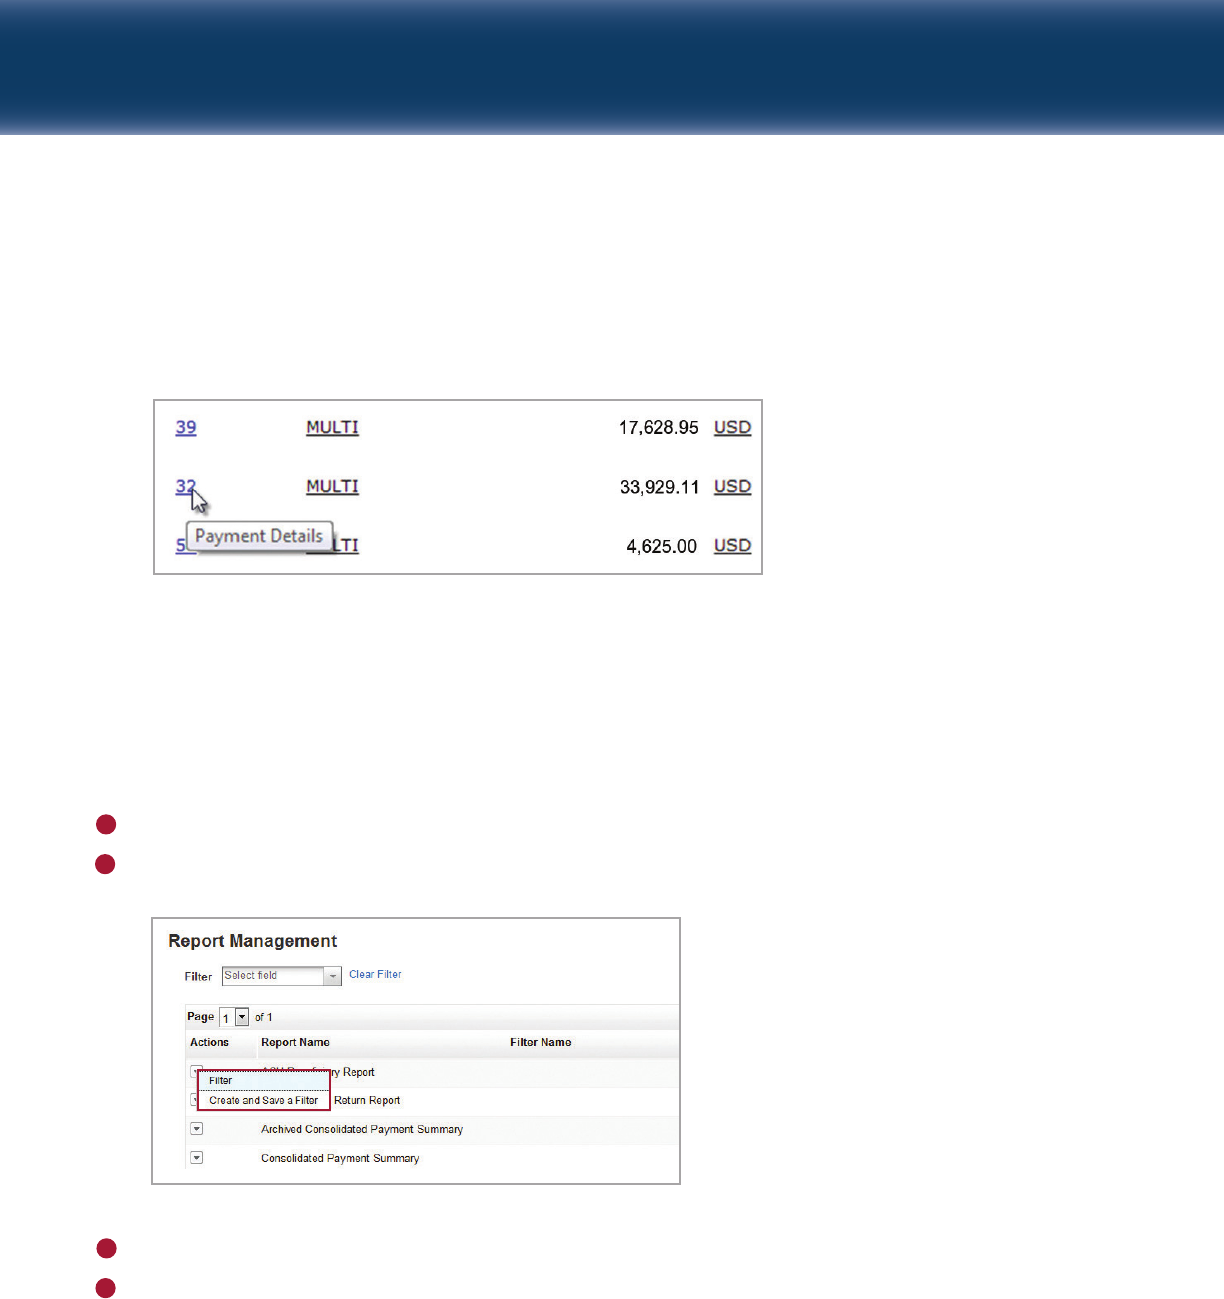
VIEWING ADDITIONAL DETAIL WITHIN A REPORT
Where available, you will be able to view additional detail within a report. Click the hyperlink next to the
record in the report to view detail.
Capital One Intellix
®
Payments Reports | 33
To save a report filter:
From
Services g Payments g Reports & Other Utilities
menu, select
Payment Reports
.
Click the
Actions
drop-down next to the report you wish to filter, and click
Create and Save a Filter
.
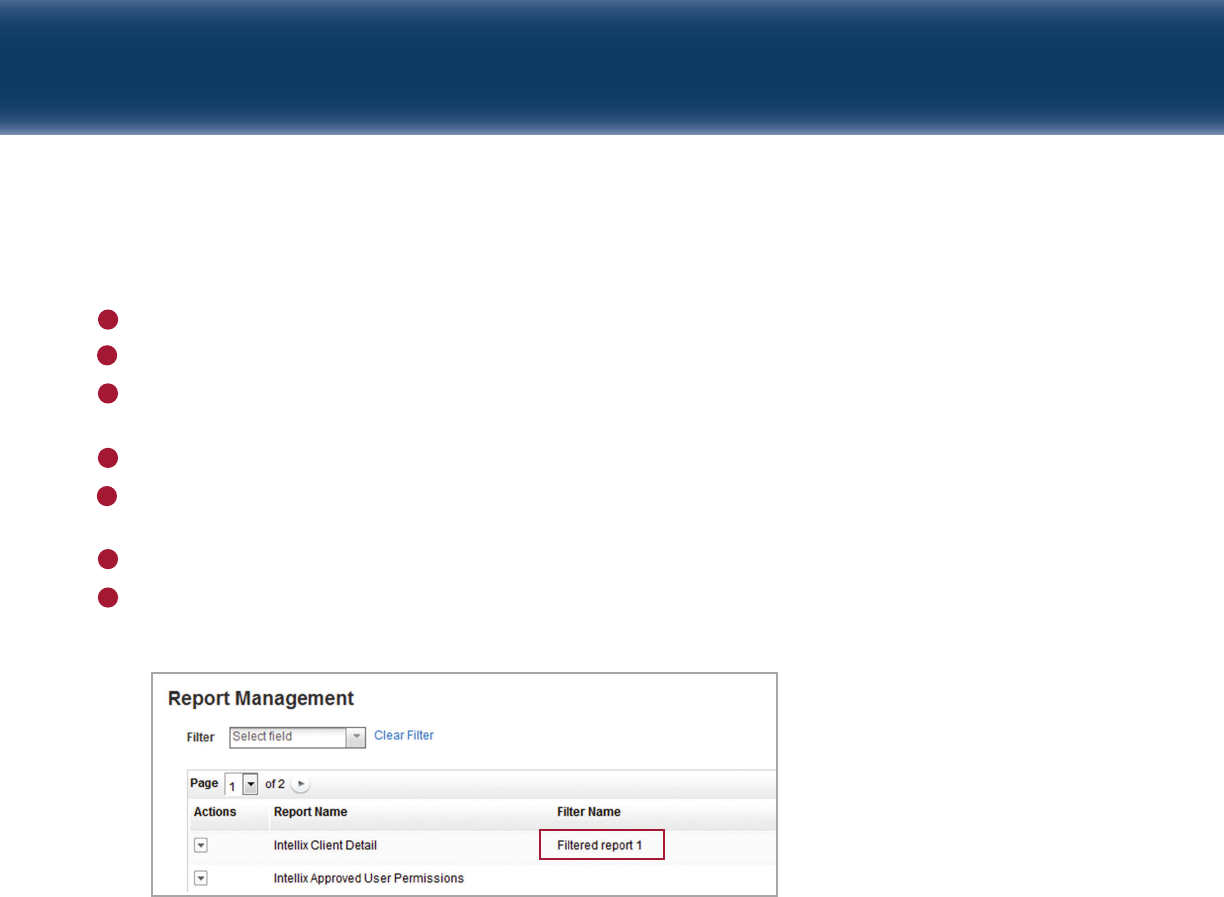
Enter a name and description for your filtered report. This is how the filtered report will be represented
in the Report Management list.
Select
Sort
options if desired.
Click the
Shared
checkbox if you wish to make this filtered report available to everyone with access to the
underlying report. Otherwise this filtered report will only be visible to you.
Select the appropriate filter options and click
Save
. A confirmation window displays.
Click
View Report
to view the filtered report. Otherwise click the
“X”
to return to the Report Management
list. The filtered report displays.
1
2
3
4
5
6
7
Capital One Intellix
®
Payments Reports | 34
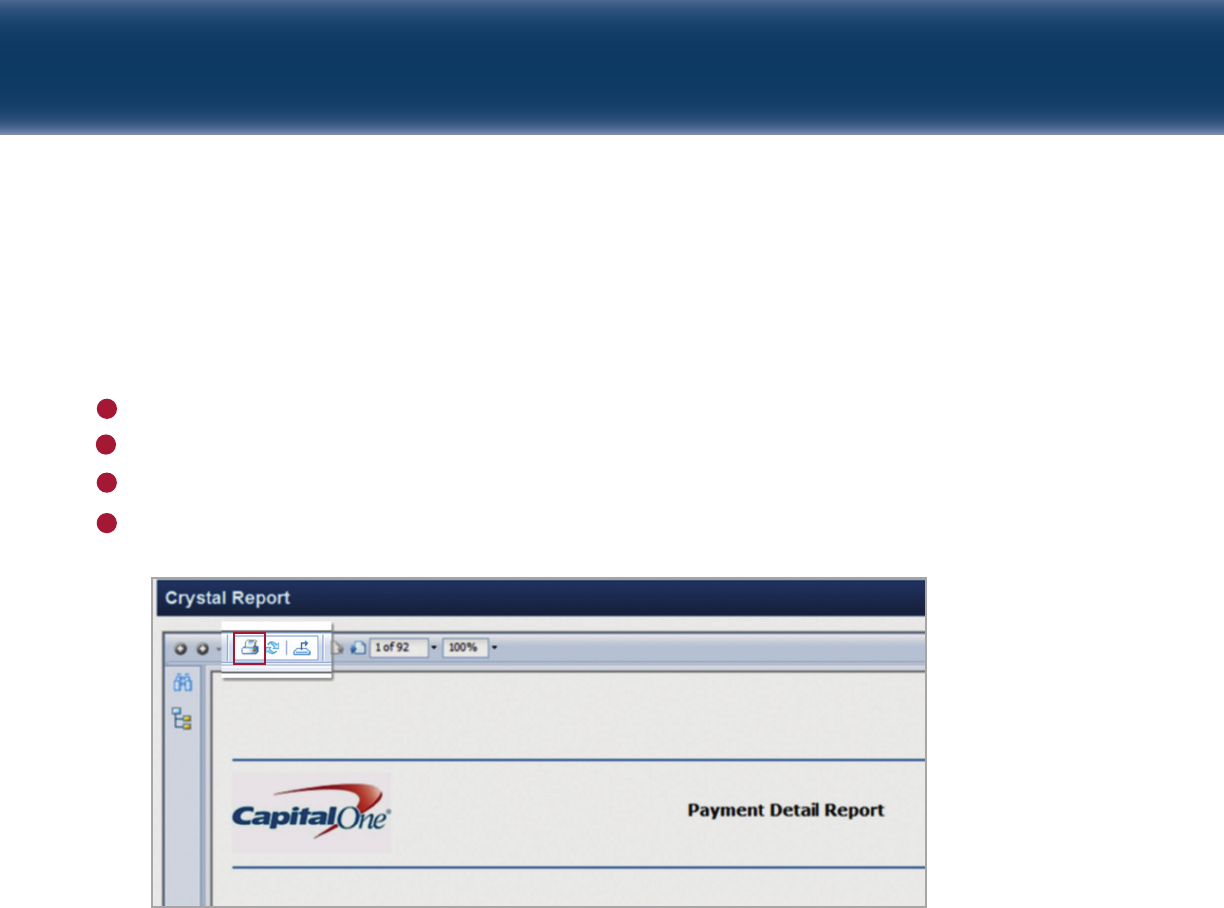
PRINTING A REPORT
This process varies based on the browser being used. In this guide we will define the process for using
Internet Explorer. For other browsers, please visit Resources
g
eLearning and reference the eLearning
modules related to this process.
Open the
Report
.
Click the
Print
button.
Select the page range you wish to print, and change any print settings as necessary.
Click
Print
.
1
2
3
4
Capital One Intellix
®
Payments Reports | 35
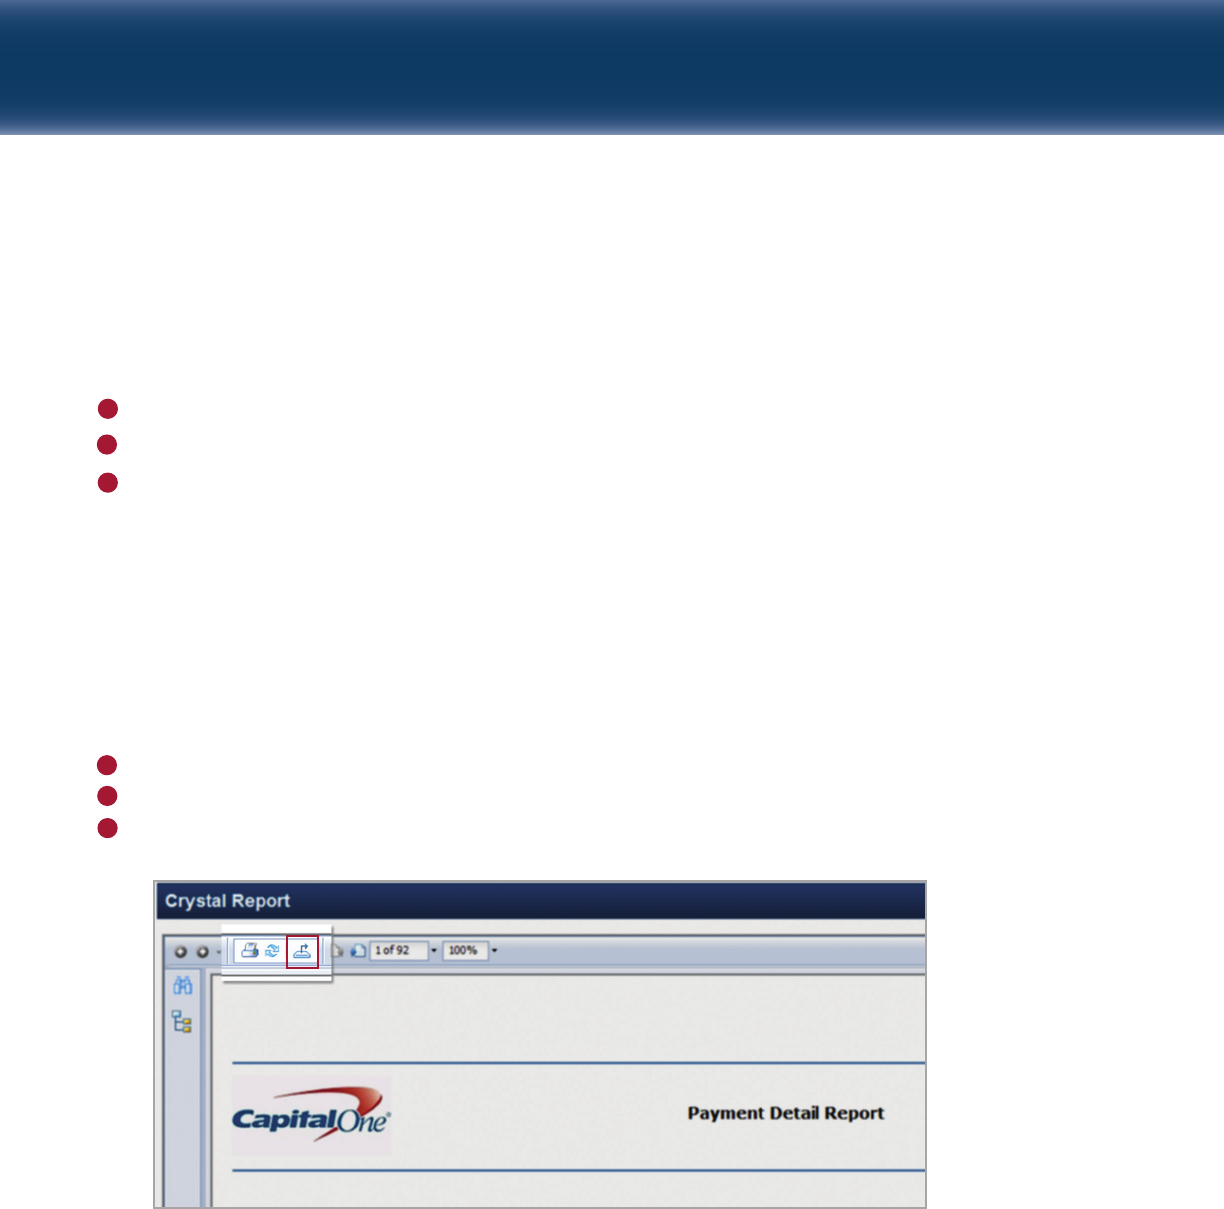
EXPORTING A REPORT
This process varies based on the browser being used. In this guide we will define the process for using
Internet Explorer. For other browsers, please visit Resources
g
eLearning and reference the eLearning
modules related to this process.
Open the
Report
.
Click the
Export
button.
Select the file format for the exported data:
• PDF: Exports data to Portable Document Format, which can be viewed with a PDF application such
as Adobe Reader.
• Microsoft Excel: Exports data into .xls format easily read by Excel version 97-2003 and above.
• Microsoft Excel – Data only: Exports data into Excel unformatted.
• Rich Text Format (RTF): Exports data and retains any formatting.
• Separated Values (CSV): Exports data in common, plain-text format where field values are separated
by a comma or other single character.
• XML: Exports data in Extensible Markup Language.
Select the range of pages desired.
Click
Export
.
When prompted, click the appropriate button to open or save the file.
1
2
3
4
5
6

6.26.17
