
Information Reporting
Reference Guide
Table of Contents
Introduction to Information Reporting 3
Viewing the Account Summary 3
Customizing the Account Summary Screen 4
Managing Columns 5
Using Views and Saving Customizations as a View 5
Creating an Account Group 7
Using the Filter on the Account Summary Screen 8
Viewing Transaction Details 9
Viewing an Account Statement Report 12
Balance and Transaction Reports 13
Report Descriptions 13
Report Filters 15
Printing a Report 16
Exporting Balance and Transaction Detail 17
Exporting and Downloading Statements 19
Searching for a Check or Deposit Ticket Item Image 21
Creating an Alert 23
Capital One Intellix
®
Information Reporting Reference Guide 2
Capital One Intellix
®
Information Reporting Reference Guide 3
Introduction to Information Reporting
Information Reporting, allows you to view information about your bank accounts & transactions. Options
available include:
• Viewing account summaries and transaction details
• Accessing balance & transaction reports, as well as other bank reports
• Exporting balance and transaction data
• Searching for and viewing statements
• Searching for an image of a check or deposit ticket/items
These functions are accessed through the
Services g
Information Reporting in Intellix
®
.
Your access to the different features and accounts within Information Reporting is based on your
organization’s entitlements and your permissions.
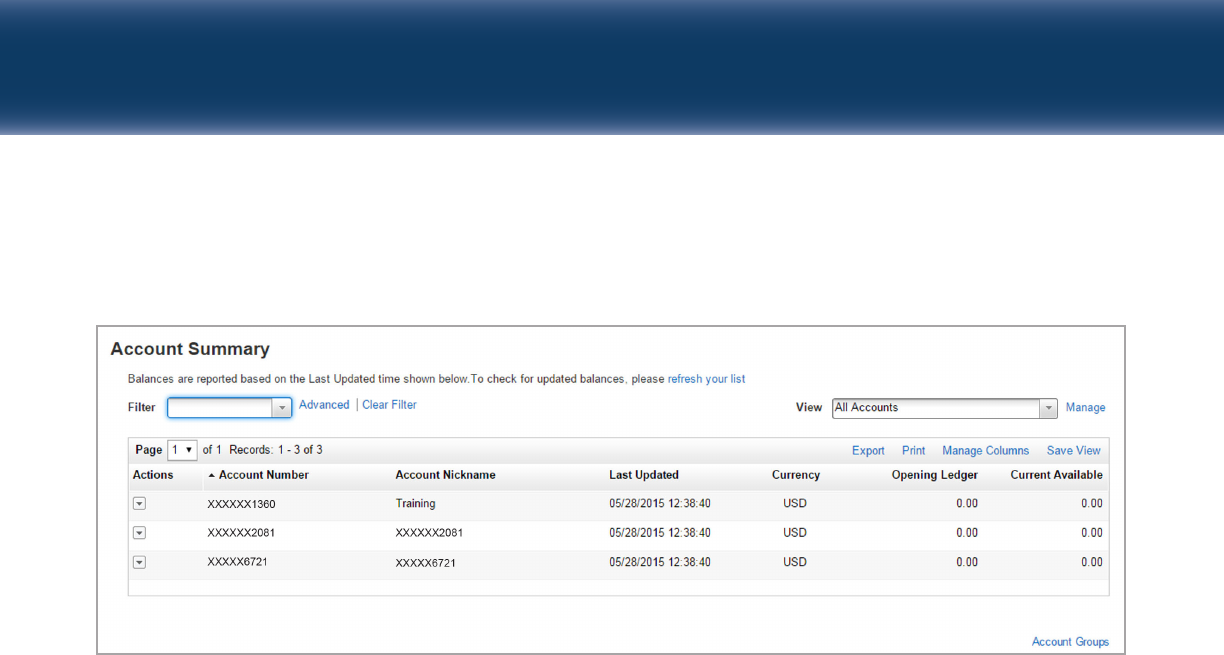
Viewing the Account Summary
The Account Summary screen provides an overview of all of the accounts and balances that you have
permission to see. Balance information includes opening ledger, current ledger, opening available, current
available balance, 1-Day Float and 2 or more days float.
From the Account Summary you can:
• Customize the view in terms of columns, accounts and other information; customizations can be saved as
new “Views”
• Drill into transaction details for a specific account
• View the Account Statement Report for a specific account
Capital One Intellix
®
Information Reporting Reference Guide 4
To view the Account Summary, select Account Summary from the
Services g
Information Reporting menu.
• The opening ledger and current available columns show the balances for the accounts.
• The balances are current as of the time listed in the “Last Updated” column.
NOTE: If you have access to current day reporting, you will be provided with the current balance. You can
also click “Refresh your List” to refresh the data every 2 minutes.
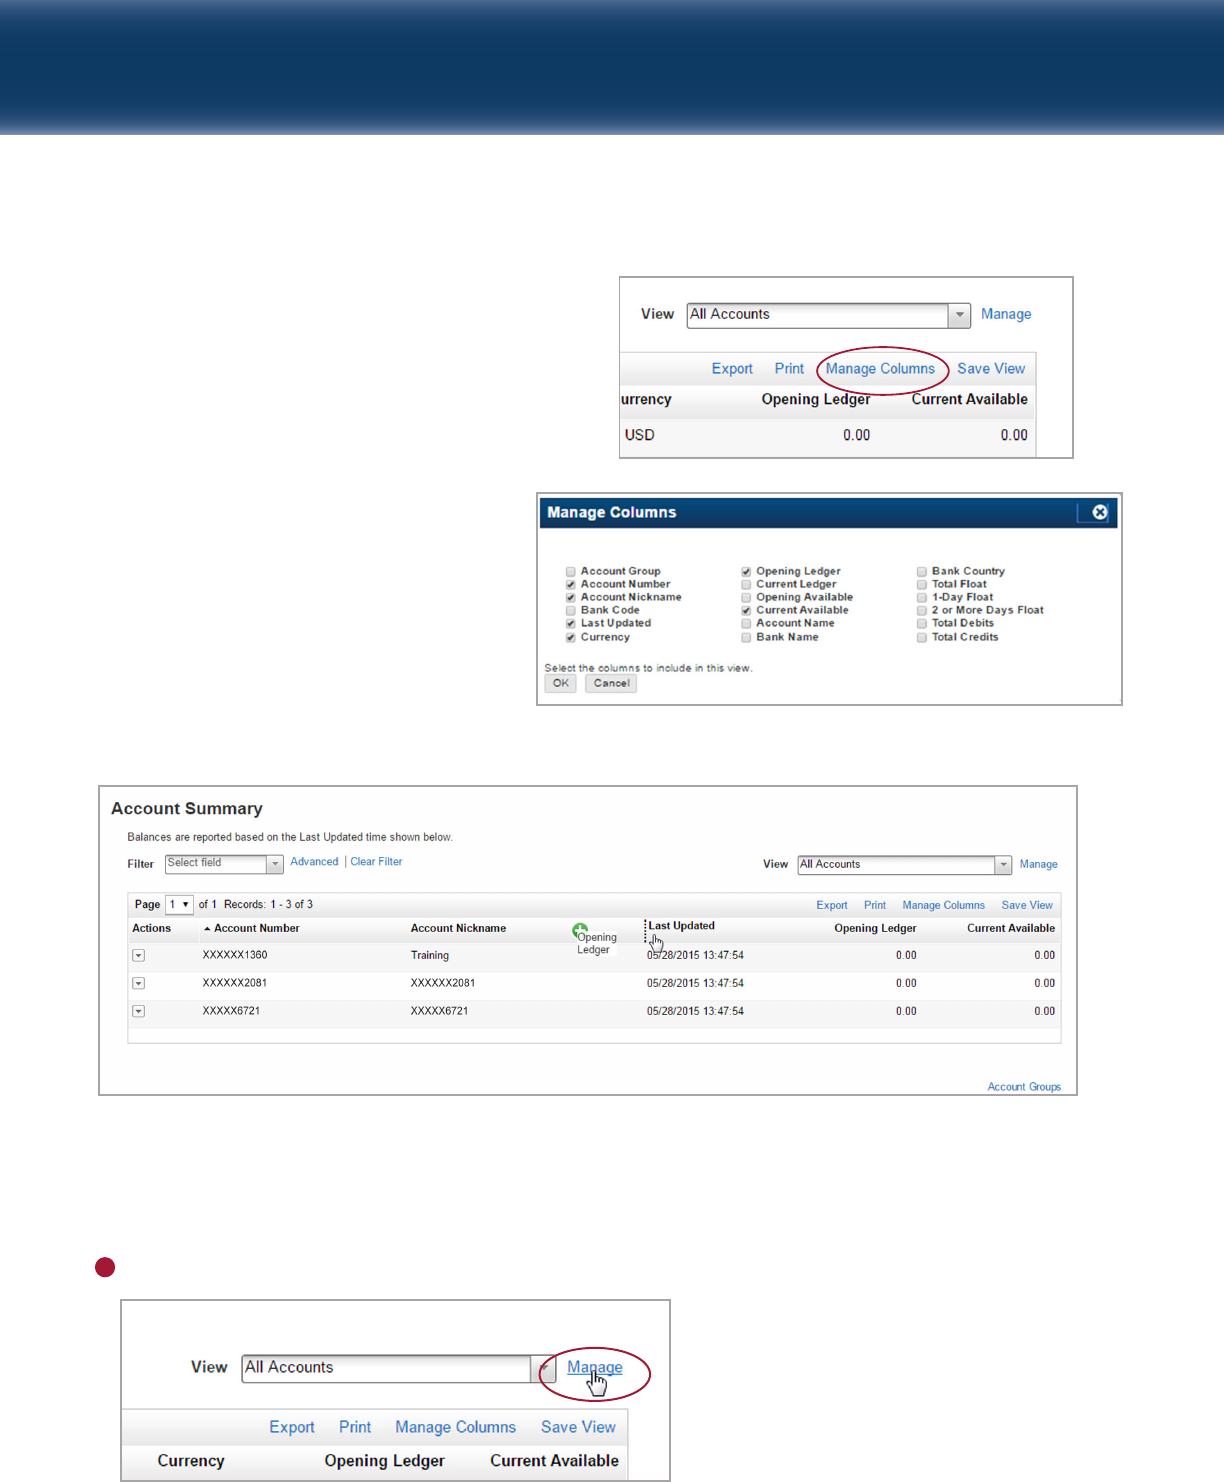
CUSTOMIZING THE ACCOUNT SUMMARY SCREEN
There are various functions available on the Account Summary to customize your view. Functions include:
• Manage Columns to remove or add columns of information
• Drag and drop columns to change the order of information
• A filter to limit the accounts (with associated information) based on set criteria. This function can be
used on the Account Summary screen in order to locate an account or narrow the accounts in the view
• Create Account Groups that can be used in a filter
• Views to quickly select a saved customized view/filter
Capital One Intellix
®
Information Reporting Reference Guide 5
MANAGING COLUMNS
In the upper-right corner of the Account Summary
is a “Manage Columns” link.
By clicking this link, you can select
or deselect columns and click OK.
1
If you would like to change the order of the columns, you can simply drag-and-drop a column to your
desired location.
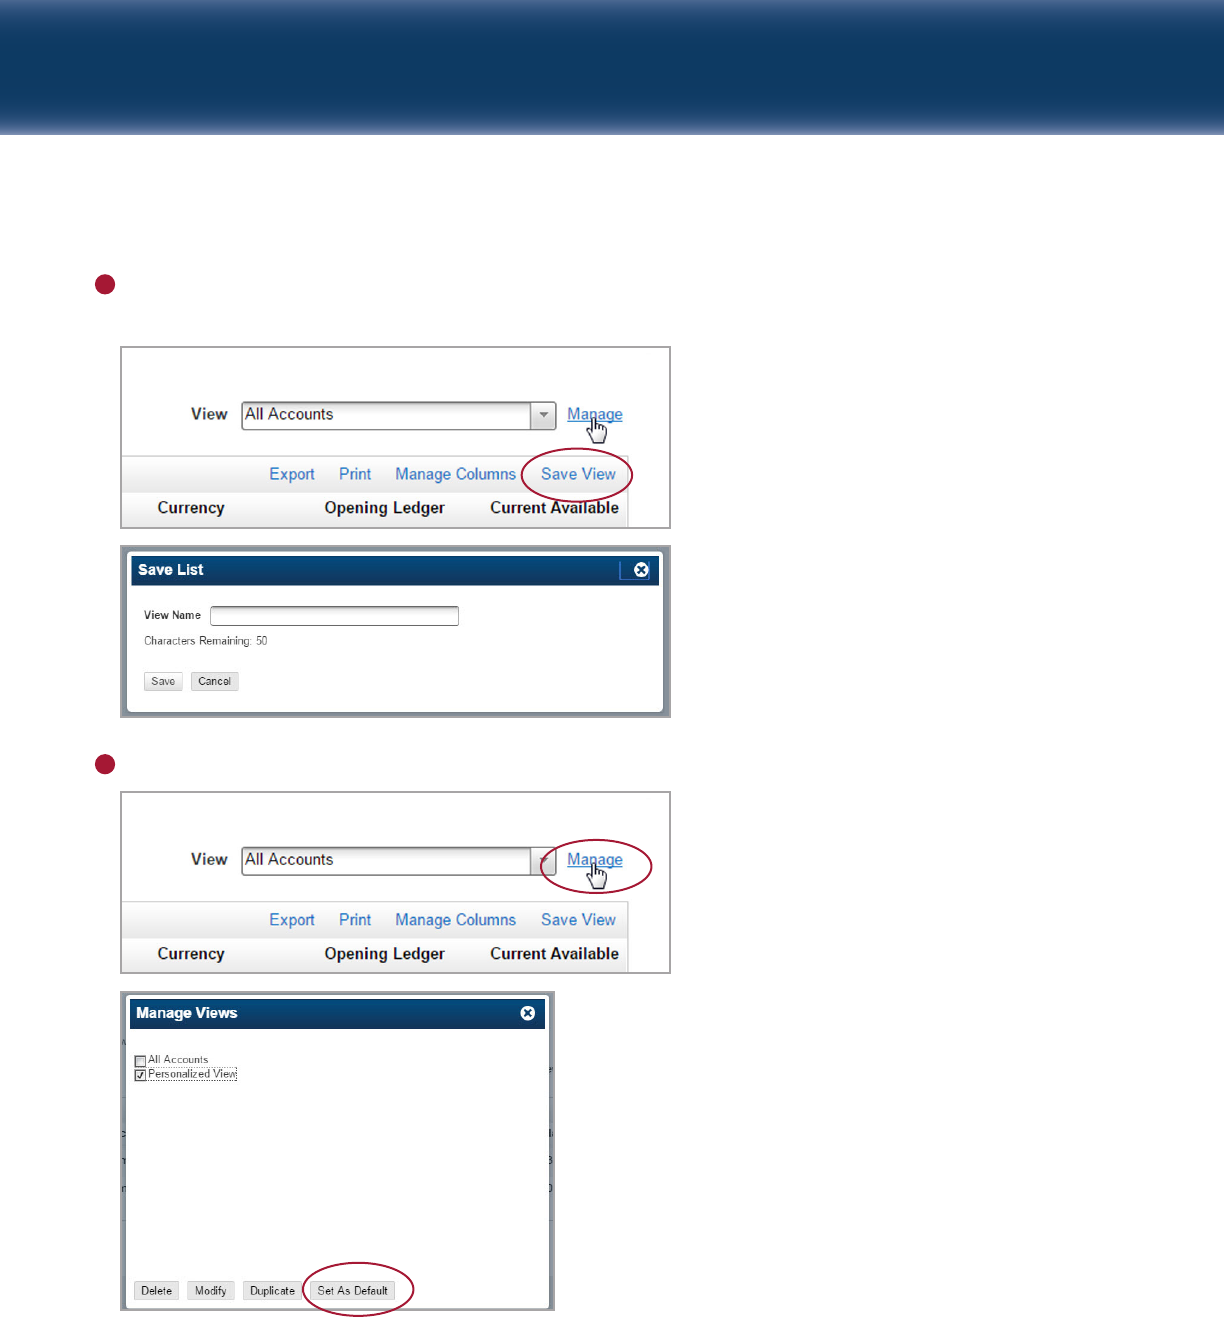
USING VIEWS AND SAVING CUSTOMIZATIONS AS A VIEW
If you customize your Account Summary screen, once you leave the screen and return, the Account
Summary will revert back to the default view. However, you can save your customizations as a new view
and make it your default view if you prefer.
Click Manage next to the View drop-down.
Capital One Intellix
®
Information Reporting Reference Guide 6
To save view changes (e.g. order of columns, removal of columns, applied filters) as a new View, click the
Save View link and provide a name for the View.
To make a View your default view, select the Manage link, select the View, and click Set as Default.
2
3
Capital One Intellix
®
Information Reporting Reference Guide 7
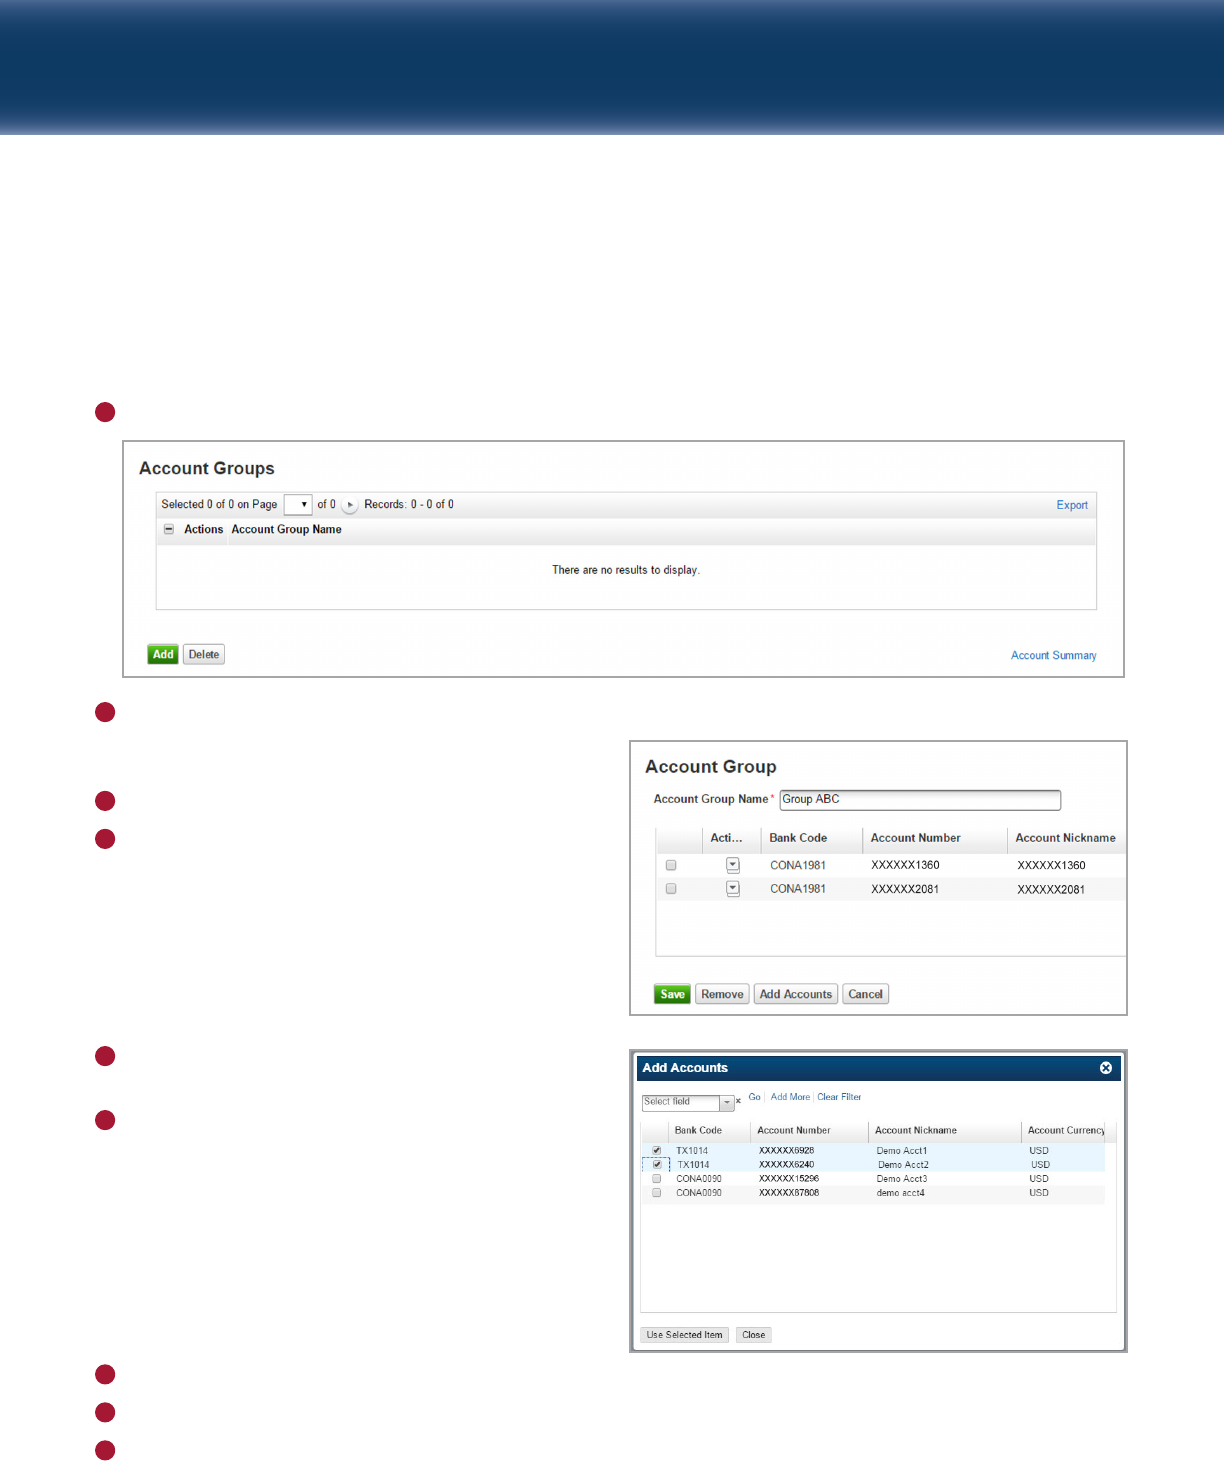
CREATING AN ACCOUNT GROUP
If you have many accounts, you may wish to create Account Groups that can be used in a filter. For
example, if your organization has many real estate properties with multiple accounts for each property,
you can create an account group for each property.
Click the Account Groups link from the Account Summary.
Click the Add button.
Enter an Account Group Name.
Click Add Accounts.
1
2
3
4
Select the accounts that you wish to include
in the group.
Click Use Selected Item. Accounts selected
display for the Group.
5
6
Click Save.
Click Close on the confirmation. The Account Group displays on the Account Groups screen.
Click the Account Summary link to return to the Account Summary screen.
7
8
9
Capital One Intellix
®
Information Reporting Reference Guide 8
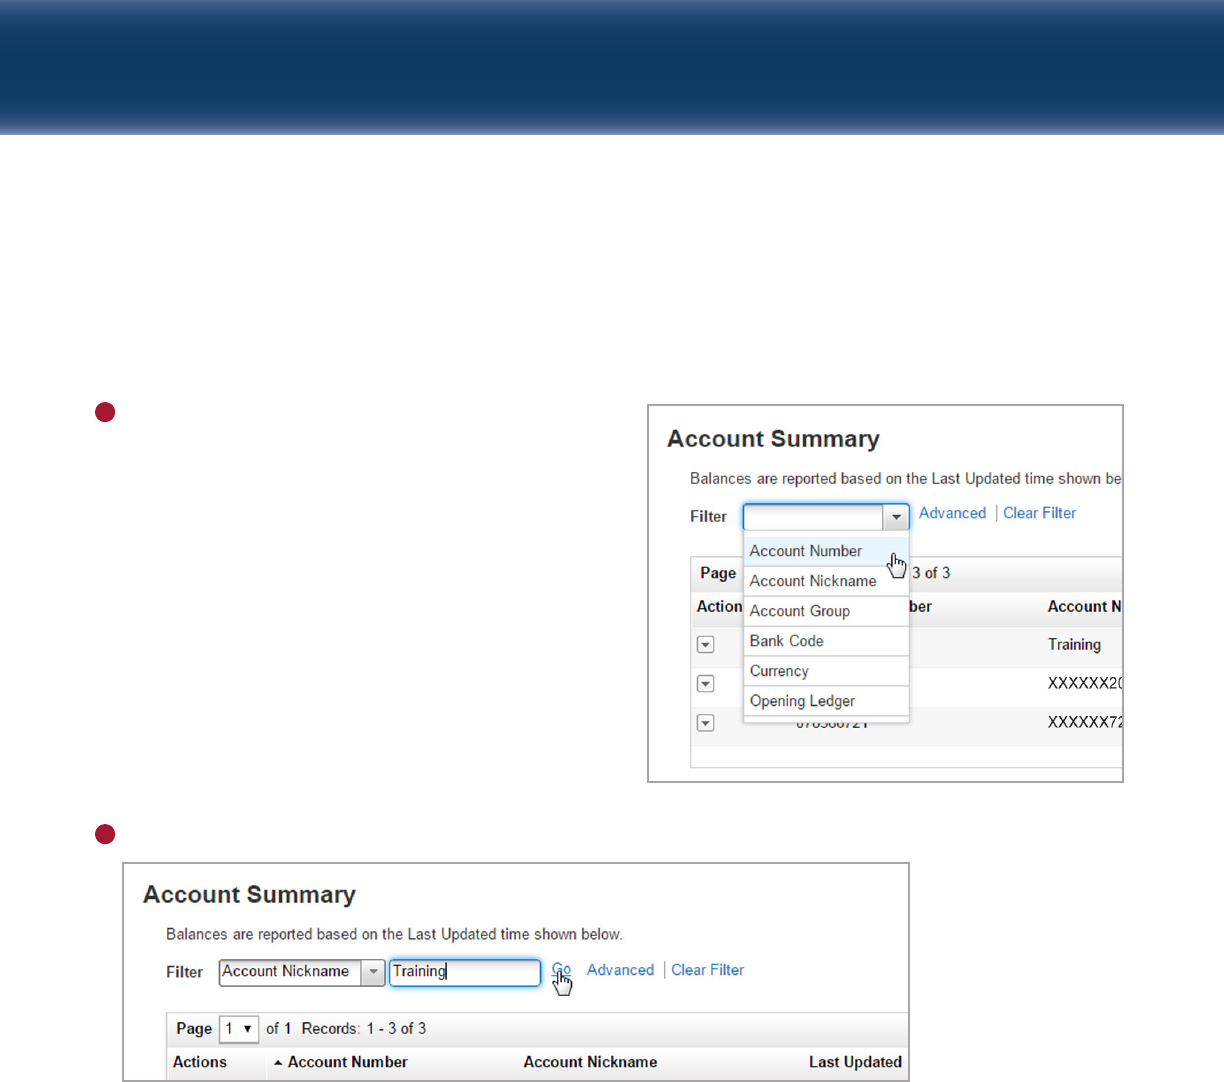
USING THE FILTER ON THE ACCOUNT SUMMARY SCREEN
The “Filter” function is available on almost all Information Reporting screens. This function can be used
on the Account Summary screen in order to locate an account or narrow the accounts (with associated
information) displayed in the view.
Click the Filter drop-down arrow to choose the field
(column) on which to filter.
For example:
• Choose Account Number or Account Nickname to
locate a particular account. This is particularly
helpful for organizations with many accounts.
• Choose Account Group to filter by a saved group.
1
2
Enter or select the criteria for the chosen field and click Go.
The Account Summary will display accounts that fit the selected criteria.
NOTE:
• Click Clear Filter to clear the filtered results.
• If you perform another filter without clearing the filtered results first, it will search within the filtered
results, not all accounts.
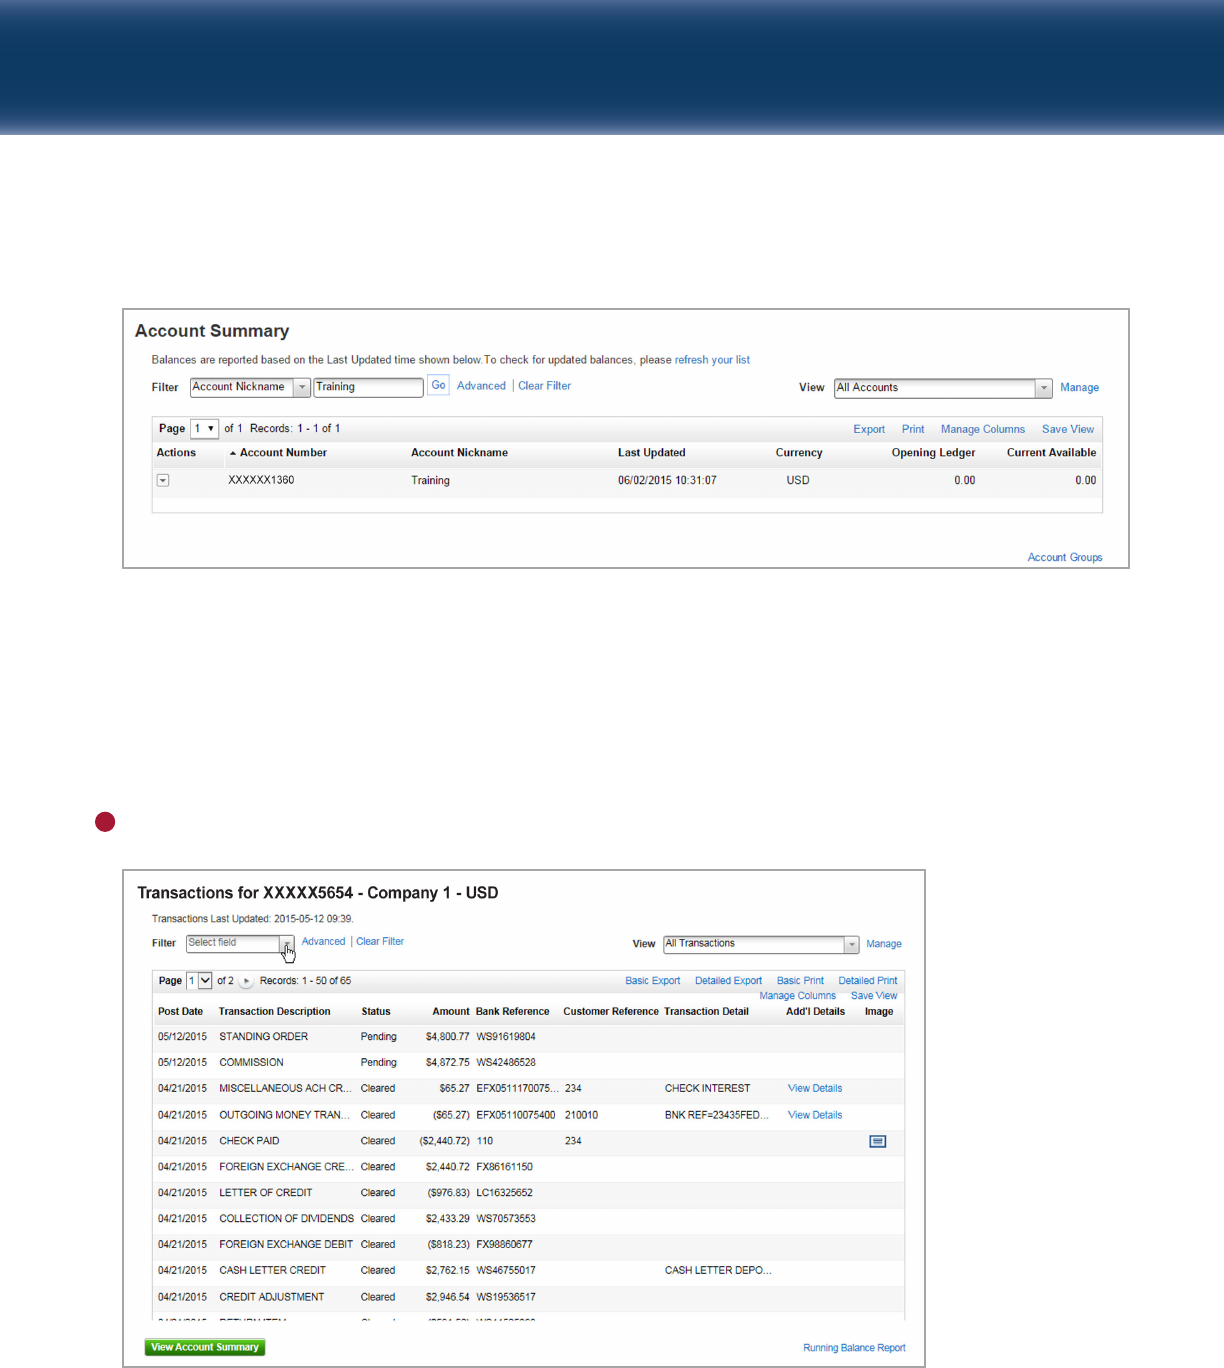
VIEWING TRANSACTION DETAILS
To view transaction details for a specific account, click anywhere on the row showing the Account
Number. The transactions for the account display on the detail screen.
NOTE: Similar to the Account Summary screen, the Transaction Details screen contains a filter to locate
the details you may wish to view. You can also customize this View using the same functions explained in
the Account Summary section. Transaction Details are available for up to three months from the Account
Summary screen. They are available in reports for up to 18 months.
Capital One Intellix
®
Information Reporting Reference Guide 9
1
Capital One Intellix
®
Information Reporting Reference Guide 10
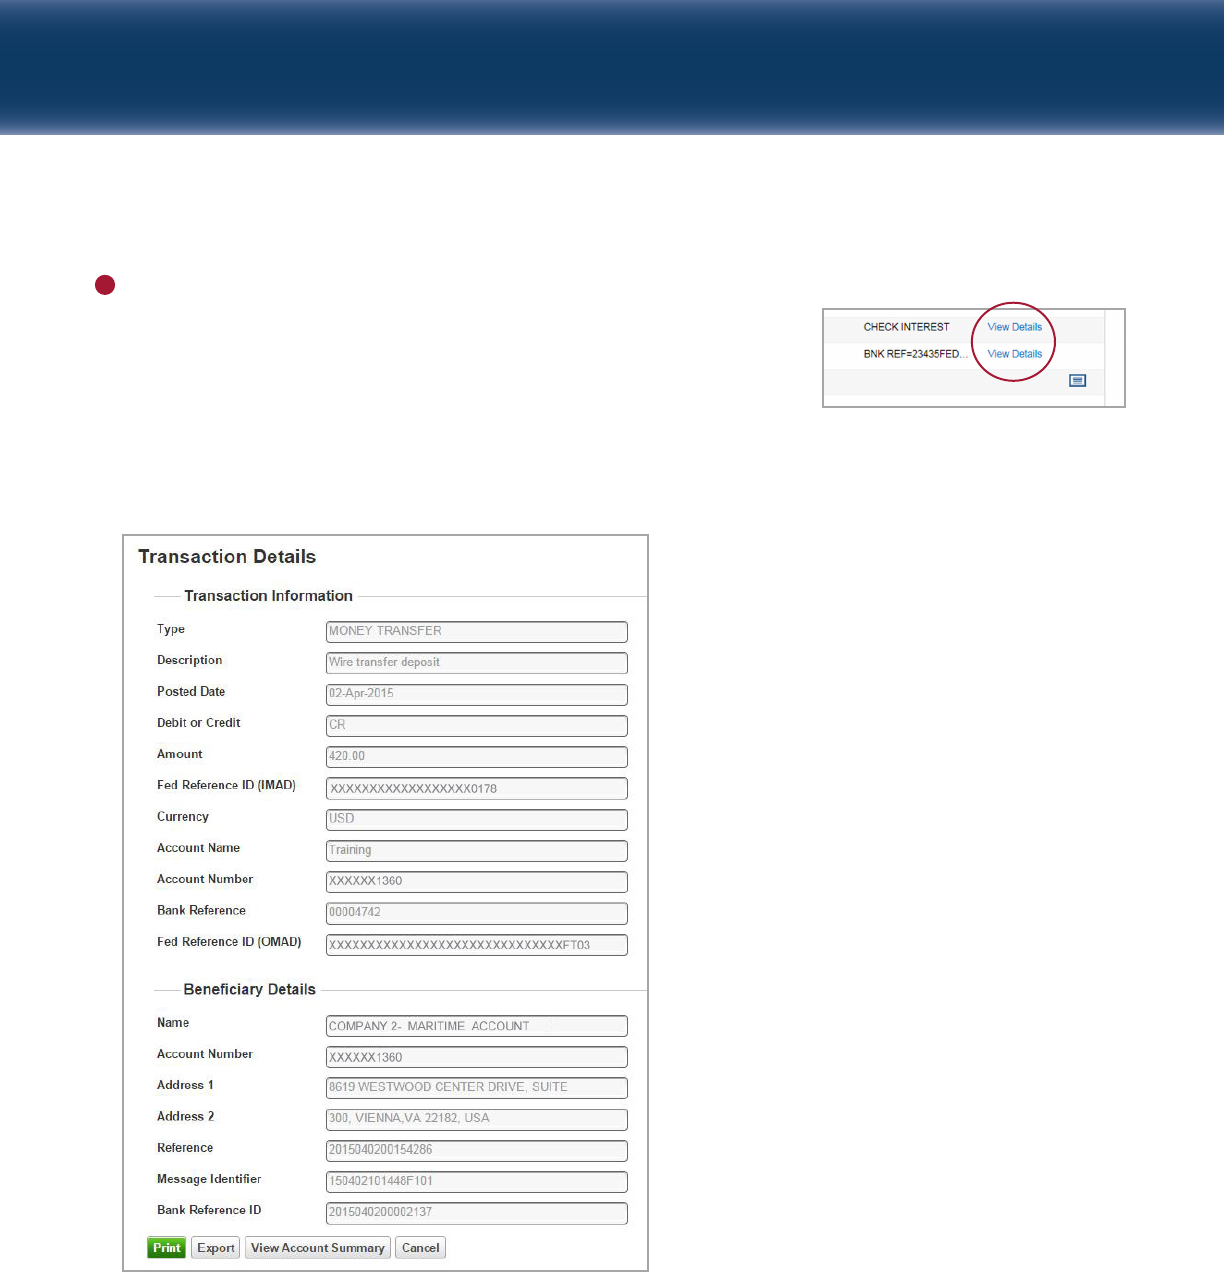
From this screen, you can:
A. View additional advice transaction details for wires or ACH
by clicking the View Details link in the Add’l Details column.
(You may need to scroll to the right to see the Add’l Details
column.)
Transaction Details display (Wire example included here):
• Click the Print or Export button to print or export the details.
• To return to the Transaction Details, click Cancel.
• To return to the Account Summary, click View Account Summary.
2
Capital One Intellix
®
Information Reporting Reference Guide 11
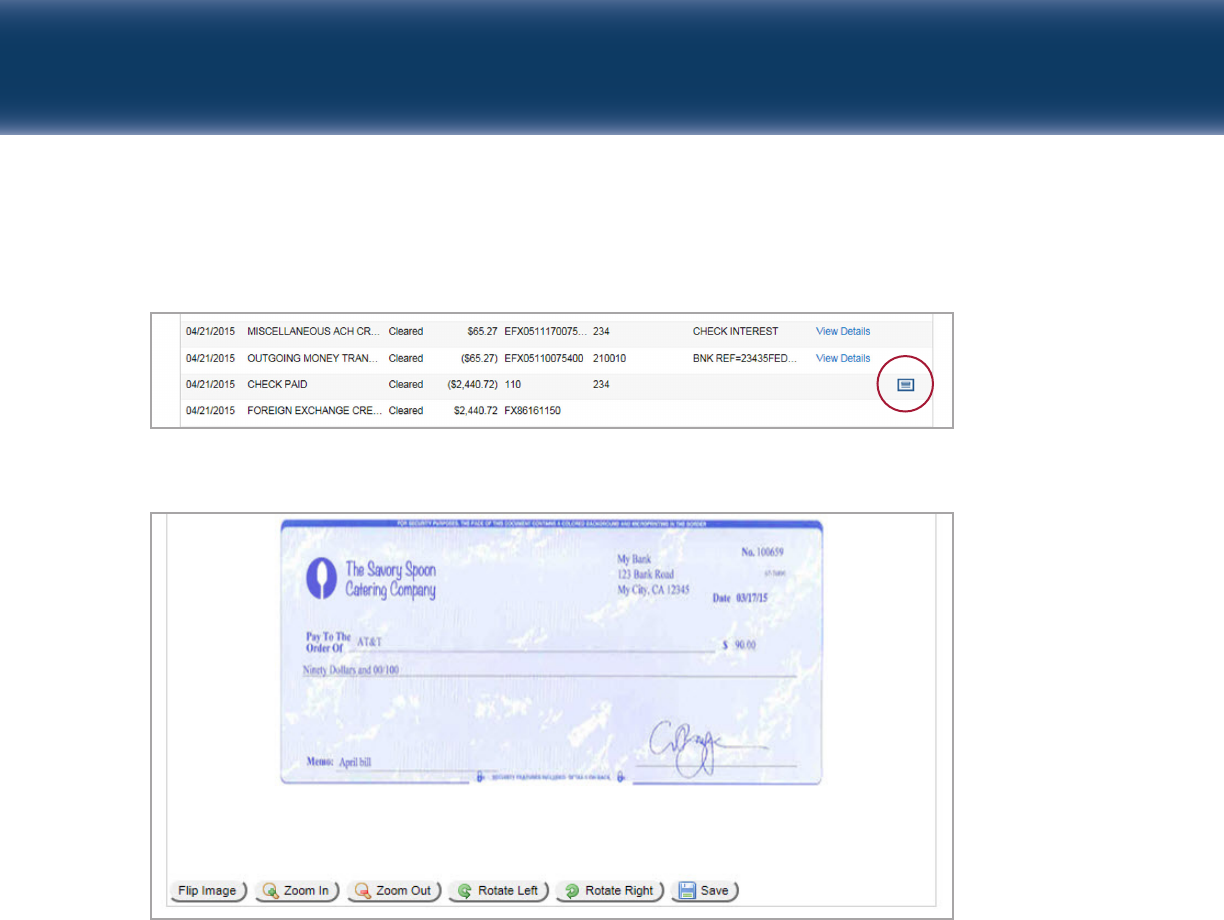
B. View an image of a check or deposit ticket by clicking the icon in the Image column.
C. An image will appear:

Capital One Intellix
®
Information Reporting Reference Guide 12
VIEWING AN ACCOUNT STATEMENT REPORT
From the Account Summary, an Account Statement Report can be opened for a particular account.
Click the Actions menu for the desired account and select Account Statement Report.
1
The Account Statement Report displays.
Capital One Intellix
®
Information Reporting Reference Guide 13
Balance and Transaction Reports
Balance & Transaction Reports
• Available history for Balance & Transaction Reporting (up to 18 months)
REPORT DESCRIPTIONS
Report Description
ACBS Facility Loan Report Displays details for all single or multiple deal facilities for Commercial loans.
Business Loan Detail Report Displays details for business lines of credit including rates, payoff amounts,
amount due, etc.
Business Loan History Report Displays transaction history for business lines of credit including balance,
interest paid, etc.
CD Balance Report Displays information on balance & interest earned for CDs.
Controlled Disbursements Displays funding requirements & details for Controlled Disbursements
Detail Report accounts.
Inclearing Report Displays a report of all check transactions drawn on the account for a specific
time period.
Lockbox Detail Report Displays detailed information about deposits made via Lockbox.
Pending NSF Items Report Displays an early window of all Not Sufficient Funds (NSF) items processed
the evening before that will be evaluated by a Capital One Relationship
Manager for payment. You may cover these items with a balance transfer
to assist your Relationship Manager’s NSF review and decisioning.
Sweep Report Displays rate & earning details for accounts that utilize Sweep investment
services.
Capital One Intellix
®
Information Reporting Reference Guide 14
Current Day Reports Description
Cash Position Report Displays opening account balances for the current day.
Current Day Displays opening ledger and available balances for each account.
Availability Report
Current Day Transaction Displays all available detail about transactions for the current day.
Detail Report
Current Day Transaction Displays a one-line summary of all current-day transactions. Clicking on a
Summary Report transaction displays the details of the transaction.
Prior Day Reports Description
Account Statement Report Displays daily cash balances with debit and credit details for a specific
period of time.
Prior Day Balance – Displays all posted balance information from prior day. The report is designed
Export Format Report for use with the client applications or spreadsheets. Data is presented in
simple columnar, comma-separated format suitable for exporting, without
formatting, page headers/footers, group, or report totals.
Daily Balance History Report Displays the historical balances for the requested accounts.
Prior Day Transaction Displays all available detail about the transactions for the requested date
Detail Report range.
Prior Day Transaction Displays a one-line summary of all prior-day transactions. Clicking on a
Summary Report transaction displays the details of the transaction.
Prior Day Transaction – Displays the transactions, closing, and float balances for one or more
Export Format Report accounts. The report is designed for use with third-party applications or
spreadsheets. Data is presented in simple columnar, comma-separated
format suitable for exporting, without formatting, page headers/footers,
group, or report totals.
Running Balance Report Displays transactions by account, including transaction and balance totals for
the account.
Capital One Intellix
®
Information Reporting Reference Guide 15
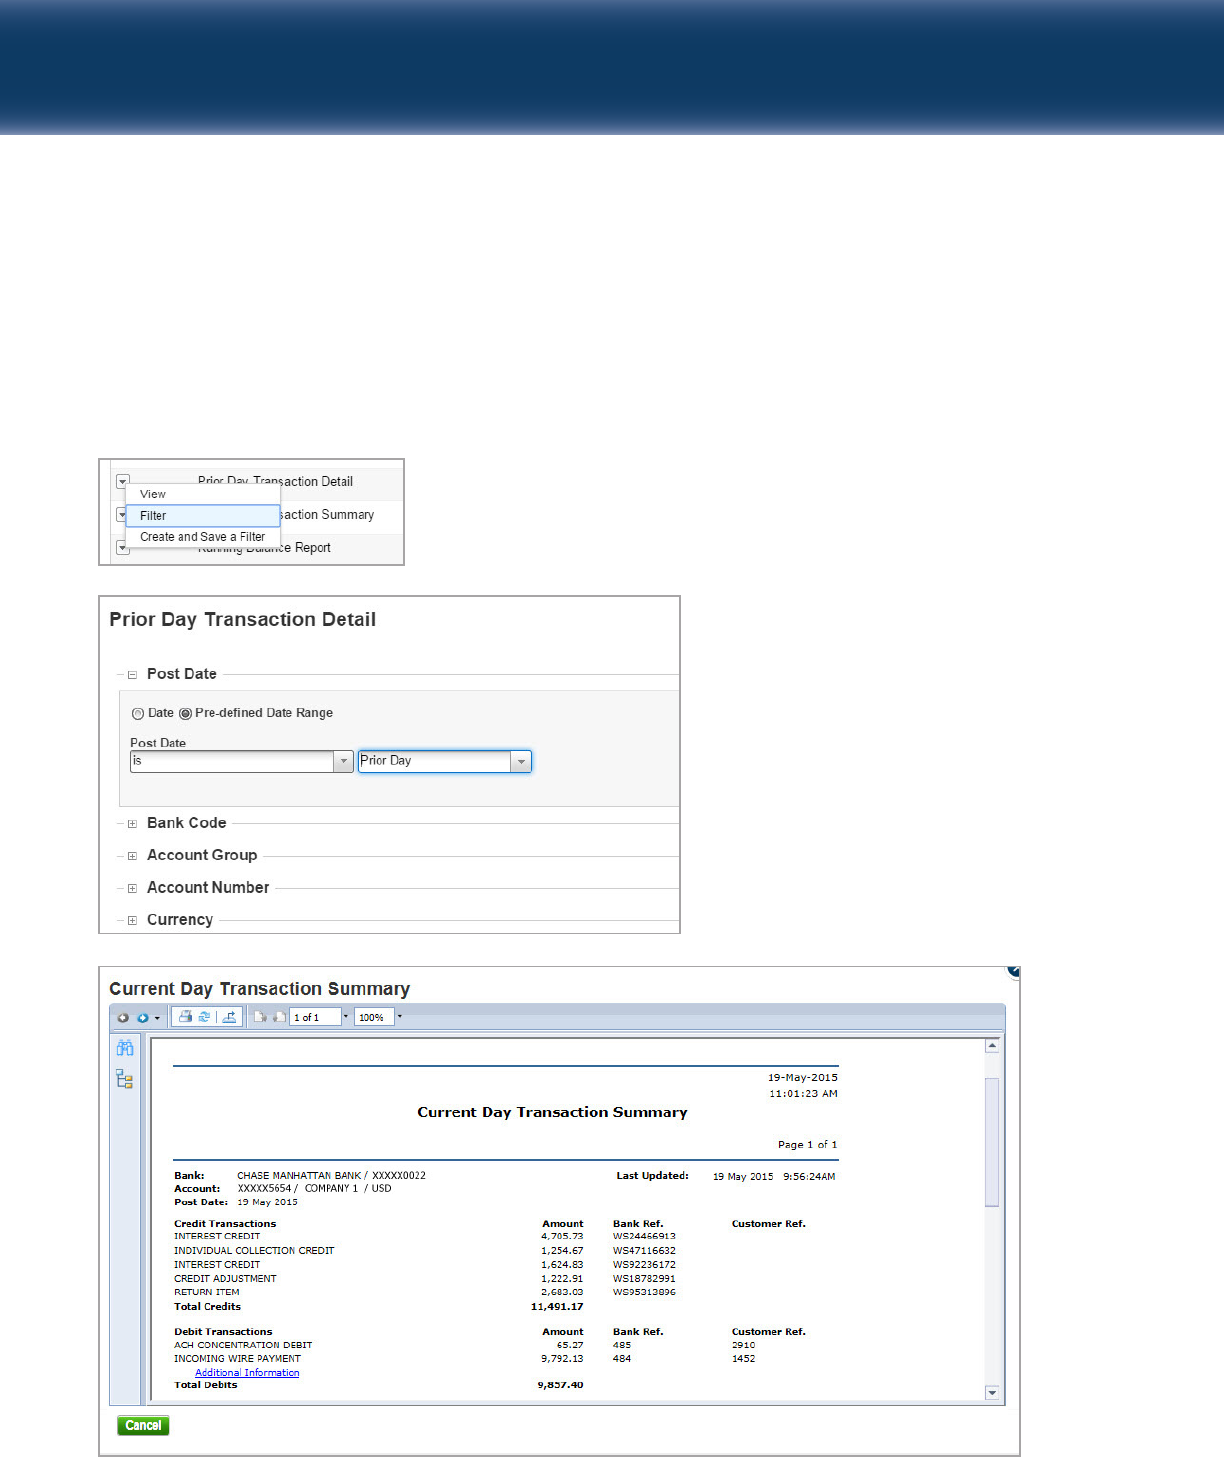
REPORT FILTERS
When running Information Reporting reports, there are filter options to narrow the information that displays
in the report. One of the options for Current Day Transaction Detail report is a ‘Since Last’ filter option.
This can be used in a current day reporting scenario to see new transactions since the last time you ran the
report. In order to use the ‘Since Last’ option, you need to create & save a filter with the ‘Since Last’ option
selected when you run the report from the report list.
Capital One Intellix
®
Information Reporting Reference Guide 16
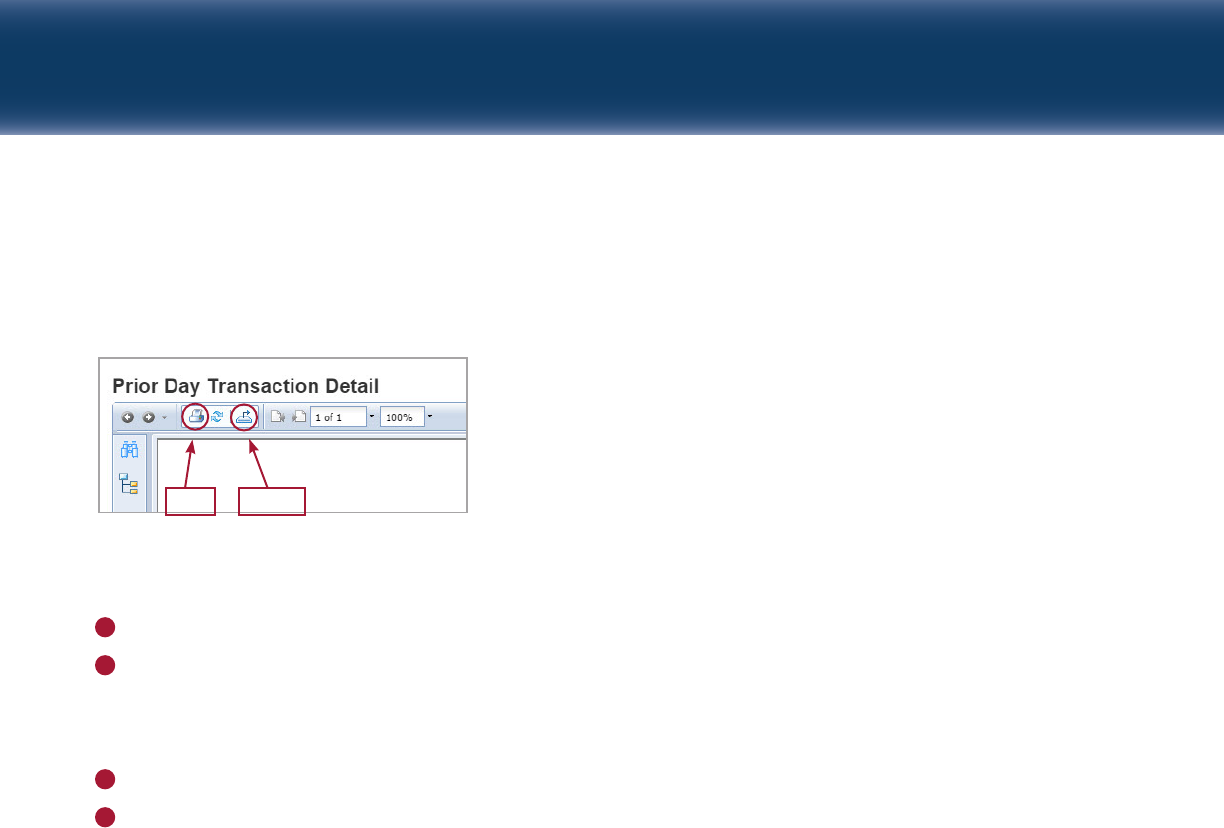
PRINTING OR EXPORTING A REPORT
At the top of the report are controls to print or export the report.
To print the report:
Click the printer icon at the top of the report.
Follow the printing instructions specific to the browser being used.
To export the report:
Click the export icon at the top of the report.
Follow the exporting instructions specific to the browser being used.
Print Export
1
2
1
2
Capital One Intellix
®
Information Reporting Reference Guide 17
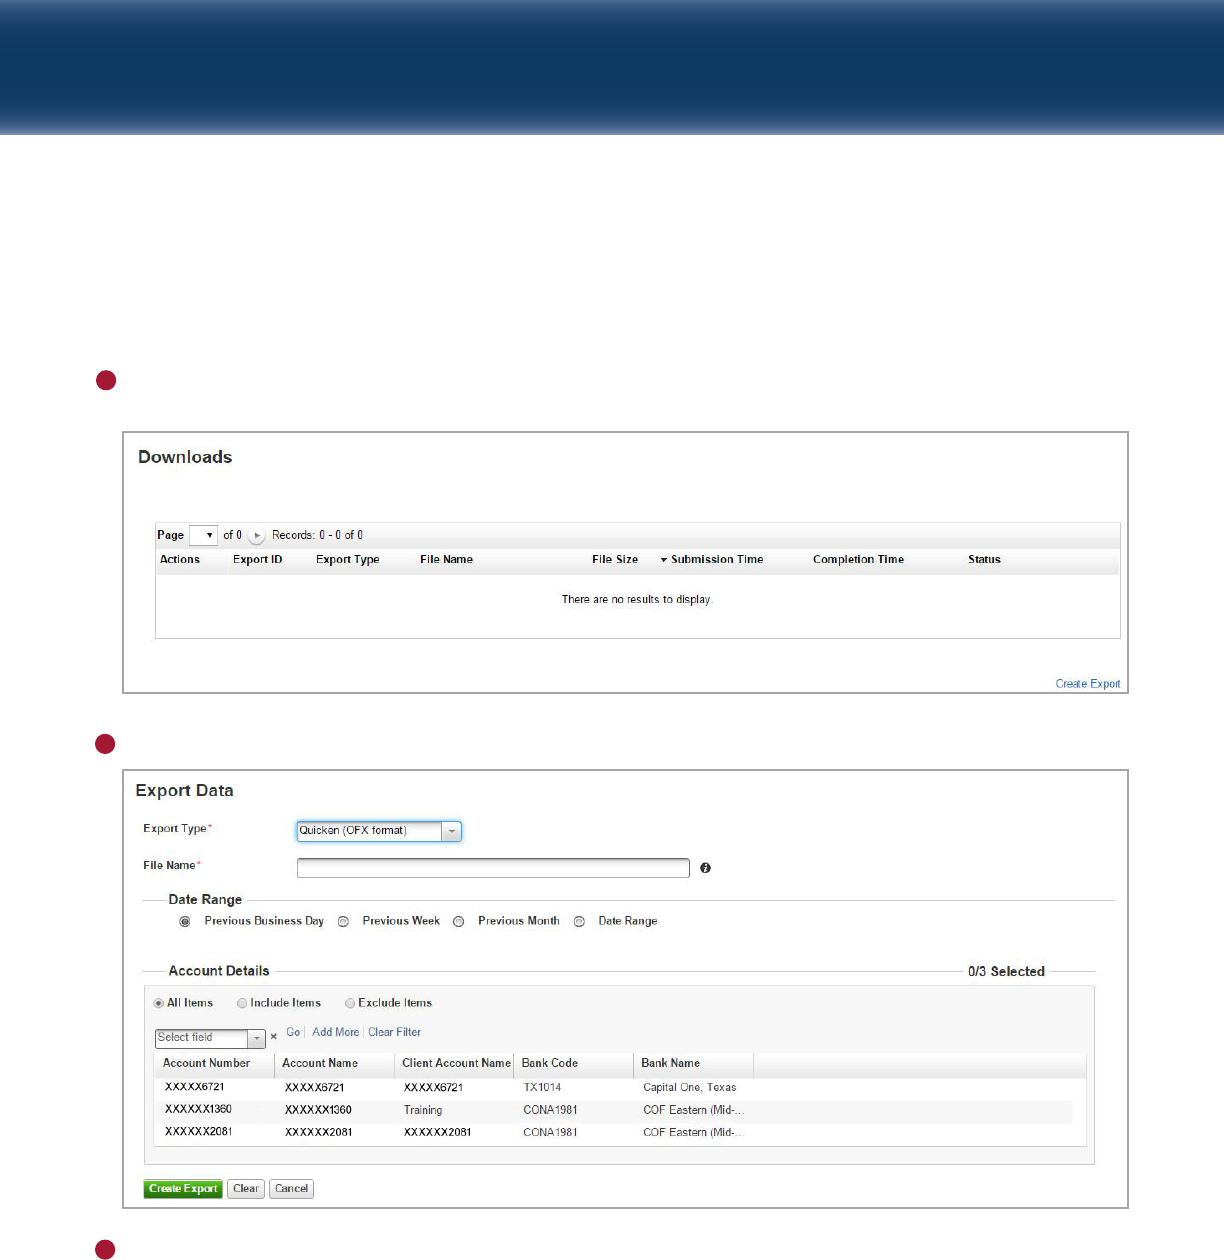
EXPORTING BALANCE AND TRANSACTION DETAIL
The Export feature allows you to download specific bank account data in BAI, Quicken and QuickBooks
format.
Select Export Information from the
Services g
Information Reporting menu. The Export Information screen
shows existing export requests and their status.
Click the Create Export link.
Complete the Export Data form:
• Export Type: Select which format you would like to export the data to
• File Name: Enter the name you wish to use for the file
• Date Range: Select the date range from the options available
• Account Details: Specify the details you wish to download
1
2
3
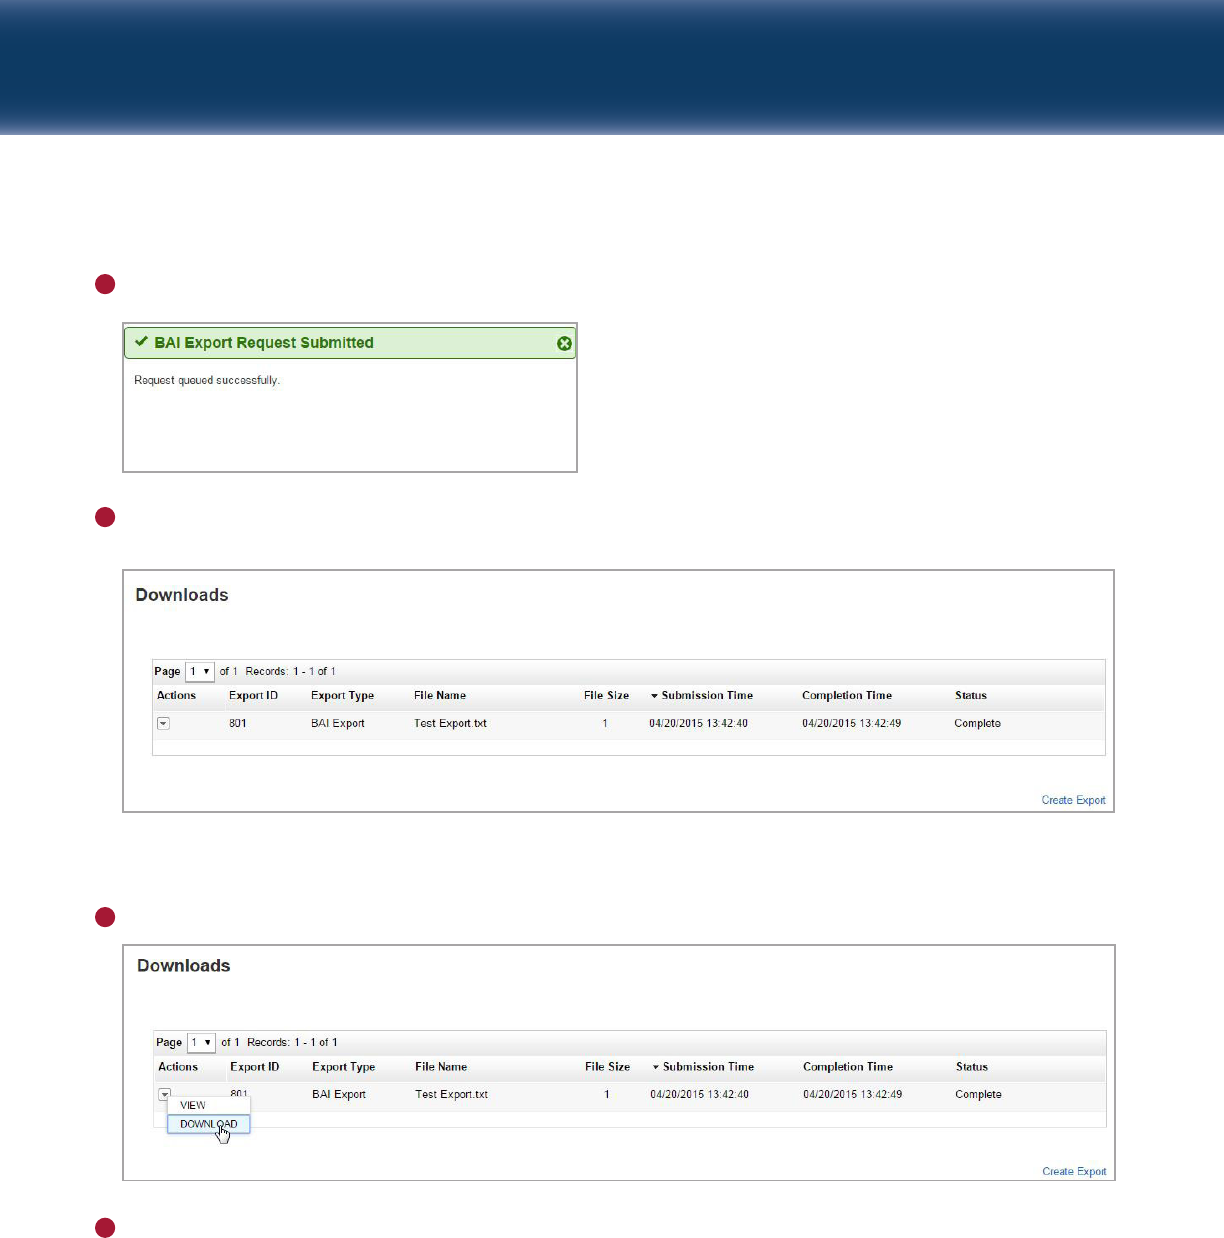
Click Create Export. A confirmation message displays.
Click Close. The export request will display on the Export Information screen with Status of the export
request.
NOTE: The status will change to Complete once the export has finished.
When the export is complete, click Download from the Actions menu for the Export item.
You can then save the file to your local drive or network.
Capital One Intellix
®
Information Reporting Reference Guide 18
4
5
6
7
Capital One Intellix
®
Information Reporting Reference Guide 19
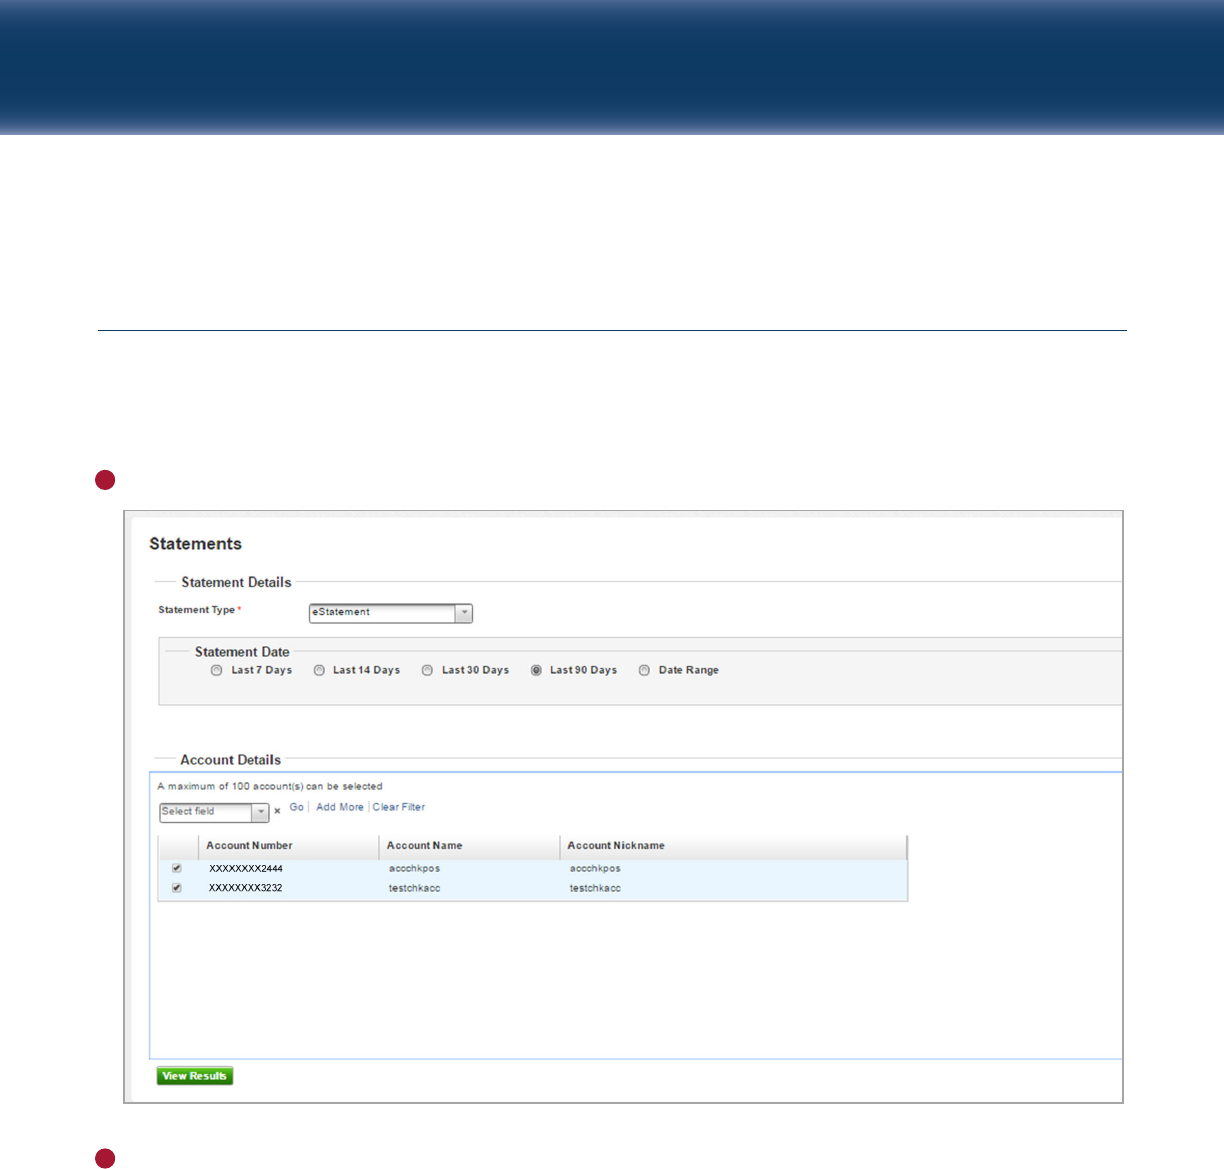
Exporting and Downloading Statements
The Statements function allows you to search for and export statements issued by the Bank – such as
eStatements (i.e. bank account statements) and Account Analysis statements. Statements will export in
PDF format and will be available for download in a Zip file.
Select Statements from the
Services g
Information Reporting menu. The Statements screen displays.
Complete the search details:
• Statement Type: Options include eStatement and Account Analysis statement.
• Date Range: The date range of the statement – limited to a one-year time period at a time.
• Account Details: Select one or more accounts to be included.
1
2

Capital One Intellix
®
Information Reporting Reference Guide 20
Click View Results. Statements will display that match the search criteria.
Select the Statements you wish to download.
Click Download. A message will appear informing you that your request is being processed. A Zip file with
the statements will be available from the Export Information screen.
Select Export Information from the
Services g
Information Reporting menu. The Export Information screen
shows existing export requests and their status.
3
4
5
6
7
8
For the exported item that contains your statements, click Download from the Actions drop-down menu.
Follow the prompts to save the file.
Capital One Intellix
®
Information Reporting Reference Guide 21
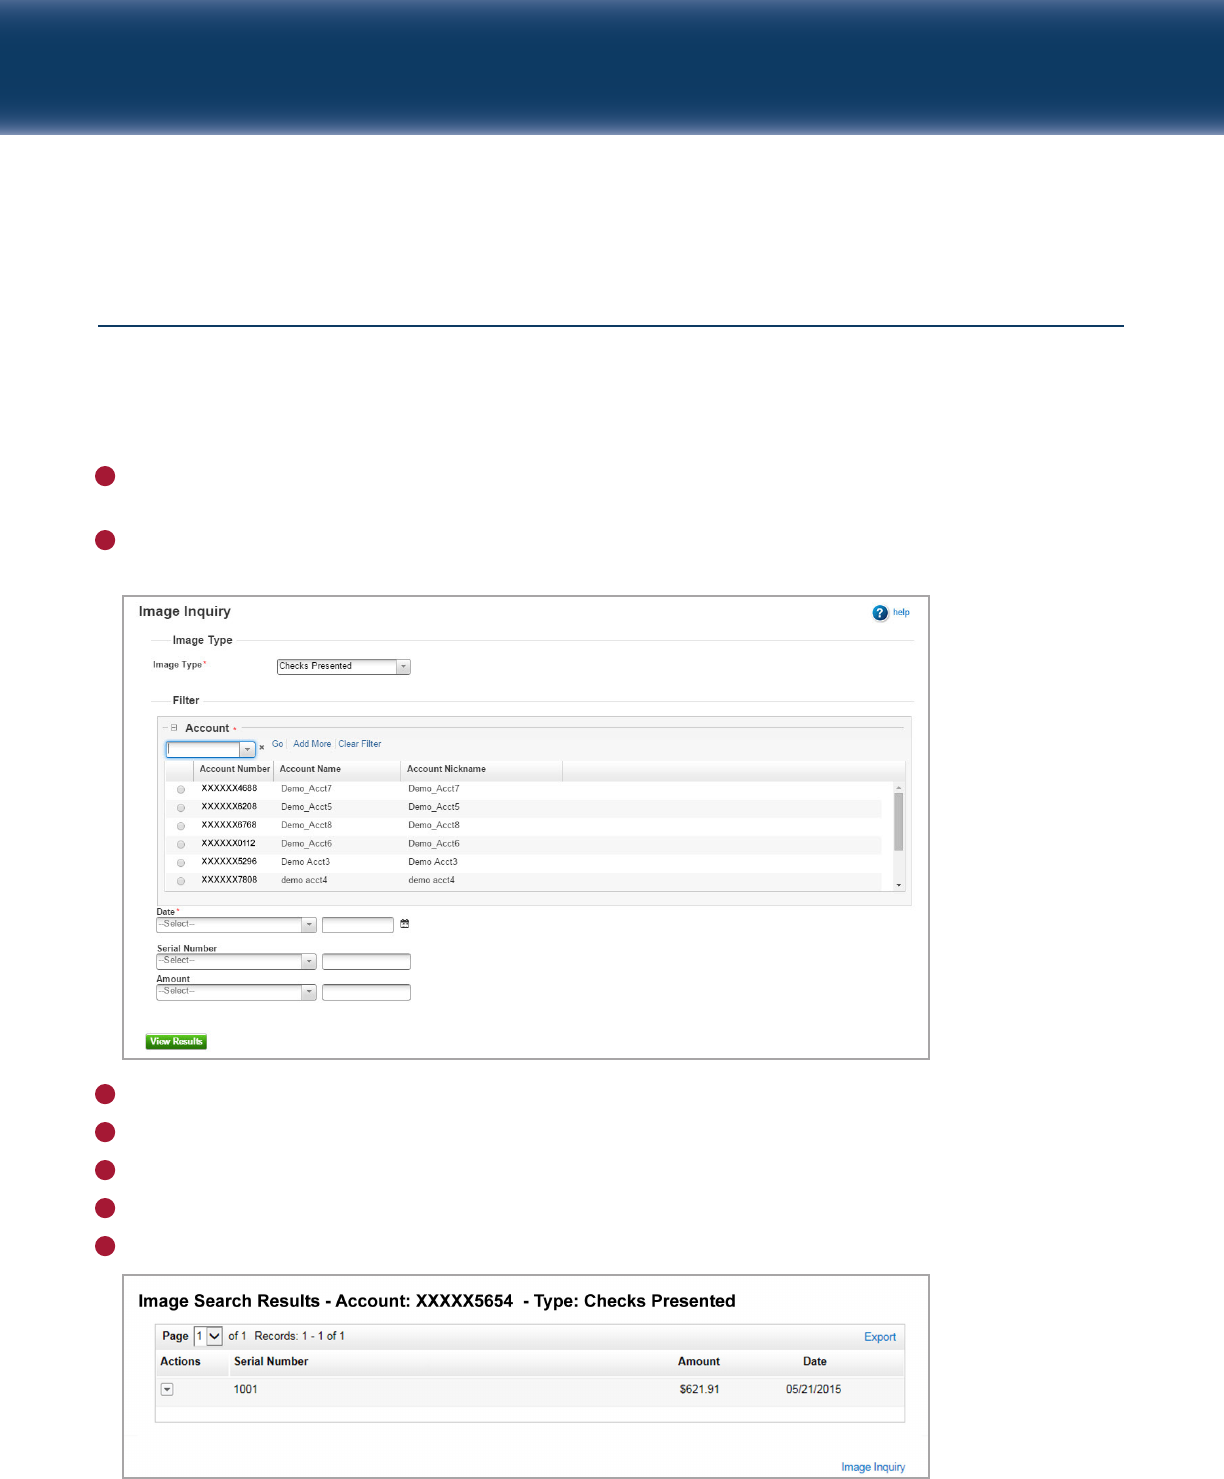
Searching for a Check or Deposit Ticket Item Image
The Image Inquiry feature allows you to search for the image of a check or deposit ticket/item. For deposit
tickets, you will first get the list of the Deposit Tickets. You can then see the image of the ticket or view the
list of checks (with associated images) that make up that deposit.
Select Image Inquiry from the
Services g
Information Reporting menu. The Image Inquiry filter screen
appears.
Select Checks Presented or Deposit Ticket/Items from the Image Type drop-down. Additional fields appear
to help you narrow down your search.
Select the Account you wish to search.
Select the Data Range to search.
If you are searching for a check, you can enter a Serial Number or Amount.
Click View Results. Results display based on the specified critieria.
To view an image from the results, click the item.
1
2
3
4
5
6
7
Capital One Intellix
®
Information Reporting Reference Guide 22
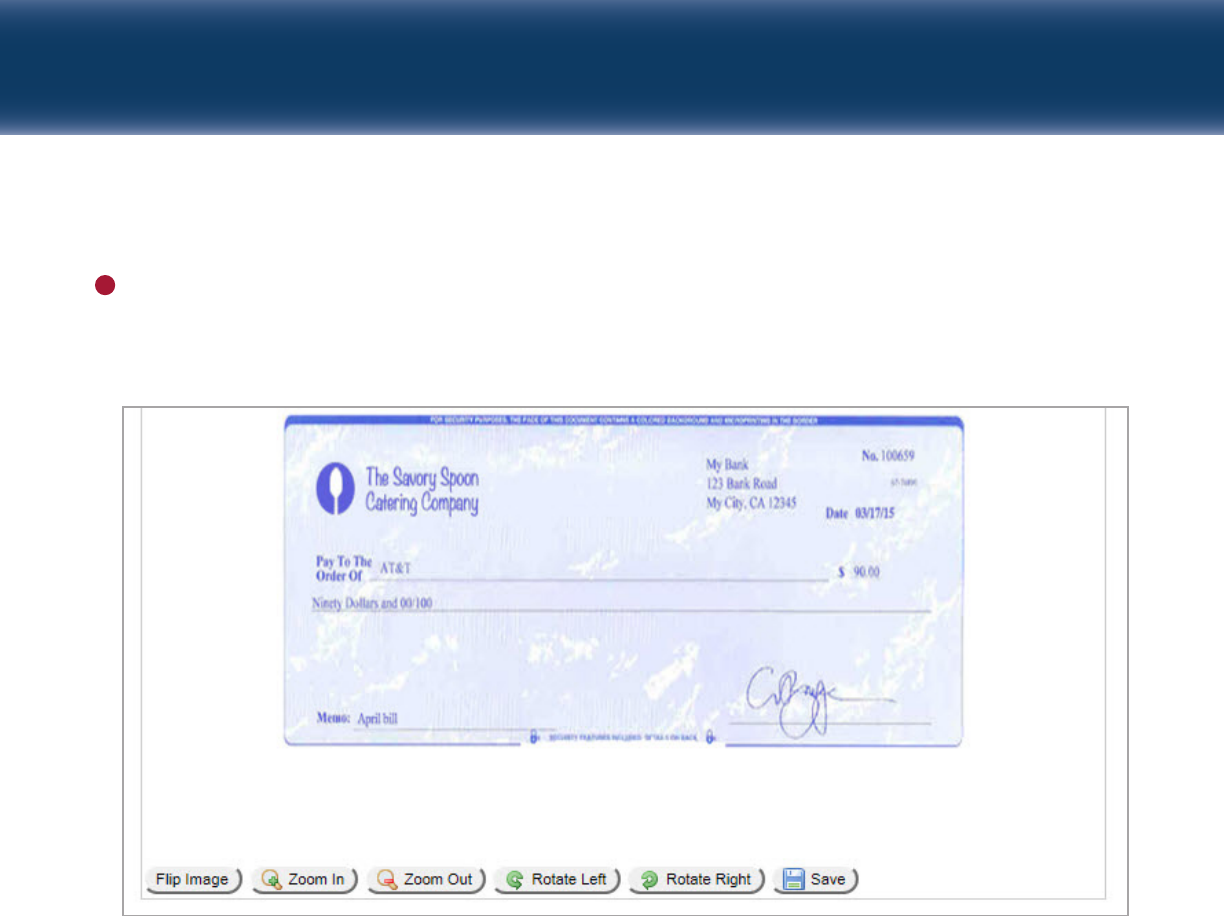
For Deposit Tickets, you can click the row and items that make up the deposit will display. You can then
click an item to view an image.
While viewing an image, you can flip the image to view other side, zoom in and out, rotate, save, or print
the image.
8
Capital One Intellix
®
Information Reporting Reference Guide 23
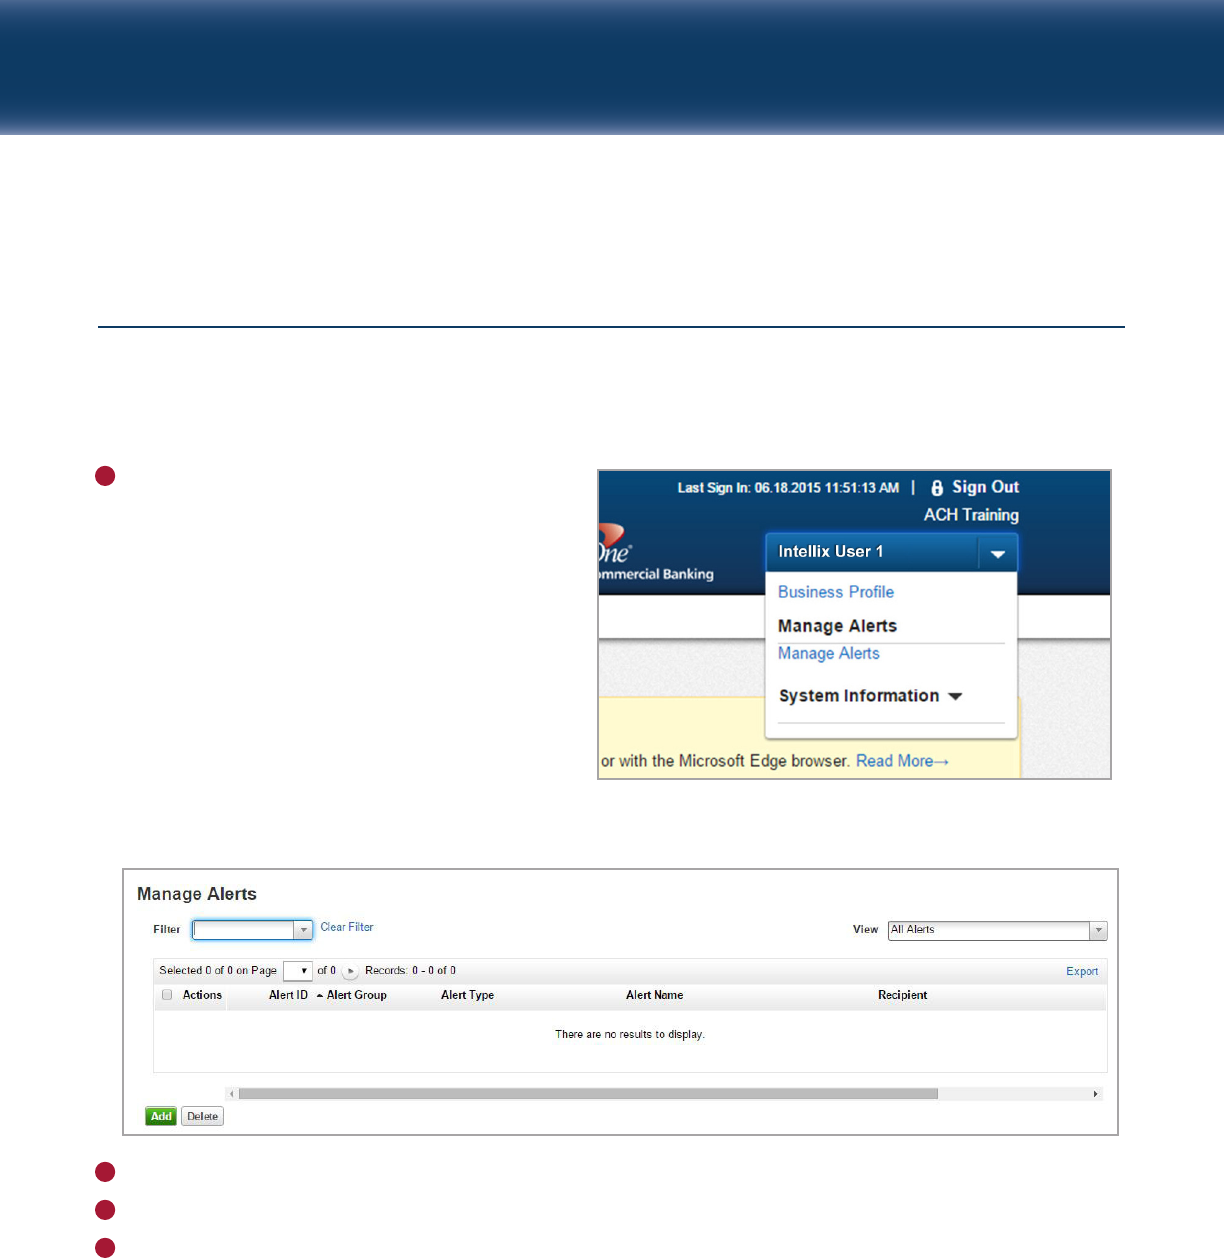
Creating an Alert
An Information Reporting alert generates an automatic email message when certain events or conditions
occur. For example, an Incoming Wire alert can be generated when a Wire transaction meeting certain
preset criteria is received by your organization.
Select Manage Alerts from the Profile drop-down
in the upper-right corner.
The Manage Alerts list screen displays.
Click Add. The Alert Settings detail screen displays.
In the Alert Group field, select Information Reporting.
For the Alert Type field, select the appropriate alert type:
• Closing Available Balance: Notifies the recipient when the closing available balance reaches a certain
amount.
• Closing Ledger Balance: Notifies the recipient when the closing ledger balance reaches a certain
amount.
• Transaction Notification: Notifies the recipient that a transaction meeting certain criteria has been
received by your company.
• Bank Report(s) Available: Notifies the recipient when a Bank Report is received.
1
2
3
4
Capital One Intellix
®
Information Reporting Reference Guide 24
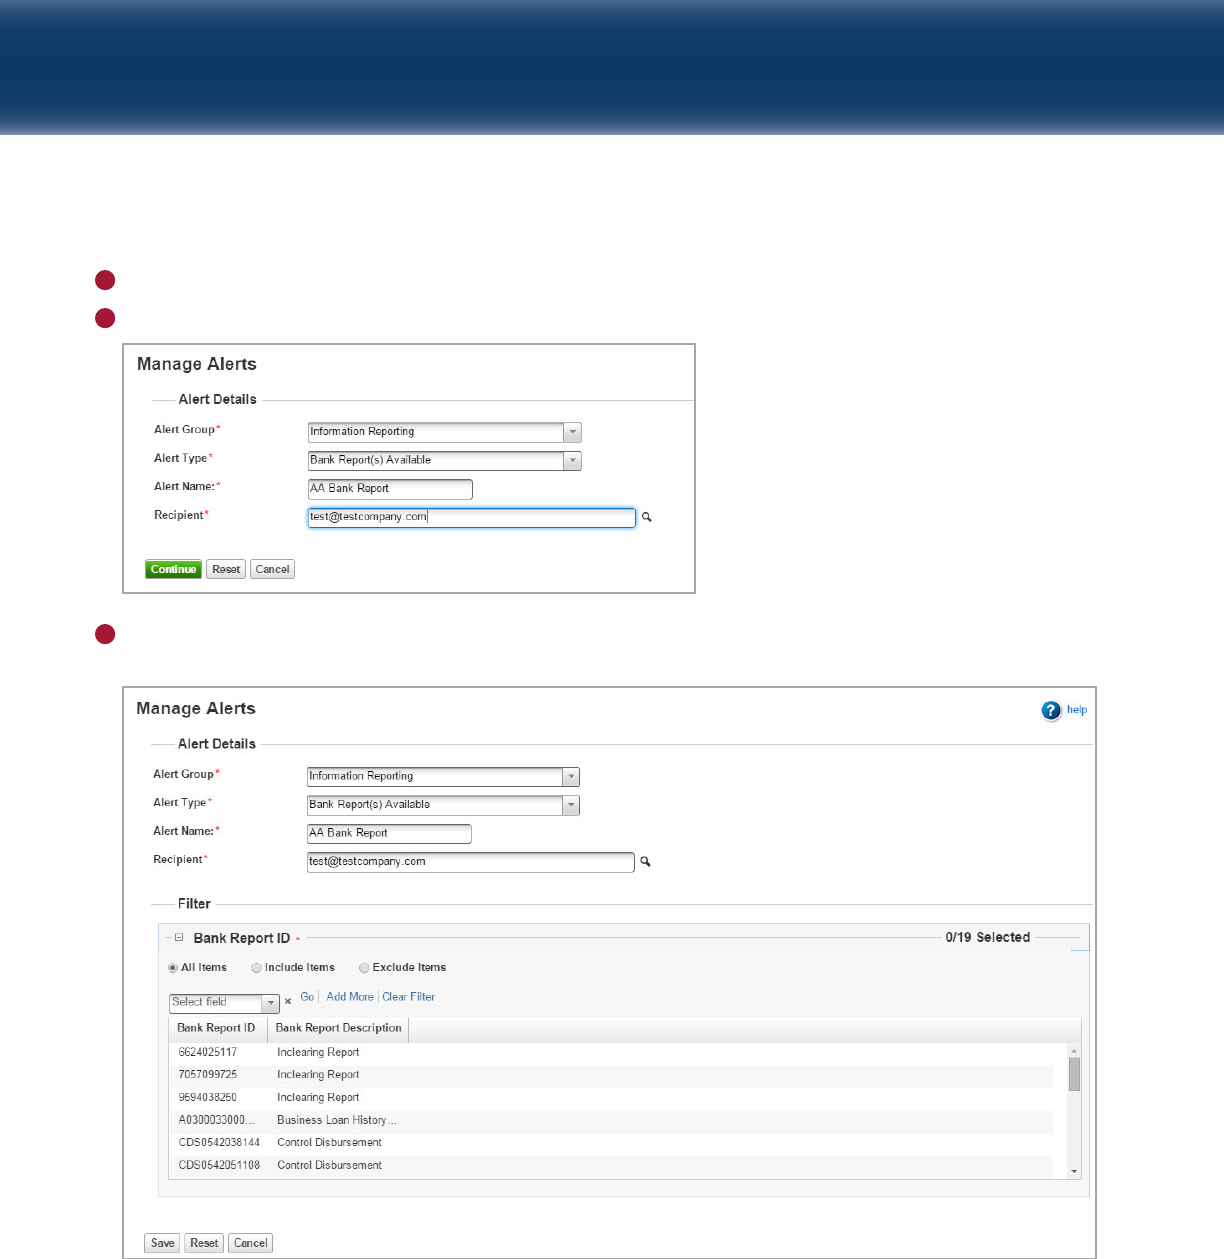
Enter an Alert Name.
Enter an email address in the Recipient field.
Click Continue. A Filter section displays, which is used to specify the criteria which must be met in order
for the alert to be sent.
5
6
7

Capital One Intellix
®
Information Reporting Reference Guide 25
Within the Account Number section, “All Items” is set by default. If needed, change this setting to
include or exclude accounts – and select the accounts to include or exclude.
Enter an Amount that will trigger the alert.
Optionally, you can choose whether the transaction is a debit or credit and you can enter a customer
reference.
Choose a specific Transaction Type that will trigger the alert.
Click Save. A confirmation displays.
You can click Add New Record to add another alert, or click Close to close the message and return to the
Alert Settings screen.
8
9
10
11
12
13

5.31.17
