1 | P a g e
nextiva.com/support
Windows® Desktop User Guide

1 | Page
© Nextiva, All Rights Reserved
Contents
About Nextiva App for Desktop .............................................................................................................................. 3
Getting Started ........................................................................................................................................................ 3
Installation ........................................................................................................................................................ 3
Sign In ............................................................................................................................................................ 3
Main Window .................................................................................................................................................. 4
Communications Window .............................................................................................................................. 5
Start Chat ......................................................................................................................................................... 6
Make Audio or Video Call ................................................................................................................................ 6
Active Communications .................................................................................................................................. 7
My Room .......................................................................................................................................................... 7
Select Audio Devices ........................................................................................................................................ 8
Contacts ................................................................................................................................................................... 9
Add ............................................................................................................................................................ 9
Edit .......................................................................................................................................................... 10
Filters .......................................................................................................................................................... 10
Presence ................................................................................................................................................................. 11
Chat .................................................................................................................................................................... 12
Chat View ....................................................................................................................................................... 12
File Transfer.................................................................................................................................................... 12
Group Chat ..................................................................................................................................................... 13
Audio and Video Calls ............................................................................................................................................ 14
Call from Your Computer .............................................................................................................................. 14
Call from Phone ............................................................................................................................................. 14
Answer Call..................................................................................................................................................... 15
Contact Name Lookup for Incoming Calls .................................................................................................... 15
Missed Call or Communication ..................................................................................................................... 15
Full Screen in Video Call Mode ..................................................................................................................... 15
Multiparty Sessions ....................................................................................................................................... 16
Call Waiting .................................................................................................................................................... 16
Call Transfer ................................................................................................................................................... 16
Message Waiting Indication and Voice Mail ................................................................................................ 16
Call Pull .......................................................................................................................................................... 17
Conference Moderator Controls .................................................................................................................. 17
Headset Support ............................................................................................................................................ 17
My Room ................................................................................................................................................................ 18
Communications History ....................................................................................................................................... 19
Visual Voicemail ............................................................................................................................................. 19
Preferences ............................................................................................................................................................ 21
Credentials ..................................................................................................................................................... 21

2 | Page
© Nextiva, All Rights Reserved
General .......................................................................................................................................................... 21
Audio .......................................................................................................................................................... 22
Video .......................................................................................................................................................... 22
Proxy .......................................................................................................................................................... 22
Call Settings ............................................................................................................................................................ 23
Nextiva Anywhere™ ...................................................................................................................................... 23
Nextiva Remote Office .................................................................................................................................. 23
Forward Calls ................................................................................................................................................. 24
Do Not Disturb ............................................................................................................................................... 24
Hide Number ................................................................................................................................................. 24
Simultaneous Ring ......................................................................................................................................... 24
Active Call Distribution (ACD) States .................................................................................................................... 25
Sign Out .................................................................................................................................................................. 25
Sign Out of Nextiva App ................................................................................................................................ 25
Exit Application .............................................................................................................................................. 25
System Requirements ........................................................................................................................................... 26

3 | Page
© Nextiva, All Rights Reserved
Nextiva App for Desktop
The Nextiva App for Desktop is a native Windows client for unified communications that provides the
following features:
• Instant Messaging and Presence
• Voice Calling (VoIP)
• Voice Calling (Desk phone)
• Video Calling
• Nextiva Call Settings
• Active Call Distribution (ACD) State control
• Visual Voicemail
• Desktop Sharing
Getting Started
Installation
You can download the Nextiva App to your computer from Nextiva’s site
at https://www.nextiva.com/support/nextiva-app-windows-setup.html
.
1. Double-click the installer and follow the installation instructions.
2. Launch the Nextiva App.
Sign In
When you first launch the application, you are prompted to sign in (Figure 1-1).
1. Enter your Nextiva username and password.
2. If you would like the Nextiva App to remember your password, check the appropriate box.
3. If you would like the Nextiva App to sign you in automatically on subsequent launches, check the
appropriate box.
4. Click Sign In.
NOTE: If you choose automatic sign in, you are automatically signed in and taken to the contact
list upon subsequent Nextiva App launches. Otherwise, you will be presented with the Sign In
screen.
After logging in, a pop-up box may appear informing you about emergency calls. You may also see a
banner in the main window related to emergency calls. Depending on your Nextiva settings, emergency
calls may not be allowed. In this case, calling an emergency number displays a pop-up box. A
notification message in the main window may also display.
Figure 1-1: Sign In

4 | Page
© Nextiva, All Rights Reserved
Main Window
When you start the Nextiva App for the first time, your Contacts list is empty (Figure 1-2). Use the
Search field to find people and add them to your Contacts list. Contacts can also be added manually by
clicking the Add button. The dial pad is also integrated with the main window.
My Information – View and
update your information, for
example, your presence,
avatar, and location.
My Room – This is your
permanent communication
room. Participants can dial in to
your audio bridge.
Contacts – View your contacts.
Communications History –
View previous chats and calls.
Full Enterprise Directory –
Show all contacts of the
directory.
Dial Pad – Make calls, it is
integrated with the main window.
Chat – Start an instant message
conversation with a selected
contact.
Call – Make an IP audio call to a
selected contact.
Call from Phone – Make a
Click-To-Dial call from your desk
phone (or secondary device).
Video Call – Make a video call
to a selected client (VoIP).
Menu – Open Call Settings,
Preferences, and Help.
Add – Add a contact, group, or
conference.
Figure 1-2: Nextiva Main Window

5 | Page
© Nextiva, All Rights Reserved
My Information
• Click the avatar to update your status or location and enter a message.
• Double-click the avatar to upload a picture or use the right-click menu.
• Right-click the avatar to update your status.
Presence
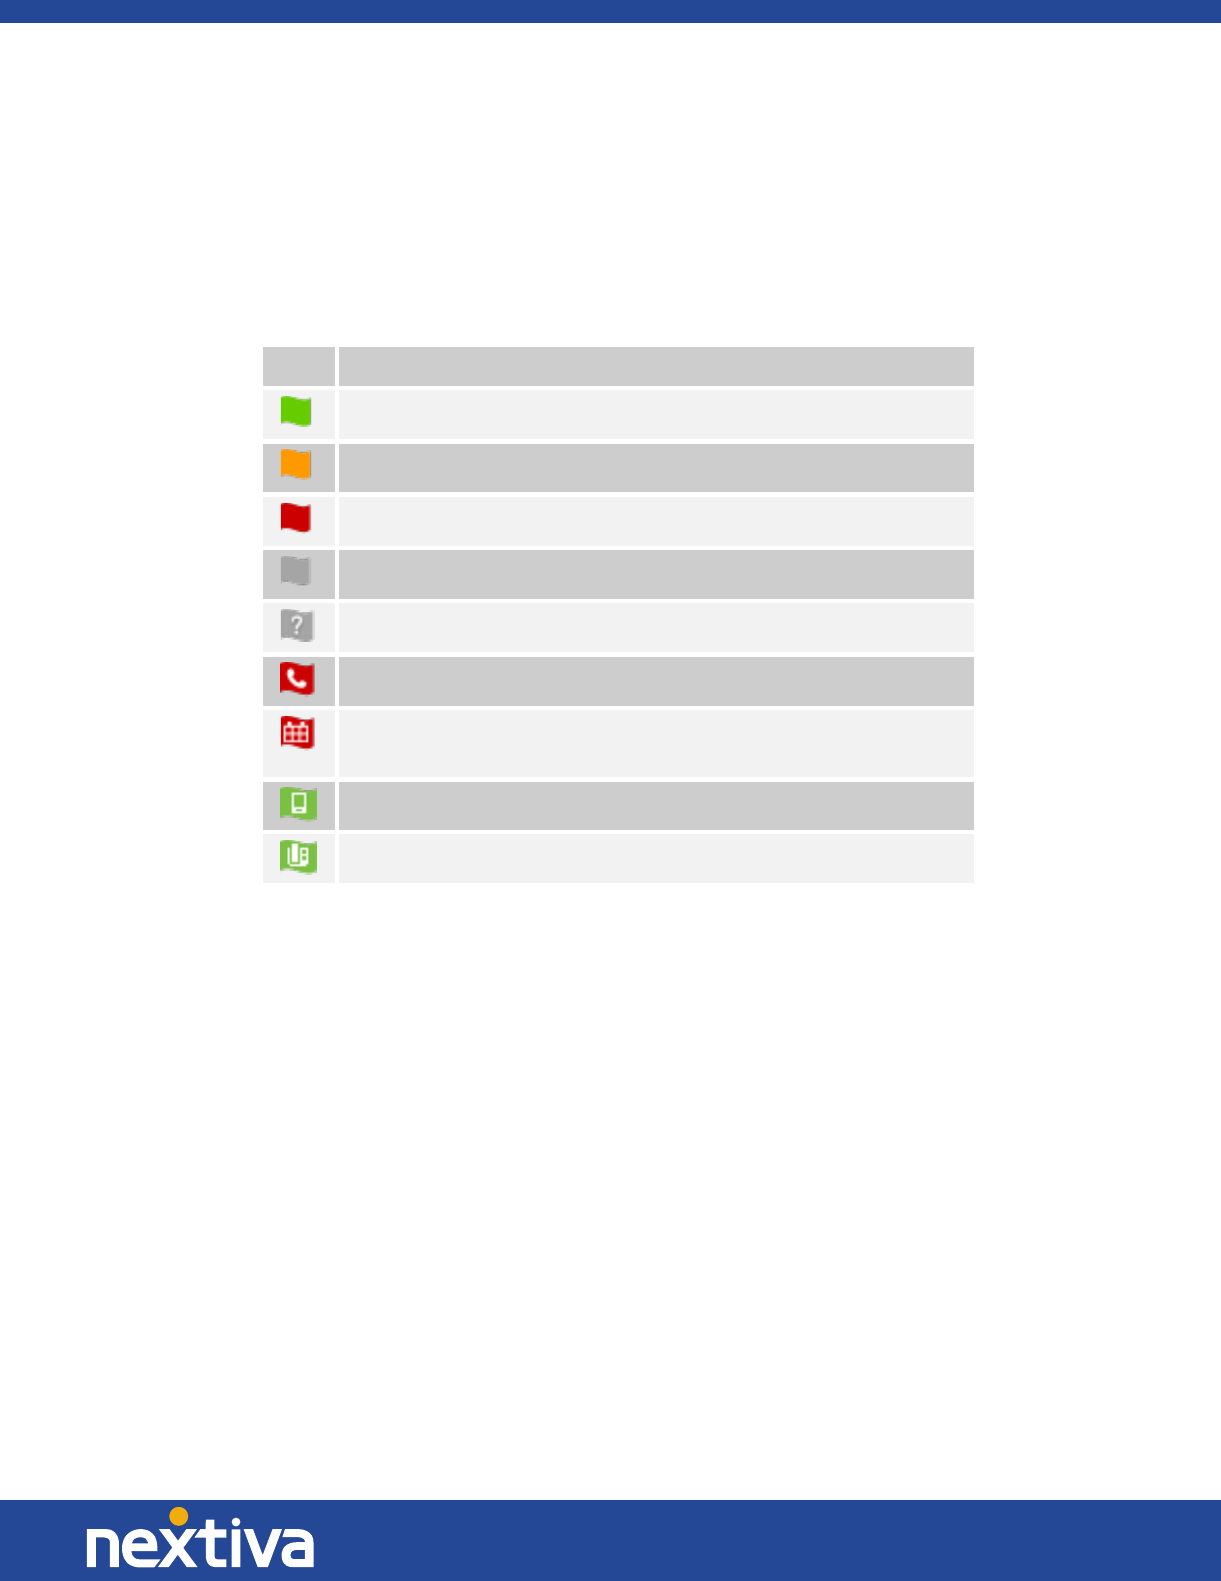
You can set your presence to one of the statuses listed below (Figure 1-3):
Icon What it means
The green presence icon indicates that the user is online and ready for communication.
The yellow presence icon indicates that the user is online but has been idle or away
from their computer for more than ten minutes.
The red presence icon indicates that the user is busy and does not want to be
disturbed.
The grey presence icon indicates that the user is offline and the only available contact
method is calling or chatting.
This icon indicates that the contact is busy on a call. This is an automated presence
status.
This icon indicates that the contact is busy in a meeting. This is an automated
presence status. The Busy – In Call status overrides the Busy – In Meeting status so
this one is only seen if there is a meeting but no call.
Figure 1-3: Presence Statuses
The Nextiva App will automatically update your presence to the following:
• Busy – In Call
• Busy – In Meeting
Location
Your location is automatically determined by your public IP Address; however, you can manually set the
text to appear for your location and time zone using the location dialog box.
Communications Window
After starting communication with one or more of your contacts, a Communications window is displayed
for chat and calls. The call window can also be integrated with the main window. From this window, you
can perform the following actions:
• Upgrade a chat to include audio, video, and desktop sharing
• End an audio or video call
• Open the dial pad
• Mute your microphone
• Adjust your speaker volume
• Place a call on hold
• Transfer a call
6 | Page
© Nextiva, All Rights Reserved
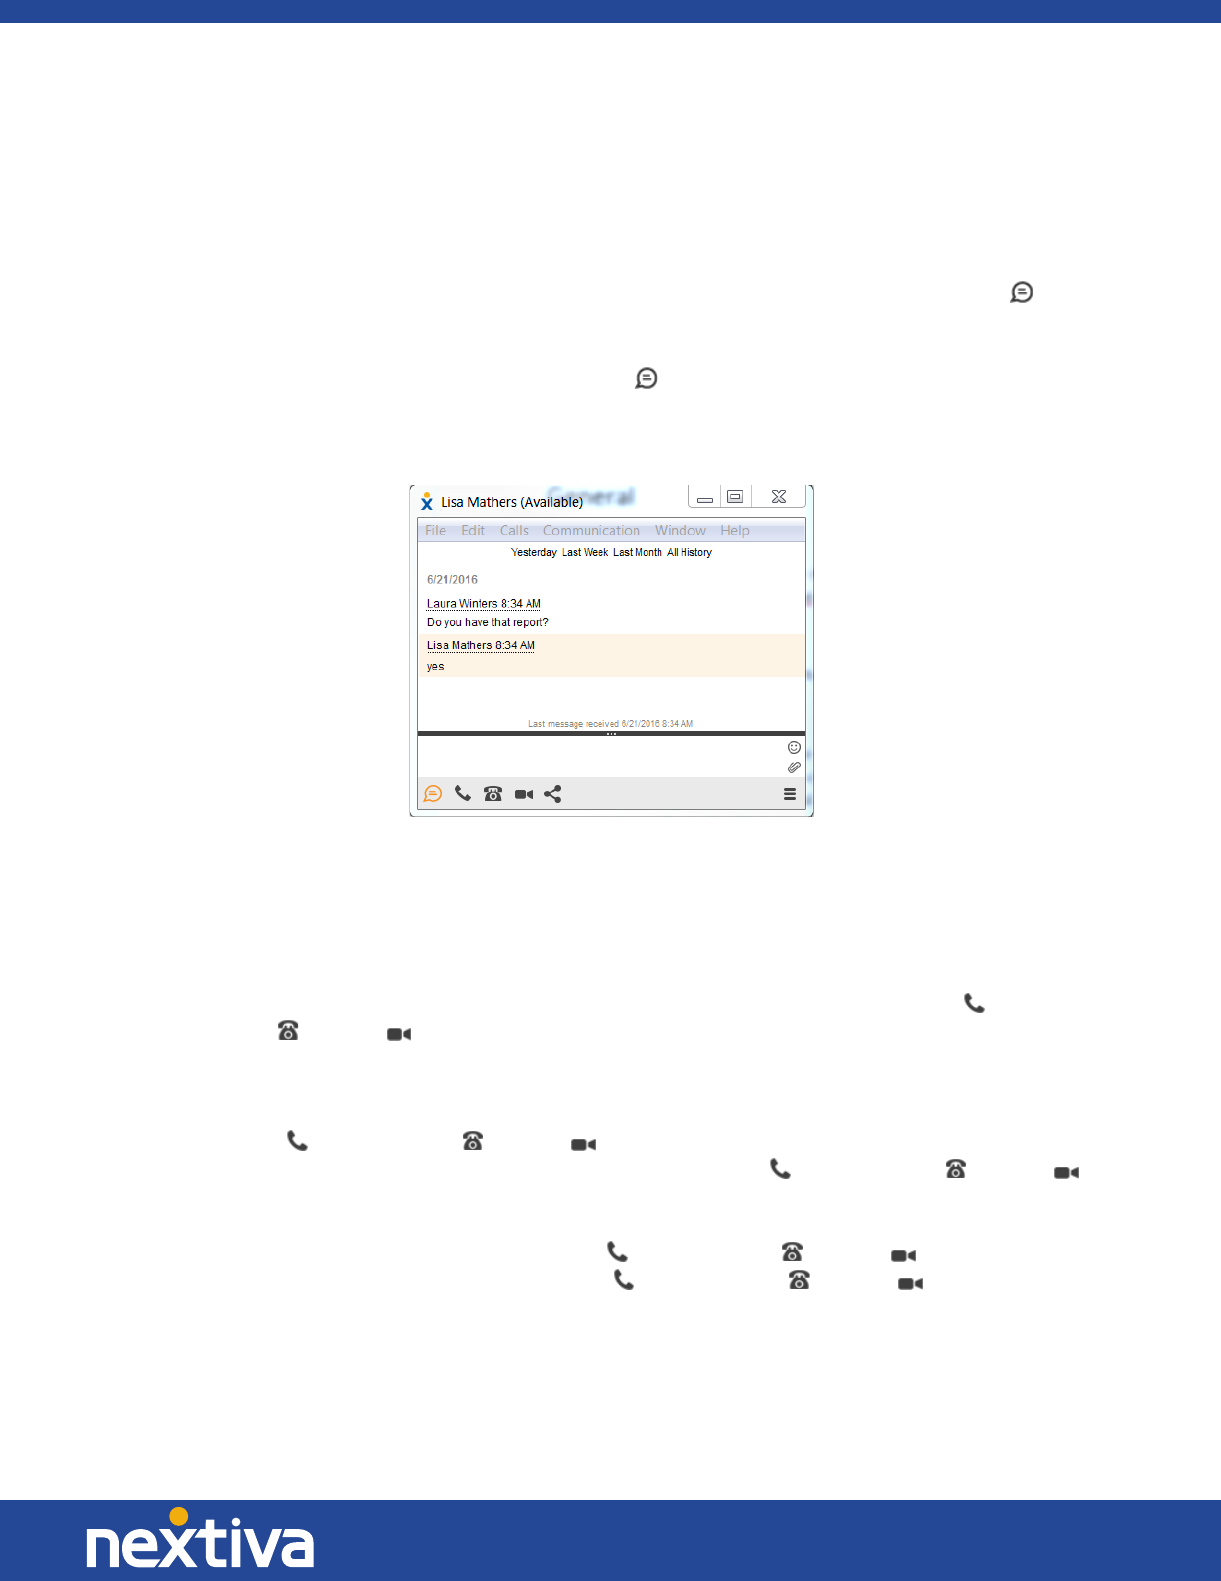
Start a Chat
You can start a chat using one of the following methods (Figure 1-4):
• Double-click a contact from the Contacts list or search results.
• Left-click one or more contacts from the Contacts list or search results, and click the Chat icon .
• Right-click one or more contacts from the Contacts list or search results, and select Chat.
• On the Communications History list, double-click a chat entry.
• In a Communications window, click the Chat icon .
• In a one-to-one chat, transfer files by clicking the Send File button in the Communications window or
use the drag-and-drop method so that they are moved to the Communications window.
Figure 1-4: Chat Window
Make an Audio or Video Call
You can make an audio or video call using one of the following methods:
• Left-click one or more contacts from the Contacts list or search results, and click the Call , Call from
Phone , or Video icon.
• Right-click one or more contacts from the Contacts list or search results, and select the Call, Call from
Phone, or Video option.
• Enter a phone number in the Search and Dial field, and then press ENTER to start an audio call or click
the Call , Call from Phone , or Video icon.
• Open the dial pad, enter a phone number, and then click the Call , Call from Phone , or Video
icon.
• On the Communications History list, double-click a call entry.
• In the Communications window, click the Call , Call from Phone , or Video icon.
• When viewing a contact’s profile, click the Call , Call from Phone , or Video icon.
NOTE: If dialing a phone number that requires additional dual-tone multi-frequency (DTMF)
tones (for example, a conference bridge), you can type the numbers on your keyboard while the
Communications window is active or open the dial pad in the Communications window.
7 | Page
© Nextiva, All Rights Reserved
Active Communications
Active communications appear at the top of the Contacts list in the main window. This area provides an
easy view to see the people with whom you are communicating. A separate call window can still be
opened using an Active Communications menu. The following is also available in this area:
• Double-click an active communication to
activate this Communications window if
the call window is shown separately. If the
call window is integrated, you can use a
menu option to show it separately.
• See who has sent you a chat message, but
only after you accept the chat session.
Before the chat session is established, the
chat items are not visible in active
communications but a history badge is
visible.
• End a call
• Mute the microphone
• Place a call on hold
• Merge two calls or transfer by dragging
and dropping calls onto each other
• Transfer a call
• Make conference calls
• See call recordings
• Park and retrieve calls
• Conference
• Call transfer
When enabled, you can use the buttons for faster access to these services.
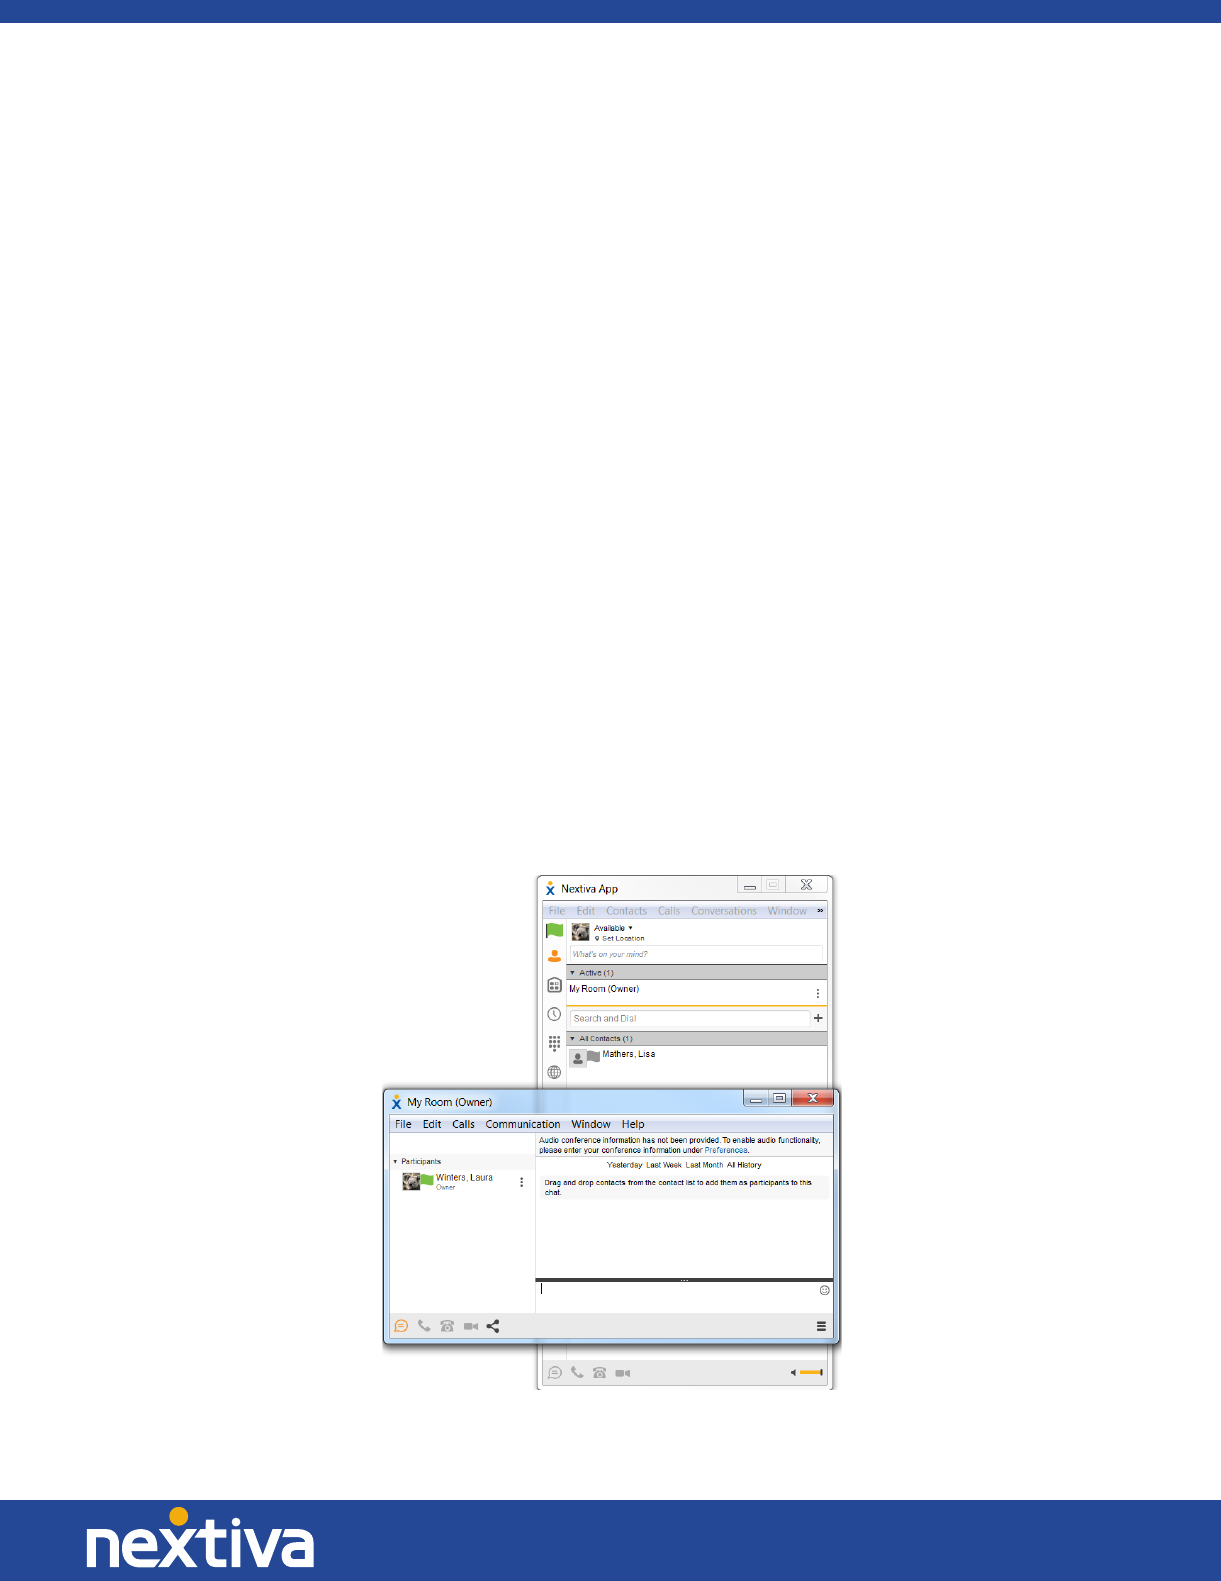
My Room
My Room is always available and a permanent room you can use to chat with anyone that joins (Figure
1-5).
Figure 1-5: My Room

8 | Page
© Nextiva, All Rights Reserved
If you assign a conference number to your profile in Preferences → Credentials, then in your room, you
and your attendees can click the Call icon to have the Nextiva App automatically dial in to the
conference and enter the appropriate entry codes.
If a conference bridge is not specified, you can initiate an N-way call in your room. The Nextiva App dials
out to all participants and takes everyone off hold after the last attendee answers.
You can invite others to your room by dragging and dropping them from the Contacts list into the My
Room communications window.
Others join your room by right clicking your name on their Contacts list and selecting Join Room.
Selecting Audio Devices
If you have multiple audio devices available for your microphone or speakers, select the preferred audio
device before starting a call.
1. Select Nextiva App from the main menu.
2. Select Preferences.
3. Select Audio.
4. Set a playback device (speakers).
5. Set a recording device (microphone).
6. Click OK.
If Use default is selected, then the Nextiva App uses the default device set in the operating system
preferences.
If you are using headsets, you can also select a separate device than the headset for alerting incoming
calls.
9 | Page
© Nextiva, All Rights Reserved
Contacts
Contacts are the people with whom you communicate and, when the contact uses the Nextiva App, you
can see their presence and share your presence with them. There are three types of contacts:
• Contacts: Actual people with whom you communicate.
• Conferences: Audio or video conference bridges that you use to communicate with others.
• Groups: Containers of contacts and/or conferences.
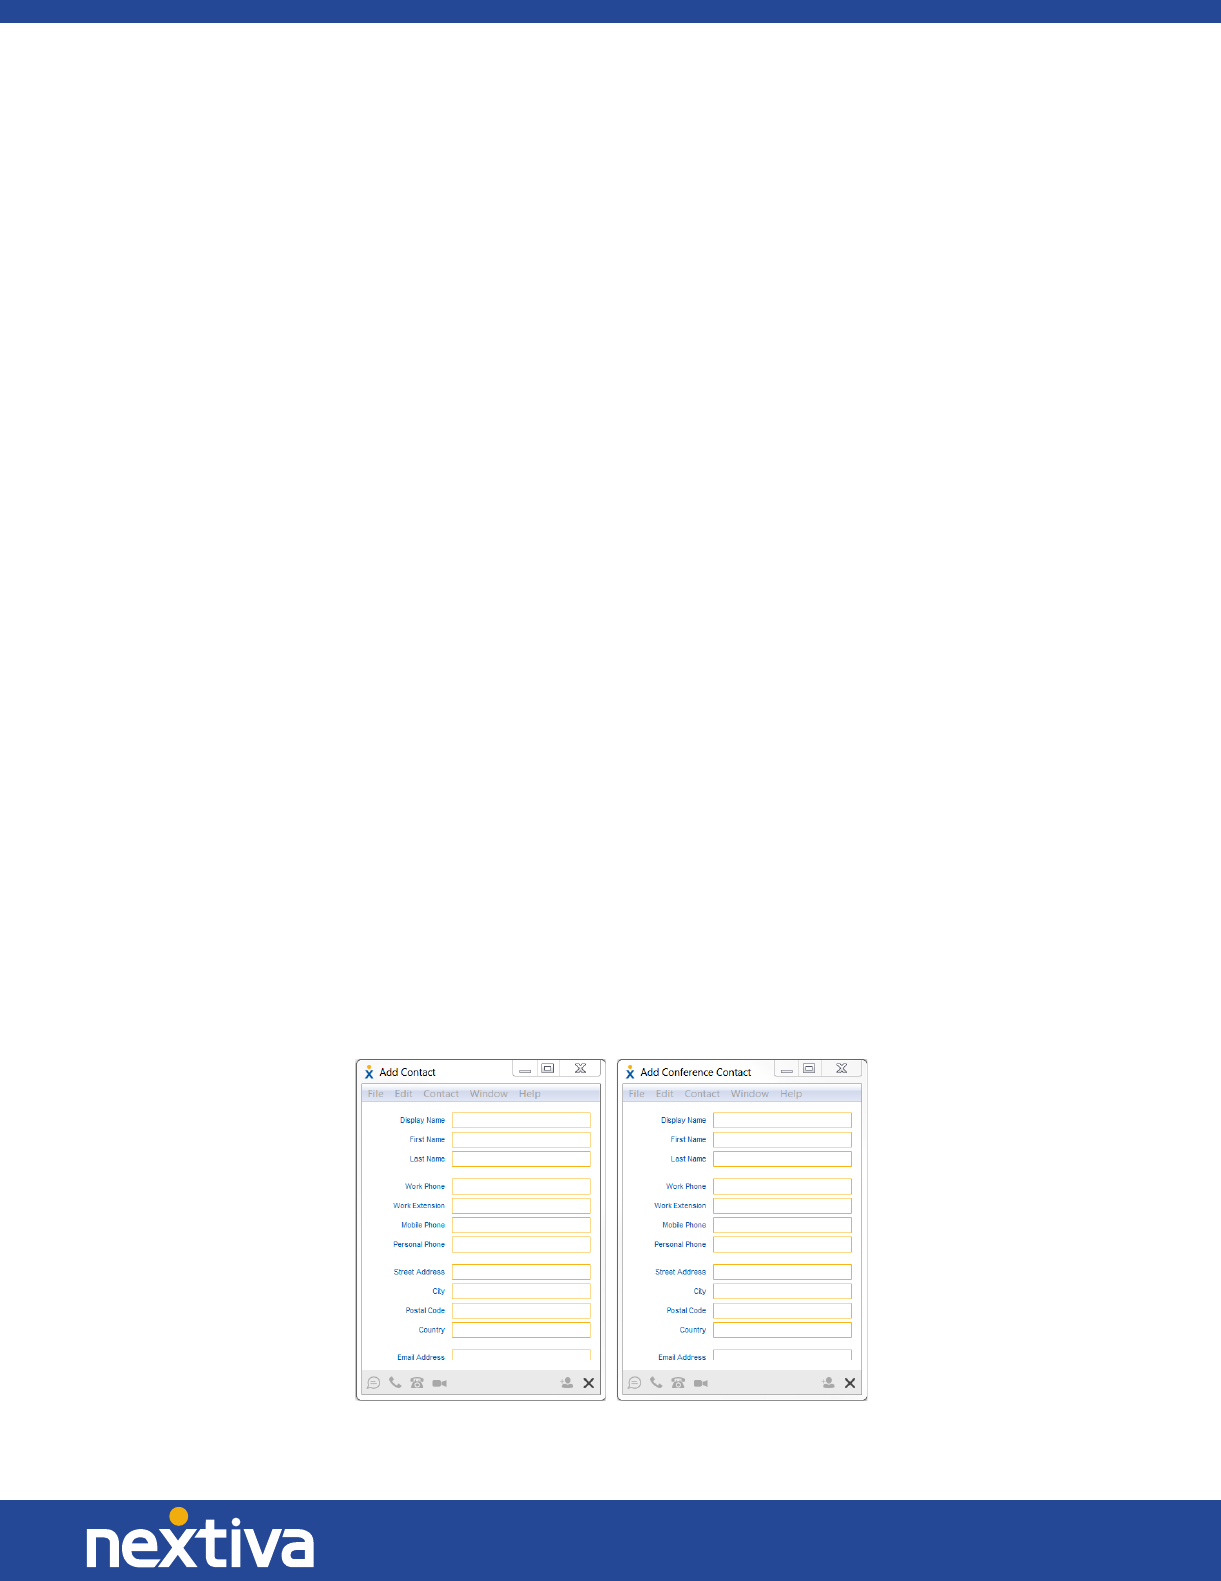
Add
When you sign in for the first time, there are no contacts on your contact list. Add a new contact at any
time by selecting Add Contact from the menu or choose the Add Contact button from the main window.
In the Add Contact dialog box, enter the contact’s information, and then click Add Contact. By default,
your presence information is always shared with a new contact if an Extensible Messaging and Presence
Protocol (XMPP) address is provided (Figure 2-1).
However, you can always share your presence information later by selecting Subscribe on the menu for
that contact on the contact list (right-click the contact or arrow button). Note that the contact must
accept your subscription request for you to establish the presence relationship successfully.
The newly added contact appears on your contact list.
Add a conference contact by clicking the same button you did for Add contact, but choose the Add
Conference menu option. A conference contact is a special contact used for conference bridges to avoid
remembering PIN codes and conference numbers, such as recurring conferences. Just create a contact
for the weekly conference, and then add a conference bridge number and PIN. Right-click the contact, or
choose it and click the Call button to join the conference.
Choose the Add Group menu option to add a new group to the contact list.
Figure 2-1: Add Contact and Add Conference

10 | Page
© Nextiva, All Rights Reserved
Edit
You can edit a contact by selecting the contact first. After you select the contact, right-click anywhere in
the area of the selected contact and a menu of options appears. This principle is the same for normal
contacts, conference contacts, and groups. When the manual sync button (cloud icon) is visible, there is
no automated syncing of the contact card details with server information. To sync the contact card data,
click on the cloud icon.
• Unsubscribe removes the presence relationship between you and that contact. This means you do not
see the contact’s presence information and your contact does not see yours. To re-establish the
presence relationship, select Subscribe. An unsubscribed contact remains on your contact list, but is
always shown without an icon. Any contact that is not presence-enabled will also appear this way.
• Remove will remove the contact from your contact list.
• View Profile opens the Contact Information dialog box where you can add, edit, or remove
information. This works for both normal and conference contacts.
• For groups, choose the Edit Menu option to rename a group.
Filters
You can filter contacts in two ways:
• Use the Filter field to search by contact name, and it will filter in real-time as you type.
• Alternatively, use the filter menus available by right-clicking the Contacts icon in the left pane to
display only specific types of contacts such as Favorites or Online Contacts. You can also sort contacts
based on first or last name, or choose whether to display the contact’s avatar and availability status in
the contact list.
11 | Page
© Nextiva, All Rights Reserved
Presence
For each contact you have subscribed to, you can see their presence. Similarly, your contacts can see
your presence on their contact list (Figure 3-1).
Presence means that your friends are able to see whether you are available to communicate or not.
Icon What it means
The green presence icon indicates that the user is online and ready for
communication.
The yellow presence icon indicates that the user is online but has been idle or away
from their computer for more than ten minutes.
The red presence icon indicates that the user is busy and does not want to be
disturbed.
The grey presence icon indicates that the user is offline and the only available contact
method is calling or chatting.
The question mark indicates that a subscription is pending and the contact has not
yet approved sharing their presence.
This icon indicates that the contact is busy due to a call. This is an automated
presence status.
This icon indicates that the contact is busy due to a meeting. This is an automated
presence status. The Busy – In Call status overrides the Busy – In Meeting status so
this one is only seen if there is a meeting but no call.
This icon indicates that the contact is only available on mobile Nextiva App.
This icon indicates that the contact is only available on a compatible desktop phone,
not Nextiva App.
Figure 3-1: Presence Legend
Avatars are not completely in real-time. The avatars are retrieved when you log in, when you add a
contact, and when the contact comes online.
To change your avatar, double-click it, and a File Explorer view opens.
If you see an error message at the top of the main window XMPP Unavailable, it means that the XMPP
connectivity has been lost for chat and presence; however, you can still make calls. To resolve this,
please contact Nextiva Support.

12 | Page
© Nextiva, All Rights Reserved
Chat
Chat View
When you initiate a chat, the Chat window opens. Chatting with a contact is possible only when you are
both online. If your contact initiates a chat, you see a pop-up notification in the bottom right-hand
corner of the screen. If you close the Chat window and open it again, sent chat messages are shown in
the window as chat history.
When the chat opens, you see the contact’s information at the top of the screen. If you want to use the
whole area for writing, you can press the background of the information or the top bar. You can
minimize or expand the information of the contact during the chat and you can leave it open or closed
depending on your preference.
At the top of the message area, there are four links: Yesterday, Last week, Last month, and All history.
From these links, you can load history from your local storage and different time frames. You can also
delete the chat history using the drop-down menu.
In the text field, you can add a smiley emoticon. Smiley emoticons can also be added by manually
entering the corresponding characters that represent that particular emoticon. Then, press ENTER to
send the message.
To enter a line break in the text field, you can use the following key commands:
• CTRL+ENTER
• SHIFT+ENTER
• ALT+ENTER
Use either one of the short commands, CTRL+C or CTRL+V, or right-click the selection for a menu to
copy/paste the text from/to the Chat window.
File Transfer
File transfer functionality is accessible only through the Chat window.
• To open the File Selection dialog box, click the Send File button on top of the text field.
• Select the file to be sent from the dialog, and then click Open. You can also drag and drop a file into
the Chat window.
• Once the file offer is issued and during its transfer, you can cancel the transfer (at any time) by clicking
Cancel.
• Accept an incoming file transfer by clicking the Accept button.
• Reject a file transfer offer by clicking the Decline button.
After the file transfer is complete, the received files can be opened or viewed in the file manager by
using the Click to open and Show in folder links.

13 | Page
© Nextiva, All Rights Reserved
Group Chat
Start a group chat by holding Ctrl while selecting multiple contacts. Then, right-click the main window
contact list or the Conference menu in the Communications window. More people can be added to the
chat later via drag-and-drop or by using the Conference menu. However, only the chat owner can add
more participants.
A group chat works the same way as a one-to-one chat. All messages from a specific person are sent to
everyone else, and all contacts need to be online to be able to participate in a group chat. You cannot
invite an offline contact or a contact that is not on a device that supports group chat. This does not
affect the group chat in any way.
A group chat’s history is saved and is available to view later in the Messages tab of the main window.
In the text field, the contacts’ names appear in different colors to easily distinguish between who sent a
message.
Only the newest chat room messages are stored on the server. One-to-one chat messages are only
saved locally. Please note that deleting a chat room is not supported.
Chat rooms can be moderated by the owner. Use the right-click menu options to remove a participant
from your chat room if you’d like. If needed, the removed participant can join later. The removal of a
participant also applies to desktop share sessions.
14 | Page
© Nextiva, All Rights Reserved
Audio and Video Calls
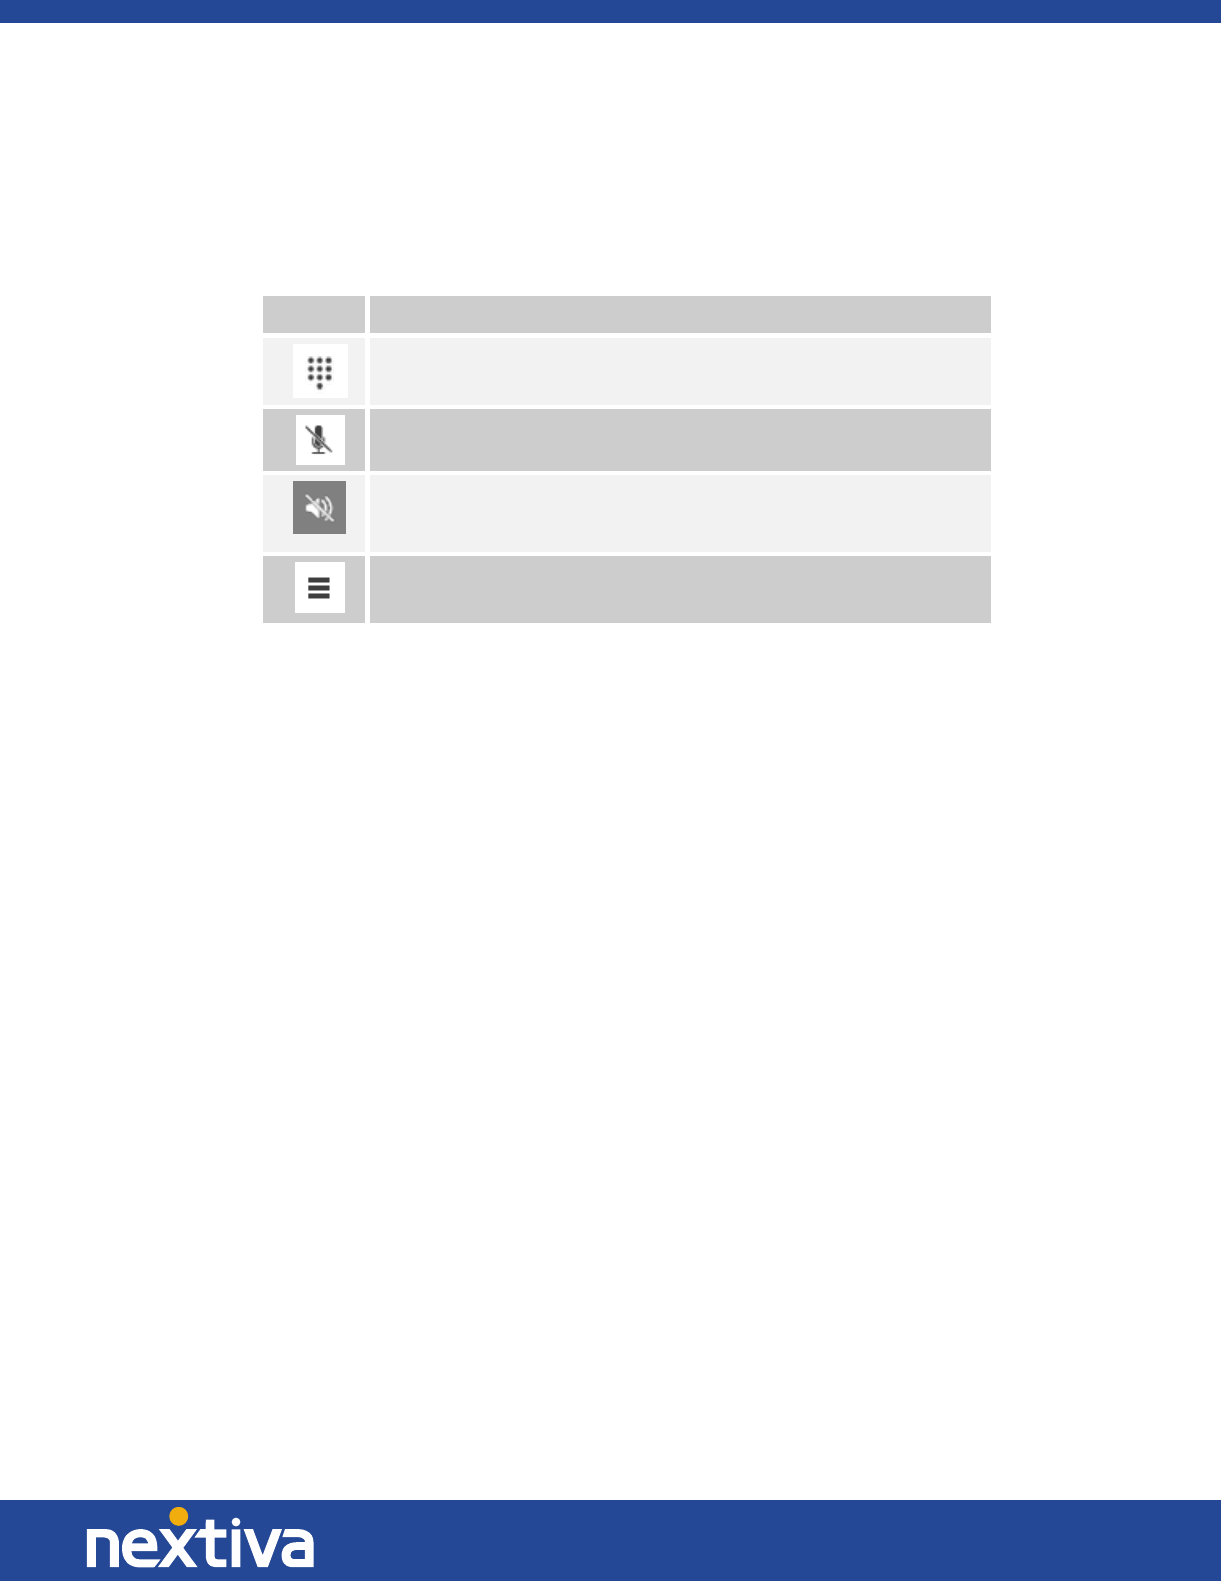
The following table describes additional Communications window icons and explains what you can do
with them for voice and video calls (Figure 5-1).
Icon What you can do
Enter additional digits using the dial pad at any time during the call (for example, to
insert a conference number). The dial pad is movable and can be dragged around
the Video Call screen to a location you set.
Mute your microphone by clicking the mute icon.
Adjust the volume bar to adjust the volume. Dragging it all the way to the left mutes
your speakers. This is shown by a small red cross in front of the volume bar.
Use this icon to access the Call Options menu. In the Call Options menu, you can
find different actions to use for a call depending on your settings and your service
provider.
Figure 5-1: In Call Icons
In the Options menu, you can:
• Transfer a call to a third party.
• Put the call on hold. If you put the call on hold, the other party cannot “un-hold”. This freezes a video
call to the last frame of the video feed. In both voice and video calls, this is communicated to all
parties by a notification appearing in the middle of the screen.
• Hide your own video.
• Add participants to a call.
Dial a number in the combined Search and Dial field to make a call. Once you type the numbers, the
Nextiva App searches for contacts on both the local contact list and the enterprise directory.
Choose your video size from the Preferences and the Video tab. Your selection is used by default for
future video calls. The available sizes are automatically presented based on your computer’s camera.
The selected video size can be modified automatically depending on your CPU load and changing
network conditions to optimize the video quality.
Call from Your Computer
To call a contact, select them from your contact list, and then click the desired communication button.
To call someone who is not a contact, type a phone number into the Search and Dial field at the top of
the Nextiva App window (search or communicate).
Call from Phone
The second option is to Call from Phone. When you click this button, your desk phone instantly starts
ringing and the call is established from your desk phone.

15 | Page
© Nextiva, All Rights Reserved
For remote calls initiated using the Nextiva App, you can also have mid-call controls such as
hold/resume, transfer, and add participant.
Automatic Busy – In Call presence also works with the Call from Phone feature.
Answer a Call
When someone is calling you, you see a pop-up notification on your screen. You can choose to answer,
reject, or silence the incoming call by closing the pop-up notification window. If you silence the call, the
ringtone is silenced but the caller does not see anything on their end. You can answer or reject the call
after silencing it only if you have chosen the chat option. If you close the incoming call pop-up
notification to silence an incoming call, then you do not have an option to answer or reject it any more.
When choosing the chat option, chat is only enabled after the call has been answered or rejected.
If you reject the call, the line will sound busy on the caller’s end and they know that you rejected the
call.
When someone is calling you with a video, you see the same pop-up notification; however, the options
are answer with video, answer as voice only, reject, or silence (by closing the pop-up window). If you
decide to answer as voice only, the call will be voice only.
Contact Name Lookup for Incoming Calls
Whenever the incoming call does not have a name associated with it, the Nextiva App will perform a
local contact search. If the number matches one of the contacts on the Nextiva App contact list, the
name is shown on the incoming call screen along with the alert.
Whenever you retrieve your call logs/history and the call log does not have a calling name associated
with it, the Nextiva App does a lookup in the local contacts and populates the name if a match is found.
Missed Call or Communication
When you have one or more missed calls or other types of communications, there is a notification on
the Communication History icon . Clicking the icon takes you to the missed communication in the
Communications History view.
Full Screen in Video Call Mode
Full screen mode can be activated for a video call by clicking the Full Screen button or by double-clicking
anywhere on a video.
To exit full screen mode, press the ESC key or the Windows button. The video will go back to its original
size when you exit full screen (even if you resized the window before going full screen).

16 | Page
© Nextiva, All Rights Reserved
In a full-size window, you will see a similar Options menu at the top that has the same functionality as it
does in the normal view. When you move the mouse, the top bar and lower communication buttons
appear on top of the video.
Multi-party Sessions
You can have multiple participants in a call, either in a My Room or in an ad hoc multi-party call. You can
add more participants to a call by dragging and dropping them on to the Communications window, or by
selecting the Conference menu item via the Communications window menu button. By choosing the
menu item, you can also add participants with just a telephone number.
In contrast to using My Room, which uses your permanent chat and collaboration rooms and conference
bridge, you can start ad hoc multi-party sessions by either selecting multiple contacts on the contact list
and starting a chat, by calling them, or by expanding a one-to-one session into a multi-party session by
dragging and dropping a contact into the Communications window. In an ad hoc session, the room used
is a temporary one that is deleted once the session ends (when the last participant leaves). Voice
conferencing does not use a bridge, but rather the Nextiva N-Way Calling supplementary service in a
sequential fashion.
If the XMPP service is not available, then ad hoc multi-party calls are not available.
Call Waiting
You can use call waiting to accept a call while you are on another call. A pop-up will inform you of the
incoming call and you may choose to accept it. The existing call is put on hold and you can switch
between these two calls by using the Hold and Unhold buttons. Additional calls will appear in the active
communications menu, and you can select which call to return to at any given time.
Call Transfer
Blind call transfer is available in the Communications window. To initiate a blind transfer, choose the
Transfer Call menu item to transfer the call to someone else. Warm call transfer is also available in the
same window. To do so, first call someone to check if they can take the incoming call, and then transfer
the incoming call to the third party.
Message Waiting Indication and Voicemail
The Message Waiting Indication (MWI) service allows you to receive a notification for a waiting
voicemail or video message. By clicking on the message icon in the upper right-hand corner of the main
window, the Nextiva App calls the predefined mailbox number so you can listen to the voicemail or view
the video message.
It is also possible to call your voicemail from the dialer by holding down the 1 button.

17 | Page
© Nextiva, All Rights Reserved
Missed calls are indicated by an icon in the main window. Missed video and audio calls are indicated
with different icons. Note that the MWI icon is in the same place when it indicates a new voicemail.
Call Pulling
Call Pulling allows you to pull an active call from one of your devices to another one where the Call Pull
feature is used. You can also pull a call by dialing *11 from the device you want to continue the call on.
Conference Moderator Controls
You can control the functionality available to conference attendees if you are the owner of the session
in My Room. You can do the following:
• Dismiss one or more participants
• Mute one or more participants
• Lock or unlock the room (attendees cannot enter while the room is locked)
• See active talker indication
• See full audio participant list
To use these features, you can either right-click on the menu or click on the moderator control icons of a
participant. It’s important to note that most features are not available via icons. To dismiss or mute all
participants or lock the room, use the right-click menus available for your own icon at the top of the
participant list.
If you are not the owner, you can only see the XMPP (chat) participant list.
Headset Support
Nextiva offers best effort support on headset functionality, but cannot guarantee the compatibility of all
headsets.

18 | Page
© Nextiva, All Rights Reserved
My Room
My Room is started by clicking on the My Room icon on the left-hand side of the navigation pane. My
Room is started automatically using your permanent chat room. You can add more participants to your
room by dragging and dropping them into the Communications window or the Conference menu.
Alternatively, they can join your room by right-clicking your name on their contact list and choosing the
Join Room menu option. Once people have joined the chat room, they can click on the Call button of
that window to join the conference. You can also share your desktop with the participants.
To use the full functionality of My Room (desktop sharing, conferencing, and chat combined), you must
manually enter your desktop sharing credentials, your conferencing number, and your PIN in the
Preferences → Credentials window.
Please note that only the owner of the room can share their desktop or add more participants. This
applies to both My Room and any ad hoc sessions.
To see a Context menu, right-click the My Room icon on the left-hand side of the navigation pane.
1. To modify credentials and conference bridge information, select Configure to go to the
preferences.
2. Select Copy invitation to copy an invitation link to the operating system clipboard. Paste this link
into meeting invitation e-mails to allow the Nextiva App participants to join the conference in
one click from Microsoft Outlook, Office applications, etc. You can also copy the My Room
invitation to your default email client and go to the My Room preferences via a right-click menu
option.
The link has two parts: one for Nextiva App users and another one for users with some other
client. The invitation can also contain a link to the desktop sharing session. The invitation always
contains a dial-in number and PIN for users who do not have the Nextiva App. The desktop share
link, when available, allows anyone to join a desktop sharing session from a standard web
browser. In addition, the Nextiva App group chat session is supported with the web
collaboration session.
The My Room icon also has a tool tip indicating the conference bridge details of your My Room.
My Room uses your permanent chat room, permanent collaboration room, and conference bridge
(audio or video). My Room is the only way to use the permanent rooms. Any other multi-party
communications, such as selecting multiple contacts and right-clicking for a conference call, or dragging
and dropping for a one-to-one chat, is done using ad hoc rooms. Ad hoc rooms are deleted once the
session is over.
All My Room sessions start as chats, but call and/or share can be added to the session while in progress.
File transfer and video conferencing are not supported in My Room or ad hoc sessions.

19 | Page
© Nextiva, All Rights Reserved
Communications History
The fourth icon from the top in the main window on the left-hand side of the navigation pane displays
your messaging history. If you double-click a conversation on the list, it will open in a new window.
The Nextiva App saves a call history for placed, received, and missed calls. The call history makes it easy
for you to redial the caller when you have missed a call or you want to easily dial a contact that you
spoke to recently.
To call a contact back directly, double-click on a name in the list (this initiates a call the same way you
previously spoke. For example, if you were in a video call, it will start a new video call). Double-clicking
an incoming call item from presence-enabled contacts will open a chat window that you can start a call
from if you’d like.
To clear the missed chat indicator, you need to open the missed chat.
The Communication History missed communications badges can be cleared by using the right-click menu
from the Communication History button on the left-pane. The menu provides options to clear All
missed, Clear missed chats, and Clear missed calls.
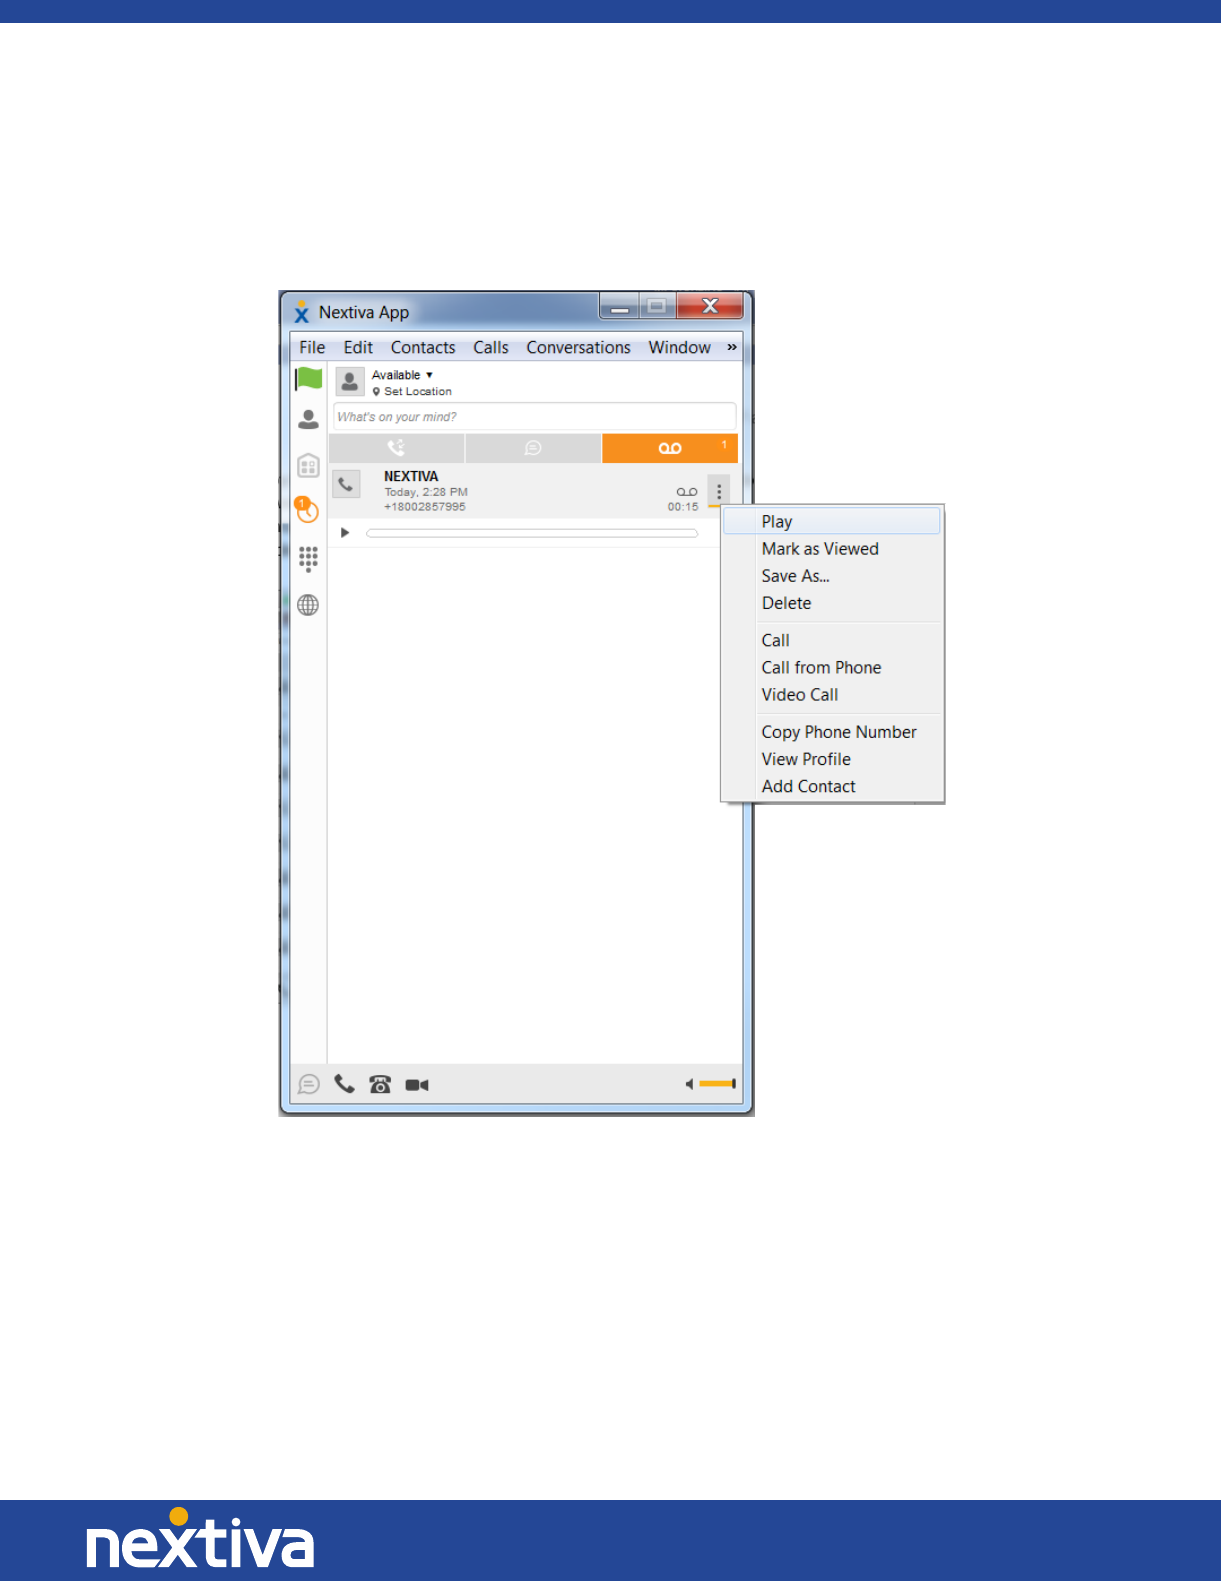
Visual Voicemail
When a voicemail is present, a button on the left side of the screen will display the number of waiting
voicemails. Additionally, you can view, listen to, delete, save and return voicemails directly from the app
(Figure 7-1).
1. Enter Communication History .
2. Select the Voicemail Icon .
3. Click the voicemail options icon on the far right of the voicemail or right-click the voicemail to
open the options menu. You may select one of the following options:
• Play: Listen to the voicemail through the app
• Mark as Viewed: Do not listen to the voicemail, but hide the voicemail indicator
• Save As…: Save the voicemail to your computer as a .wav file
• Delete: Delete the voicemail from the system
NOTE: Deleting a voicemail is permanent. If you have not saved the voicemail somewhere on
your computer, or had the voicemail delivered to you in an email, you will not be able to
retrieve the voicemail.
• Call: Place a call to the sender of the voicemail using the Nextiva App
• Call from Phone: Place a call to the sender of the voicemail using your desk phone
• Video Call: Place a video call to the sender of the voicemail using the Nextiva App if the sender
uses a Nextiva video phone or the Nextiva App
20 | Page
© Nextiva, All Rights Reserved
• Copy Phone Number: Copy the phone number to your computer’s clipboard enabling you to
paste it into any other systems you may use
• View Profile: View the contact profile of the sender of the voicemail
• Add Contact: Add the sender of the voicemail to your contact list
Figure 7-1: Visual Voicemail

21 | Page
© Nextiva, All Rights Reserved
Preferences
Preferences provide access to the available settings for the Nextiva App. Follow the steps below to
access Preferences:
1. Select Nextiva App from the main menu.
2. Select Preferences.
Credentials
My Room
Specify the conference details to be used for your My Room.
Protocols
If protocols such as XMPP or Xsi are available to be viewed, they will appear here.
Device Management
If the Device Management configuration URL is available to be viewed, it appears here.
General
Language
Select your language, and then click OK or Apply. The change will take effect immediately. Note that
the number of languages is determined by Nextiva.
Log In
Enable or disable automatic sign-in when starting the application.
Confirmations
Usually there is a confirmation pop-up notification each time you remove a contact or call history
record. By selecting one, or all, of the check boxes, you disable the confirmations when deleting
information. Here you can also control whether a pop-up notification is always shown for publishing
location information. Typically, this is shown at login.
Logging
Logging is used for troubleshooting. You may be asked by Nextiva Support to turn on logging and then
send a log file directory.

22 | Page
© Nextiva, All Rights Reserved
Audio
Output Device (Speakers)
Choose a headset, PC-integrated speakers, or external speakers for audio output. Your external playback
device is selected by default (if you have one connected).
Voice Recording (Microphone)
Choose a headset microphone, PC-integrated microphone, or external microphone for voice recording
during calls. Your external recording device is selected by default (if you have one connected). You can
also choose automatic gain control and test your recording device.
Alert Signal
Select the audio device and ring signal that is played when you receive an incoming call. The same signal
is used for both voice and video calls. You can also select your own ring signal if you’d like.
Sounds
Select which events trigger a notification sound. To disable the sound, uncheck this box. To hear the
sound, select a sound event, and then click Play.
Video
Capture Device
Select a camera that you want to use for video calls. Your external web cam is selected by default (if you
have one connected).
Video Size
Select one of the available sizes. Note, however, that higher sizes require more bandwidth and a more
capable central processing unit (CPU).
Proxy
Proxy Settings
Select how HTTP proxies should.

23 | Page
© Nextiva, All Rights Reserved
Call Settings
The Nextiva App supports the following service management features, allowing supplementary services
to be managed using the native Nextiva App Call Settings window:
• Nextiva Anywhere™
• Nextiva Remote Office
• Call Forwarding
• Do Not Disturb
• Hide Number (Calling Line Identification Presentation [CLIP]/Calling Line Identification Restriction
[CLIR])
• Simultaneous Ring
You can also use the call settings with a main window on the top of the window if this feature is
enabled. When enabled, this feature allows Nextiva Anywhere™, Do Not Disturb, Remote Office, and
Call Forwarding to be managed in the Main Window using single clicks or right clicks.
Nextiva Anywhere™
Nextiva Anywhere simplifies communications when you’re on the go by extending the features of a desk
phone to any other desk phone or mobile device, regardless of the network or manufacturer. Callers dial
one number and can reach you on any phone you choose. A desk phone, cell phone, and/or a soft phone
may ring simultaneously.
You will enjoy voice call continuity with the ability to move live calls from one device to another without
hanging up.
You can also add locations (numbers) that can be used in the service via the Add New Location button.
Use the Alert all locations simultaneously check box to have all numbers ring simultaneously.
The Diversion Inhibitor check box prevents a call from ending up as a voicemail, which can be an issue in
conference call situations.
Select Answer Confirmation to receive a separate audio prompt when answering a call from that
number (location). It may be useful in cases where mobile numbers are being used to prevent incoming
calls from going to mobile voicemail since the call will be ended without going to voicemail if the answer
confirmation is not provided.
Select the Call Control check box to enable the server platform to provide mid-call services such as Call
Transfer and Conferencing for that number (location).
Nextiva Remote Office
This service allows you to use any phone as your office phone from a charging and numbering
perspective. For instance, a hotel room phone can be used as your office phone.

24 | Page
© Nextiva, All Rights Reserved
To enable Remote Office, click the Edit icon and specifying a phone number to be used as the Remote
Office number.
Forward Calls
To set up call forwarding, enter the number you’d like your calls to forward to. Different types of call
forwarding is supported, such as forward always, forward when busy, forward when you do not answer,
and forward when you are unreachable.
Do Not Disturb
When you activate do not disturb, all calls are typically sent to voicemail. To enable this service, click the
Enable check box.
Hide Number
You can hide or display your number when calling or communicating with other parties or contacts. To
enable this feature, click the Enable check box. To show your number, set this to Disable.
Simultaneous Ring
You can add up to ten additional numbers or Session Initiation Protocol Uniform Resource Identifier
(SIP-URI) addresses that you would like to ring in addition to your primary number when you receive a
call. Additionally, specify whether you want to receive answer confirmations or not.

25 | Page
© Nextiva, All Rights Reserved
Active Call Distribution (ACD) States
You can control your ACD state in a call center through the
Nextiva App. To do this, please follow the instructions below:
1. Click Window at the top menu of the app.
(If you do not see Window, it may be under the two
arrows.)
2. Select Call Center from the menu, and a Queues
window will pop-up (Figure 10-1).
3. Select your desired ACD State from the drop-down
list:
a. Sign-In: Connects you to the call center but
does not route calls to you.
b. Available: You are ready to receive calls.
c. Unavailable: You are not ready to receive calls, and this can be combined with a
numbered system of unavailable codes to track reasons why you are not available to
receive calls.
d. Wrap-Up: A temporary state automatically applied at the end of a call if the call center
is configured to use this state.
e. Sign-Out: Disconnects you from the call center entirely.
Sign Out
Signing out of the Nextiva App sets your status to “Offline” for your contacts and displays the Sign In
screen.
Sign Out of the Nextiva App
To sign out, follow the steps below:
1. Select Actions from the main menu.
2. Select Sign Out.
Exit the Nextiva App
To exit the application completely, close the Sign In window or:
1. Select Nextiva App from the main menu.
2. Select Quit Nextiva App.
3. NOTE: Closing the main window (not the Sign In window) does not exit the application, but
rather minimizes the Nextiva App to the system tray (Dock). This allows you to continue to
receive calls and messages without having the Contact List window on your desktop.
Figure 10-1: Queues

26 | Page
© Nextiva, All Rights Reserved
System Requirements
System requirements are as follows:
• Operating system: Windows Vista, Windows 7, Windows 8/8.1, Windows 10 (Classical view only).
• The installation footprint is approximately 215 MB on Windows.
• For voice calls, a sound card, speakers, and a microphone or a headset are required.
• For video calls, a web cam is required.
• A minimum 2 GB random access memory (RAM) is required.
• Minimum 1 gigahertz (GHz); however, 1.5 GHz is recommended, Pentium 4 at a minimum, dual core
CPU is recommended for video calls at a minimum.
• Open Graphics Library (OpenGL) 1.5 or higher is recommended.
For high-definition (HD) video, the following is recommended:
• HD camera
• HD resolution support in display
• Pentium Quad Core or equivalent
• 2 GB RAM
